
You want your motorcycle to start and run like normal after long storage, not make you fix it. Prepare fuel, battery, tires, fluids, and corrosion protection before you put the bike away, and check or maintain the battery and fuel while it sits. Take a few key steps now and you avoid costly repairs later.
I’ll show practical, easy-to-follow steps for where to store the bike, what to do to the engine and fuel, how to care for the battery and tires, and how to protect the finish and fasteners. Follow the checklist and you’ll save time, money, and frustration when you ride again.
Key Takeaways
- Prep the bike’s fuel, fluids, and battery to prevent damage during long storage.
- Protect tires, metal parts, and the finish to avoid flat spots and corrosion.
- Use secure, dry storage and run a simple checklist when putting the bike away and bringing it back out.
Preparing the Motorcycle for Long-Term Storage
I focus on three tasks that keep the bike safe: remove dirt and moisture, find and fix damage, and record the bike’s condition. Each step saves time and money when I bring the bike back into service.
Cleaning and Drying
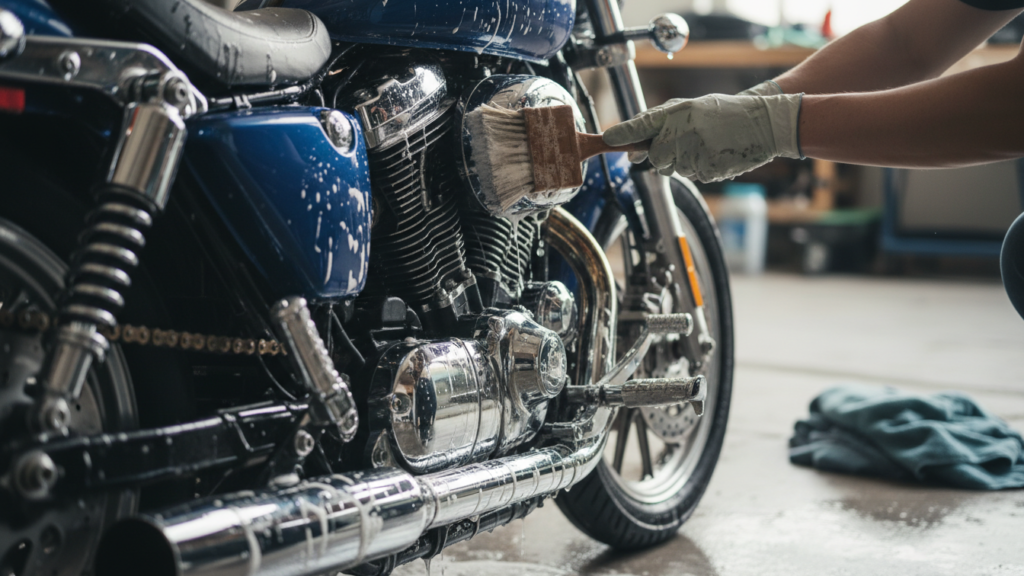
I start with a full wash to remove road grime, salt, and brake dust. I use a mild motorcycle-safe detergent and a soft brush on painted and chrome surfaces. I rinse well and dry every spot, including under the seat and around the engine, to prevent rust and corrosion.
I pay special attention to chain and sprockets. I clean the chain with a specific chain cleaner, then lube it lightly before storage. I also spray a thin coat of corrosion inhibitor on exposed metal parts, but avoid getting lubricants on brake rotors or pads.
I remove the battery or fully charge it and connect a smart maintainer. I wipe electrical connectors with contact cleaner and keep them dry. Finally, I cover the bike with a breathable cover to prevent moisture buildup while keeping dust out.
Inspecting for Damage
I do a thorough visual check for leaks, cracks, and worn parts. I inspect brake lines, hose fittings, tire sidewalls, and fork seals. I look for oil or coolant drips on the ground and trace them to the source.
I check tire condition and pressure. If I expect storage longer than three months, I inflate tires to the recommended pressure and, if possible, put the bike on stands to prevent flat spots. I inspect the chain for tight spots or kinks and set proper tension.
I test lights, horn, and switches. I turn the engine over by hand if the bike will sit for many months to confirm the valves and pistons move freely. I note anything that needs repair before storage to avoid damage that worsens while the bike is idle.
Documenting Condition
I take dated photos from multiple angles: left, right, front, rear, close-ups of the odometer, and any damaged areas. I store these images in a cloud folder and on my phone for easy access. Photos help with insurance claims and track changes over time.
I log mileage, fluid levels, and recent maintenance tasks in a simple checklist. I note the last oil change date, coolant level, brake pad thickness, and tire pressure. I also record the battery state and whether I removed or left it connected to a tender.
I keep receipts and service records together in a small folder on the bike or in a digital file. I label the storage location and date on the file so I can quickly find what I need when it’s time to ride again.
Fuel System Protection
I protect the fuel system so the bike starts easily and parts like injectors, carburetor jets, and seals don’t clog or corrode. The steps below cover stabilizing fuel, when to drain, and how to run the engine after treatment.
Adding Fuel Stabilizer
I add a quality fuel stabilizer to a full tank to prevent ethanol-related phase separation and varnish. Use a product labeled for gasoline engines and follow the manufacturer ratio — typically 1 ounce per 2.5–3 gallons. Pour the stabilizer into the tank, then fill to the top to minimize air space and moisture buildup.
After adding stabilizer, I run the engine for 5–10 minutes or ride until the engine reaches operating temperature to ensure treated fuel reaches the carburetor or injectors. This step protects the whole fuel system. For more guidance on product choices and ethanol effects, I check resources like the ethanol information at the USDA or fuel-stabilizer guidance from the manufacturer.
Draining the Fuel Tank
I drain the tank when I expect storage over a year or if I want zero chance of varnish. First, I work in a well-ventilated area and disconnect the fuel line at the petcock or drain plug into an approved container. For carbureted bikes, I also remove and drain the float bowls.
If the tank has rust or contaminants, I remove it and flush with clean gasoline or use a tank-cleaning kit. After draining, I leave the petcock open or a small vent to avoid pressure traps. I cap and store drained fuel in approved containers, labeled with date and stabilizer added.
Running the Engine After Treatment
I always run the engine after adding stabilizer or after draining and refilling. Running for 5–15 minutes ensures the treated fuel circulates through injectors, carburetor passages, and the fuel pump. I watch for steady idle and normal throttle response as signs the system is clear.
If the bike won’t run well after treatment, I check fuel lines, filter, and spark for problems before longer attempts. For fuel-injected bikes, I consult the service manual for recommended procedures and may use a scan tool to verify fuel pump and injector operation.
Battery Care During Storage
I focus on three main steps to keep a motorcycle battery healthy: remove it if the bike will sit for weeks, keep it on a smart tender while stored, and, if possible, store the battery in a cool, dry place away from the bike.
Removing the Battery
I disconnect the negative (ground) terminal first, then the positive, to avoid sparks. I loosen any hold-downs and lift the battery straight up; heavy batteries may need two hands or help.
I clean the terminals with a wire brush and a baking-soda-and-water paste if there is corrosion. After rinsing and drying, I apply a thin coat of dielectric grease or petroleum jelly to slow future corrosion.
If the battery is weak or older than four years, I test it with a multimeter or take it to a shop before storage. A battery below 12.4 volts needs charging; I correct that before storing. Label the battery with the removal date and model for easy reinstallation later.
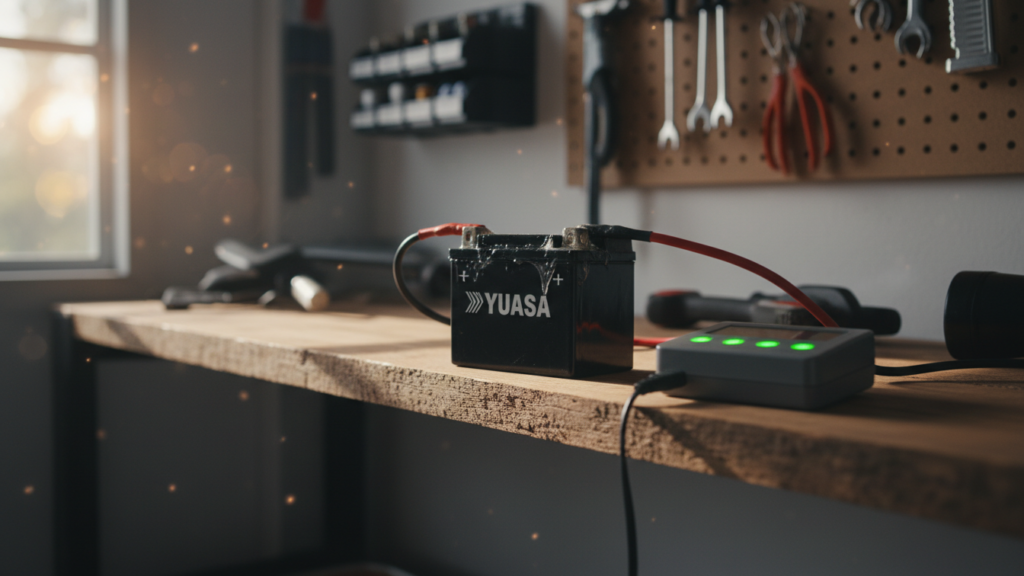
Using a Battery Tender
I use a smart charger/tender designed for lead-acid or AGM batteries that switches to float mode automatically. Simple trickle chargers can overcharge and damage the battery; avoid them.
I attach the tender clips to clean terminals—red to positive, black to negative—and set the charger for the battery type (conventional, AGM, gel). I plug the tender into a grounded outlet and route the cord so it won’t be a trip hazard.
I check the tender’s indicator lights weekly to confirm float status. For long storage, I keep the tender connected continuously. If I can’t leave it plugged in, I remove the battery every 2–4 weeks to fully charge it.
Storing the Battery Separately
I store the battery upright in a ventilated, cool area between 15–20°C (60–68°F) when possible. I avoid freezing conditions and hot attics because extreme temps shorten battery life.
I place the battery on a non-conductive surface like a wooden board or plastic tray and keep it away from metal objects. I cover terminals with electrical tape or terminal caps to prevent accidental shorting.
I check the state of charge every month with a multimeter and recharge to 12.6–12.8 volts if it drops below 12.4 volts. For safety, I keep a carbon monoxide–free space and follow manufacturer instructions for any sealed or maintenance-free battery.
Fluid Maintenance
I focus on the fluids that cause the most damage if left unattended: engine oil, coolant, and brake fluid. Changing, topping, and flushing these at the right intervals prevents corrosion, seal failure, and component damage during long storage.
Changing the Oil and Filter
I change the oil and oil filter right before storing the bike. Old oil contains acids, moisture, and metal particles that sit in the engine and eat at bearings and surfaces over time. Fresh oil and a new filter protect internal parts and reduce corrosion during months of inactivity.
Warm the engine first by running it briefly so the oil drains cleanly. Use the grade and type recommended in the owner’s manual. Tighten the drain plug to the specified torque and replace the crush washer if the manual calls for one.
Record the mileage and date of the change on a sticker or in my log. If storage will exceed a year, I change the oil again halfway through that period.
Checking and Refilling Coolant
I inspect coolant level and condition before storage. Old or low coolant can allow freezing, corrosion inside the radiator, and pitting in the head if temperatures drop.
If the coolant looks rusty, oily, or cloudy, I flush the system and refill with the motorcycle-specific antifreeze mix my manual specifies. I set the mix for my local winter low temperature to prevent freeze damage.
I also check hoses and clamps for soft spots or leaks and replace any brittle hoses. For sealed systems, I verify pressure cap condition and tighten lines to the recommended spec.
Inspecting Brake Fluid
I check brake fluid level and color in both front and rear systems before storing. Dark or cloudy fluid indicates moisture contamination; water lowers boiling point and causes internal corrosion.
If fluid is discolored or it’s been over two years since the last change, I flush and replace it with the DOT rating listed in the owner’s manual. I bleed the brakes properly to remove air and ensure firm lever and pedal feel.
I keep the brake reservoir capped and clean during storage. If I expect very long storage, I mark the date of the fluid change and plan a replacement interval when I bring the bike back to use.
Tire and Suspension Considerations
I focus on two main actions that protect tires and suspension during long storage: keep the bike off its wheels when possible, and set tire pressure to the right level. These steps reduce flat spots, preserve rubber, and prevent suspension seals from staying compressed.
Elevating the Motorcycle
I use a center stand or paddock stands to lift the bike so tires don’t bear weight. If my bike has no center stand, I lift it with front and rear paddock stands or a lift table. This removes static load from the tires and keeps the suspension from sitting compressed for months.
When stands aren’t available, I place the bike on wood blocks under the frame to spread the load. I avoid using soft surfaces that can shift or sink. I also chock the wheels and engage the parking brake or put the transmission in gear to stop movement.
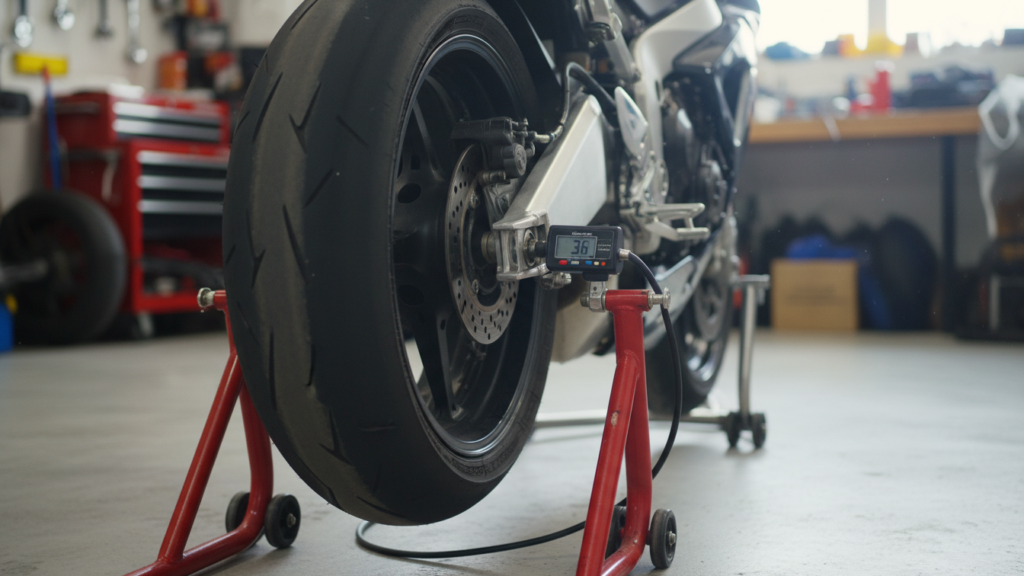
Adjusting Tire Pressure
I inflate tires to the manufacturer’s recommended pressure, or slightly above (3–5 psi) if I can’t elevate the bike. Higher pressure helps reduce the chance of flat spots by spreading the load more evenly across the tread.
I check pressures every 4–6 weeks and watch for slow leaks or sidewall cracking. If I store the bike indoors in a cool place, I still inspect tires for dry rot and replace them if I see deep cracks or excessive aging regardless of tread depth.
Rust and Corrosion Prevention
I focus on blocking moisture and stopping chemical reactions that eat metal. Small, regular actions before storage make the biggest difference.
Applying Protective Lubricants
I clean parts first — degrease the chain, cables, and exposed linkages so the lubricant bonds to metal. For chains, I use a motorcycle-specific chain lube and apply it to the inside of the chain while slowly turning the wheel. That keeps rollers and O-rings protected.
I coat pivot points, levers, and exposed bearings with a light machine oil or a thin grease where water can’t wash it away. I avoid heavy grease on moving parts that should stay free. For long-term storage, I spray a light film of corrosion inhibitor (like a water-displacing spray) on electrical connectors and bare metal, then wipe excess to prevent gumming.
Reapply before returning the bike to service. Check chain slack and re-lube after the first short ride.
Protecting Exposed Metal Surfaces
I wash and dry the whole bike to remove salt, bugs, and road grime that promote corrosion. After drying, I wax painted panels to seal out moisture and apply a thin layer of oil or corrosion inhibitor to chrome and bare steel. Use a microfiber cloth to work oil into crevices like exhaust joints and frame welds.
I avoid plastic tarps that trap condensation. Instead, I use a breathable cover and store the bike off damp floors on stands or wood blocks. For long gaps, I remove or fully charge the battery and keep it on a tender to prevent acid leaks or corrosion at terminals. I also loosen or remove fuel if it will sit more than a month, treating remaining fuel with stabilizer to prevent varnish in the system.
Protecting the Motorcycle’s Exterior
I focus on blocking moisture, dirt, and UV while keeping paint, chrome, and rubber from degrading. Small choices—cover type and storage spot—make the biggest difference.
Covering the Motorcycle
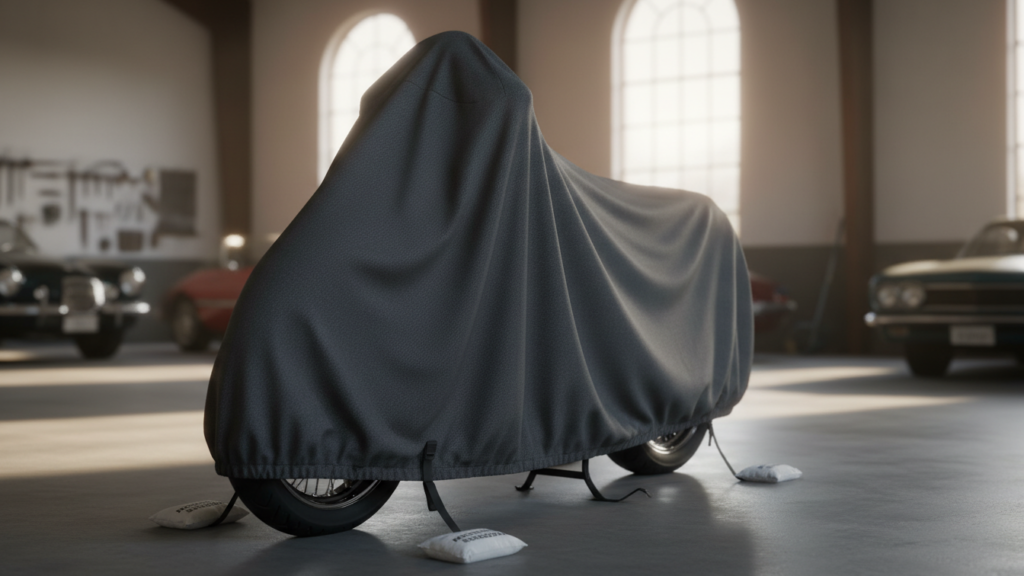
I pick a breathable, water-resistant cover that fits snugly. A loose cover flaps in wind and rubs paint; a tight one prevents dust and keeps rodents out. Look for covers with soft inner lining, taped seams, and vents to reduce condensation. I avoid plain plastic tarps because they trap moisture and can trap heat.
I use straps or built-in buckles to secure the cover to the frame or wheels. If I store outdoors, I add a reinforced bottom hem and a lock loop for security. For long indoor storage, I still cover the bike to block dust and light; I choose a fabric that won’t wick moisture, like cotton-blend motorcycle covers. For detailed care on materials and weatherproofing, I refer to manufacturer guidance and resources like this Motor Vehicle Maintenance page from the U.S. government: https://www.nhtsa.gov.
Selecting the Right Storage Space
I place my motorcycle where humidity stays below 60% and temperature swings are small. Basements can be damp, garages can be dusty, and outdoor sheds may leak—so I check for vents, drainage, and a solid floor. If I must store outside, I put the bike under an overhang or inside a ventilated motorcycle tent with a breathable cover.
I avoid parking against exterior walls where cold and moisture collect. I use a small desiccant pack or a ventilated dehumidifier in enclosed spaces to prevent corrosion. For long-term security, I choose a well-lit area with easy access and consider a ground anchor or alarm. For further storage location guidance, I consult reputable sources like the Motorcycle Safety Foundation: https://www.msf-usa.org.
Security Measures for Stored Motorcycles
I focus on two main ways to protect a parked bike: physical locks that stop thieves at the scene, and electronic systems that alert me or help recover the bike afterward. Both reduce theft risk when I can’t watch the motorcycle every day.
Securing with Locks
I use a heavy-duty disc lock or chain lock that resists bolt cutters and leverage attacks. For disc locks, I pick one with a built-in alarm or reinforced shackle. For chain locks, I choose hardened steel chains (minimum 10–12 mm) and cover them with a sleeve to prevent frame scratches.
I always lock the wheel to a fixed object when possible. If no immovable anchor exists, I run the chain through the frame and rear wheel and anchor it to the ground or a firmly mounted post. I avoid only locking the brake rotor or a single wheel if the rest of the bike can be lifted.
I vary where I lock the bike so thieves can’t rely on a routine. I also use two different types of locks (for example, a chain plus a disc lock) because tools for one lock won’t always work on the other.
Using Alarms and Tracking Devices
I fit an alarm with a loud siren and adjustable sensitivity so small vibrations don’t trigger it all night. I place the sensor and siren inside and test activation distance; a good system intimidates thieves and draws attention fast.
I pair alarms with a GPS tracker that sends location updates to my phone. I pick trackers with real-time tracking, geofencing alerts, and a backup battery so they work if the bike’s battery is disconnected. I hide the tracker in the frame or under a seat where it’s hard to find.
I subscribe to a tracker plan that includes reliable cellular coverage and set up notifications for movement and low battery. If the bike is in long-term storage, I turn on periodic check-ins to confirm the device still reports and I can access location history if needed.
Post-Storage Steps
I will walk through the exact checks and simple tests I perform before I ride after long storage. These steps focus on safety: brakes, fluids, tires, battery, lights, and any signs of pest or fuel problems.
Inspecting Components Before Use
I start with a visual and hands-on inspection. I check tires for flat spots, low pressure, dry rot, or cracking. I run my hand along the tread and sidewalls and use a gauge to set the manufacturer’s recommended PSI.
I inspect brake pads and rotors for rust or glazing. I squeeze the brake lever and press the pedal to confirm normal resistance and travel. If the lever feels spongy, I look for leaks at calipers and lines.
I check fluid levels: engine oil, coolant, brake fluid, and final drive oil. I look for contamination or separation. I also inspect fuel for varnish, dark color, or sediment if I didn’t drain or stabilize it.
I examine the chain or belt for rust, tight spots, and correct tension. I clean and lubricate the chain if needed. I also check mounts, fasteners, and any visible wiring for corrosion or chew marks from rodents.
Testing Electrical Systems
I reconnect the battery and note its voltage with a multimeter. A healthy, charged battery should read roughly 12.6V at rest. If the voltage is below 12.4V, I charge the battery before riding.
I test all lights: headlight (low and high), tail light, brake light, turn signals, and hazard lights. I check each bulb for brightness and secure sockets. I listen for a weak flasher relay or slow blink as signs of corrosion or low voltage.
I turn the key and listen for abnormal starter sounds. A slow crank usually means low battery or poor starter connections. I inspect battery terminals and clean any corrosion, then apply dielectric grease to prevent future corrosion.
I also test the horn, gauges, and any auxiliary electronics. If I find blown fuses, I replace with the correct amp rating and trace the cause before riding.
Addressing Any Storage-Related Issues
If I find stale fuel, I drain the tank and carburetor or fuel rail, then refill with fresh fuel and a fuel-system cleaner. For fuel-injected bikes, I add a treatment and run the engine until clear.
If brakes show rusted rotors, I ride slowly while applying light braking to clean minor rust. For severe pitting or warped rotors I replace parts before riding. I also bleed brakes if the lever feels spongy.
If tires have flat spots or severe dry rot, I replace them. Small flat spots often go away after short rides, but cracked sidewalls need immediate replacement.
For rodent damage or chewed wiring, I replace or professionally repair affected wiring and connectors. For seized or stuck components, I use penetrating oil and gently free the part, or call a mechanic if the issue resists simple fixes.
FAQs
How long can I leave my motorcycle stored?
I can store a motorcycle for months if I prepare it right. Short-term means a few weeks; long-term means several months to years and needs extra steps like fuel treatment and battery care.
Do I need to drain the fuel tank?
I usually add a fuel stabilizer and run the engine a few minutes to circulate it. Draining is okay if storage will exceed a year or if the bike will sit with non-stabilized fuel.
What should I do with the battery?
I disconnect the battery and put it on a smart trickle charger or remove it indoors. That keeps the battery healthy and avoids slow drains.
How do I protect tires and suspension?
I inflate tires to recommended pressure and, if possible, put the bike on stands to avoid flat spots. If stands aren’t available, I roll the bike occasionally or move it a few inches every few weeks.
How often should I check on a stored bike?
I check every 4–8 weeks for signs of pests, leaks, or battery issues. I also start the bike or run the charging system occasionally if conditions allow.
Conclusion
I recommend planning storage as part of regular bike care. A few small steps now—fuel treatment, battery care, tire support, and a clean dry spot—cut the chance of big repairs later.
I like to use a short checklist before I put a bike away:
- Stabilize fuel and fill tank.
- Disconnect or maintain the battery.
- Block the tires and lift the suspension if possible.
- Clean, lubricate, and cover the bike.
I prefer indoor storage, but if I must store outside I choose a covered, ventilated spot and a breathable cover. I also lock the wheels and use an alarm or disc lock to deter theft.
I check the bike every month or two while it’s stored. I turn the engine over, top off fluids if needed, and look for leaks or pests. Small problems are easy to fix; ignored ones grow costly.
Use labels and a simple log for dates and tasks. That helps me remember what I did and when, so the bike is ready to ride when I take it out of storage.