
You want your bike to run smooth and last longer, and the chain is one of the easiest parts to keep in good shape. I’ll show you the simple steps to clean, lube, and set chain tension so you can ride safer and avoid costly wear.
Keep the chain clean, lubricated, and properly adjusted after every few hundred miles or after wet rides to extend its life and keep the bike performing well.
I’ll walk you through the right tools, safe setup, how to inspect for wear, and quick checks to make this maintenance fast and reliable so you can spend more time riding and less time in the garage.
Key Takeaways
- Clean and inspect the chain regularly to prevent wear.
- Use the correct lube and apply it to the rollers, not the sideplates.
- Set chain tension to the spec in your manual and recheck after short rides.
Understanding Motorcycle Chains
I explain what motorcycle chains are, how they differ, and why specific parts matter for wear and safety. I focus on real, usable details you can check, adjust, or replace.
Types of Motorcycle Chains
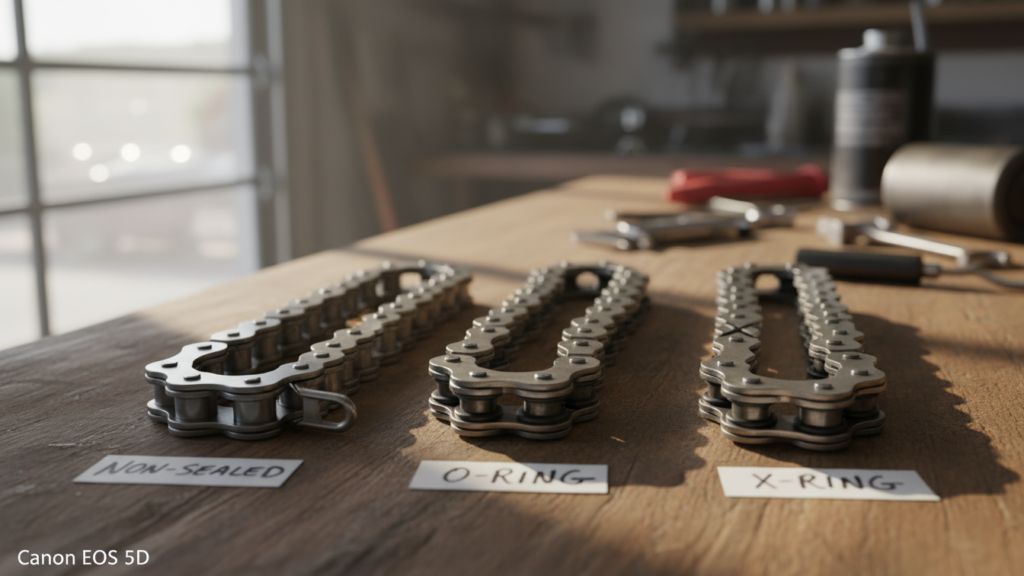
There are three common types: non-sealed (roller), O-ring, and X-ring chains.
Non-sealed chains are cheaper and lighter but need frequent lubrication and wear faster. I recommend them only for low-cost, low-mileage bikes.
O-ring chains have rubber rings between inner and outer plates that keep lubricant in and dirt out. They last longer than non-sealed chains and need less frequent lube. Most street bikes use O-ring chains for a good balance of life and maintenance.
X-ring chains use an X-shaped seal that reduces friction more than O-rings. They often run cooler and last slightly longer. I pick X-ring chains for higher-performance bikes or when I want the best lifespan for the money.
Use a chain that matches your bike’s power, mileage, and riding style. Check your owner’s manual for the recommended chain pitch and tensile strength.
Components and Terminology
A chain has inner plates, outer plates, rollers, pins, and bushings (or sealed equivalents).
Rollers sit between plates and contact the sprocket teeth.
Sprockets are the front (countershaft) and rear (wheel) gears that the chain runs on. Sprocket tooth count affects acceleration and top speed; fewer teeth on the front increases acceleration, more on the rear increases top speed.
Pitch measures the distance between chain pins. Common sizes are 520, 525, and 530 on sport and cruiser bikes. Match chain pitch to the sprockets.
“Master link” or “clip link” is the removable link used for installation or removal.
“Tension” refers to chain slack measured midway between sprockets. Too tight or loose causes wear and safety issues.
“O-ring/X-ring” indicates the seal type and internal lubrication. “Stretch” means wear at the pin-bushing interface, not metal stretching; replace chains when excessive stretch appears.
How Chains Affect Motorcycle Performance
A worn chain reduces power transfer and can cause jerky throttle response. I notice sluggish acceleration and noise when a chain or sprocket is worn.
Chain alignment and correct tension keep the rear wheel tracking straight and reduce tire wear. Misalignment pulls the wheel sideways and increases sprocket tooth wear.
Lubrication lowers friction and heat, improving efficiency and lifespan. A dry chain heats more, wears faster, and can snap under load.
Replacing sprockets and chain as a set prevents rapid re-wear. I always inspect sprocket teeth shape and match a new chain to new sprockets to maintain smooth power delivery.
Preparing for Chain Maintenance
I gather the right tools, check safety items, and inspect the chain and sprockets so the job goes smoothly and I avoid damage or injury.
Required Tools and Supplies
I keep a simple kit ready: a chain cleaner or degreaser, a soft-bristled brush, lint-free rags, chain lubricant (appropriate for O-ring, X-ring, or non-sealed chains), and a torque wrench. I also have basic hand tools — sockets, adjustable wrench, and a screwdriver — to remove the rear wheel or loosen the axle if needed. A motorcycle stand or paddock bobbins that lift the rear wheel makes cleaning and lubing easier and safer. I carry disposable gloves and eye protection to avoid contact with chemicals. If I plan to replace the chain or sprockets, I add a chain riveter or master link tool and a fresh master link.
Motorcycle Safety Precautions
I work on a level surface and use the motorcycle stand to keep the bike stable and the rear wheel off the ground. I disconnect the battery if I’ll be working near the electrical system or removing the rear wheel. I let the engine and chain cool if I’ve recently ridden; lubricants and cleaners spread better on a warm, not hot, chain. I wear gloves and eye protection when handling solvents and lubricants. I secure the bike with wheel chocks or tie-downs when necessary to prevent tipping. I follow the owner’s manual torque specs for axle nuts and adjusters to avoid parts failure.
Inspecting the Chain and Sprockets
I rotate the wheel and inspect the chain for stiff links, rust, excessive slack, or kinks. I measure chain wear with a ruler or dedicated chain gauge; most manuals specify maximum slack in millimeters. I check sprockets for hooked, chipped, or worn teeth and inspect both sides of each tooth for even wear. I look for uneven wear patterns that could signal misalignment or a worn rear hub bearing. If I find more than one or two stiff links, deep rust, or worn sprockets, I plan to replace the chain and sprockets together to prevent premature failure. For reference on wear limits and service intervals, I consult the motorcycle owner’s manual and resources like the Motorcycle Safety Foundation (https://msf-usa.org) and a trusted maintenance guide such as a manufacturer service page.
Cleaning the Motorcycle Chain
I focus on safe lifting, the right cleaners, and a clear step-by-step method so the chain is clean, protected, and ready for lube. I explain what tools and products I use and the order I follow to avoid damage or injury.
Safe Lifting Techniques
I always secure the bike before I start. Use a paddock stand or center stand rated for your bike’s weight; never rely on the kickstand alone when you need wheel rotation. If I must use a rear paddock stand, I position the hooks under the swingarm or spools, following the bike maker’s instructions.
I wear gloves and eye protection. I also block the front wheel so the bike cannot roll. If the bike is heavy or unstable, I ask someone to help lift or use a hydraulic lift. Proper footing and a flat surface reduce the risk of tipping while I spin the wheel to access the chain.
Recommended Cleaners and Degreasers
I pick a product made for O‑ring, X‑ring, or standard chains depending on my chain type. Use a non-caustic, biodegradable chain cleaner or a citrus-based degreaser. Avoid strong solvents like paint thinner or brake cleaner that can dry and damage O‑rings.
I keep a soft-bristled chain brush, a toothbrush for tight areas, rags, and a plastic scraper for caked-on grime. For heavily soiled chains, a spray-on chain cleaner plus a second round with a brush works best. I always check the product label to ensure compatibility with rubber seals and paint.
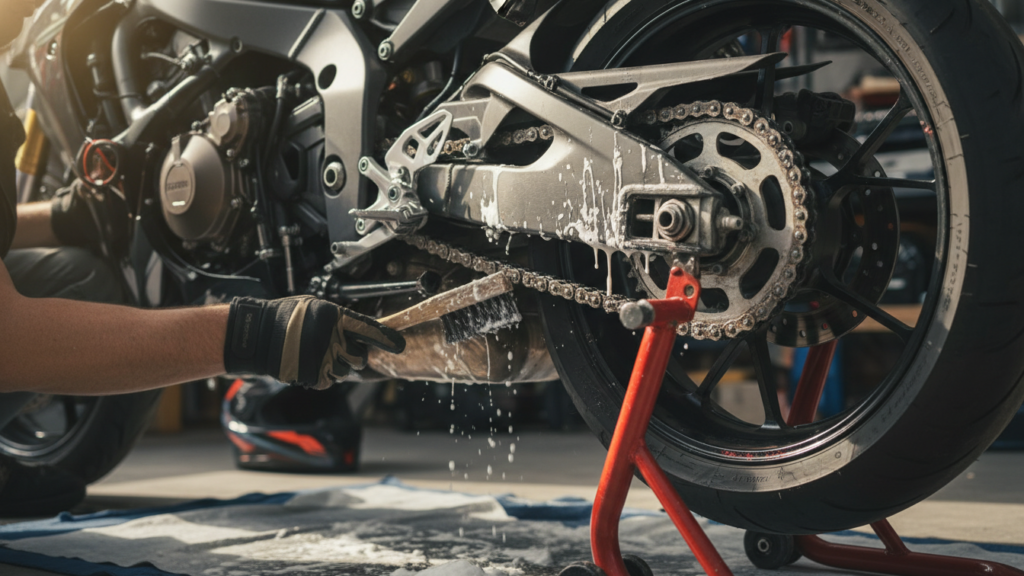
Step-by-Step Cleaning Process
I place the bike on a stand so the rear wheel spins freely. I spray the cleaner evenly over the chain, cassette, and sprockets, letting it soak for 1–3 minutes to loosen grime but not long enough to dry.
I scrub along the chain with a brush while turning the rear wheel backward. I clean each link side, the rollers, and the sprocket teeth. For stubborn deposits I use a toothbrush and a plastic scraper, taking care not to gouge seals.
I rinse or wipe the chain with clean rags until the rag shows minimal dirt. I let the chain dry fully, or I speed drying with a gentle air blower. I inspect for worn links, tight spots, or damaged O‑rings and replace parts as needed before I apply lubricant.
Lubricating the Chain
I focus on picking the right lube, timing my applications, and using a steady technique so the chain moves smoothly and the sprockets last longer.
Choosing the Right Chain Lubricant
I pick a lubricant made for my chain type: non-sealed, O-ring, X-ring, or Z-ring. For O-ring and similar sealed chains I use a chain lube that is labeled safe for O-/X-/Z-rings to avoid swelling or damage to the rubber seals.
I choose between wax-based and oil-based lubes. Wax-based lubes stay cleaner and attract less dirt, but need more frequent reapplication. Oil-based lubes penetrate better and protect in wet rides, but they can fling and collect grime faster.
When riding in rain or off-road I use a heavier, water-resistant formula. For street use and long mileage I prefer a low-fling synthetic or wax spray. I always check the label and my bike manual first.
How Often to Lubricate
I lubricate after every cleaning and on a regular mileage schedule. For most street bikes I lube every 300–600 miles (500–1,000 km) depending on weather and road grit.
I also lube immediately after a wet ride or riding through heavy grime. That prevents rust and keeps the chain from stiffening.
If I ride off-road or in dusty conditions I shorten the interval to 50–150 miles (80–250 km). I watch for dry, squeaky links or visible rust and lube sooner if needed.
Proper Lubrication Techniques
I put the bike on a stand or tip it to access the rear wheel so I can spin the wheel freely. I rotate the rear wheel with one hand and apply lube to the inner side of the chain while it moves.
I aim the lube at the rollers and the spaces between the inner plates, not just the outside. This lets the lubricant reach the pins and bushings where most wear happens.
After applying a light, even coat, I let it sit for a few minutes to penetrate, then wipe off excess with a clean rag. Excess lube attracts dirt; wiping reduces fling and keeps the chain cleaner.
I avoid spraying lube on brake discs, tires, or painted surfaces. I follow the product instructions for cure time, and recheck chain tension and alignment after lubrication.
Adjusting Chain Tension
I check chain tension with a clear method and fix it using the bike’s adjusters and basic tools. I focus on correct slack, alignment, and torque to keep the drive smooth and safe.
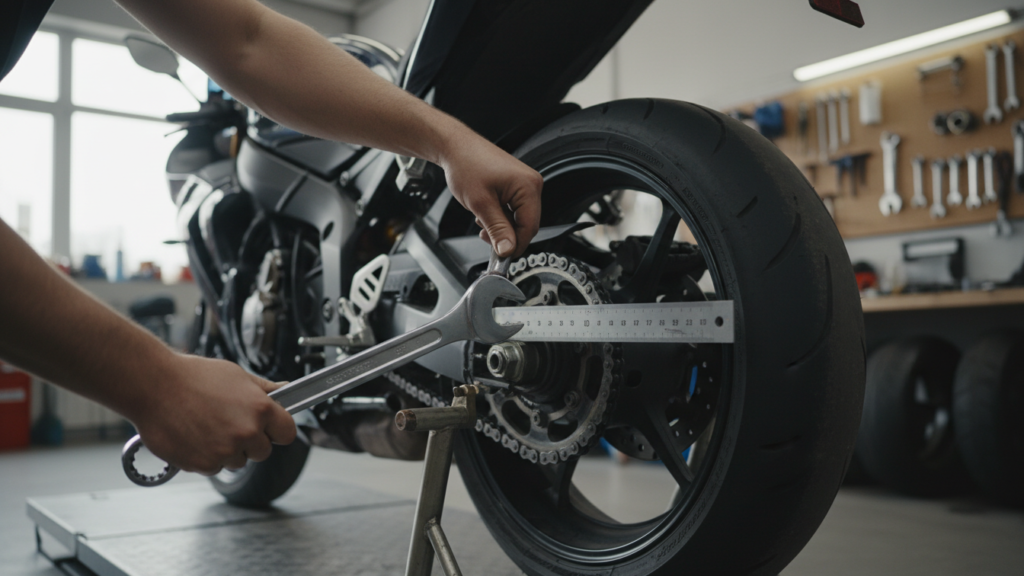
Checking Chain Slack
I place the bike on its center stand or use a paddock stand so the rear wheel hangs free. I find the chain midpoint between front and rear sprockets, then push the chain up and down to measure total movement.
Target slack usually falls in the owner’s manual — often 20–40 mm (0.8–1.6 in) for many motorcycles. I measure with a ruler or tape, and I record the value on both sides. If one side differs by more than about 5 mm, I suspect misalignment or uneven wear.
I also spin the wheel slowly and watch for tight spots or kinks. A chain that binds or has stiff links needs cleaning, lubrication, and possibly link repair before tensioning.
Correcting Chain Tension
I gather tools: correct-size spanner, socket set, torque wrench, and a ruler. I loosen the rear axle nut just enough to allow movement of the wheel in the adjuster slots.
I turn the left and right adjuster bolts evenly, counting turns or matching scale marks. I check slack at the chain midpoint after each small adjustment. When slack reaches the specified value, I tighten the axle nut to the torque in the manual.
I recheck alignment by measuring the distance from a fixed point on the swingarm to the axle on both sides, or by aligning chain marks on the adjuster plates. I finally rotate the wheel and remeasure slack once more, then torque the axle to spec.
Avoiding Common Tensioning Mistakes
I never tighten one side only; that causes wheel misalignment and uneven sprocket wear. I avoid over-tightening — a too-tight chain stresses bearings and causes rough running.
I don’t rely on feel alone. I use the owner’s specified slack and a ruler. I replace worn sprockets and chains together; tightening a stretched chain on worn sprockets shortens component life.
I torque fasteners to spec and recheck after a short ride. Small checks after 50–100 miles catch settling before damage occurs.
Inspecting for Wear and Damage
I check the chain and sprockets for stiff links, rust, stretch, hooked teeth, and any missing parts. I look for tight spots, uneven wear, and signs that the chain no longer runs smoothly on the sprockets.
Identifying Signs of Chain Wear
I first lift the rear wheel or use the sidestand to get clear access to the chain. I push the chain at several points to find tight spots or kinks; a healthy chain should flex smoothly. I also measure chain stretch with a ruler or a specific chain gauge — if the chain shows about 1–2% elongation beyond spec, it needs closer attention.
I inspect rollers and side plates for pitting, corrosion, or flat spots. Darkened or crusty areas tell me old lubricant trapped dirt and caused wear. I look for metal flakes or excessive slack when I rotate the wheel, which can signal internal wear.
For more on measuring elongation and service limits I refer to manufacturer manuals or trusted sources like the Motorcycle Safety Foundation and OEM service guides for accurate specs.
Recognizing Worn Sprockets
I examine both front and rear sprockets for tooth shape. Worn sprocket teeth look hooked or pointed rather than symmetrical and rounded. If teeth lean in the riding direction or show sharp edges, the sprocket has uneven wear.
I check for burrs, cracks, or missing teeth and compare tooth height across the sprocket. A new chain on worn sprockets will skip and wear quickly, so I treat sprocket condition as a paired issue. If the chain shows heavy wear and sprockets are visibly degraded, I replace both together.
I also look at alignment marks and runout; bent sprockets or misalignment accelerate wear. OEM maintenance pages and repair manuals provide recommended inspection intervals and torque values.
When to Replace the Chain
I replace the chain when I find stiff links that free up only with force, visible elongation beyond the motorcycle’s spec, or broken/missing parts. If a simple cleaning and relubing doesn’t restore smooth motion, replacement is safer than risk of sudden failure.
I also replace the chain when sprockets show hooked teeth or the rear sprocket tooth heights vary significantly. For high-mileage bikes, I follow manufacturer mileage limits and inspection intervals — many recommend replacement between 15,000–30,000 miles depending on riding and maintenance. If unsure, I consult the owner’s manual or a certified dealer to confirm the correct chain type and length before fitting.
Maintaining Chain Longevity
I focus on habits, storage, and protection that cut wear and keep my chain working longer. Small choices—how I ride, where I park, and what covers I use—make the biggest difference.
Riding Habits That Reduce Wear
I avoid sudden throttle snaps and hard launches because they slam the chain and sprockets. Smooth, steady acceleration spreads the load and lowers stress on links and teeth.
I keep my engine in the right RPM band for the gear I’m in. Riding at very low RPMs or lugging the engine puts extra tension on the chain. I also shift before redline to prevent high-impact loads that stretch the chain.
I don’t ride through deep water or heavy mud when I can avoid it. If I must, I clean and relube the chain soon after to remove contaminants. I check chain tension after long rides or after carrying a passenger or luggage, because added load changes the required slack.
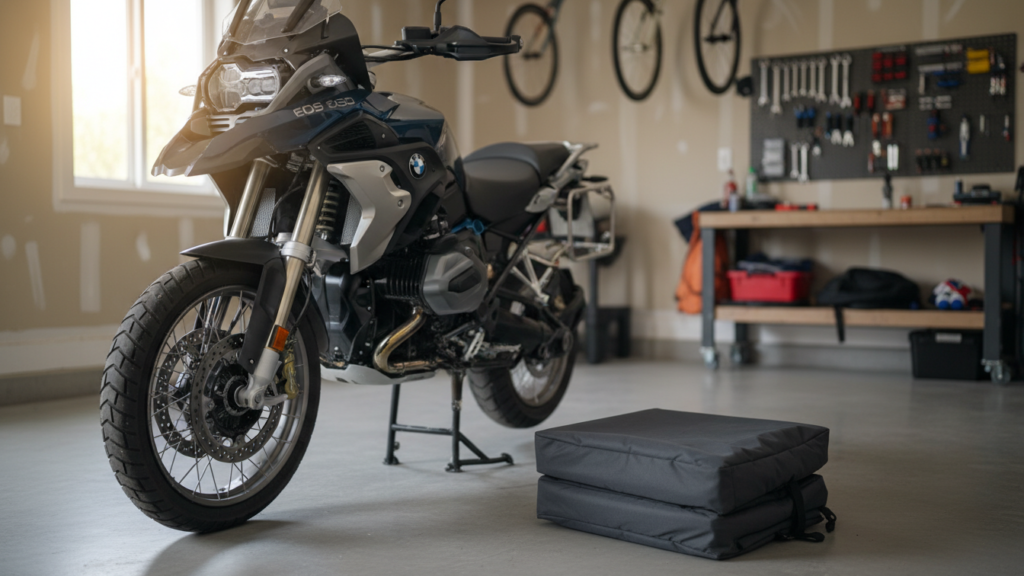
Storing Your Motorcycle Properly
I store my bike off the ground when possible to keep the rear wheel from bearing full weight for long periods. A paddock stand or center stand helps prevent uneven wear and sagging.
I clean and lubricate the chain before long storage to protect against corrosion. I also apply a light coat of corrosion inhibitor on exposed metal if I expect humid or salty air.
I keep the bike in a dry, temperature-stable place away from direct sunlight. If indoor space is limited, I use a breathable cover and raise the rear wheel occasionally to prevent flat spots and constant chain tension.
Using Chain Guards and Covers
I fit a chain guard that matches my bike’s design to block road grime and reduce fling. Solid guards keep debris from grinding into the chain and sprockets, which cuts wear.
I use a partial cover or O-ring-friendly protector if my chain has seals. Some full covers trap heat or moisture, so I choose ones with vents or made for my chain type.
I inspect guards and mounts regularly. A loose or damaged guard can catch the chain or rub the tire, so I tighten bolts and replace worn parts promptly.
Environmental Considerations
I focus on reducing pollution and waste when I clean and lube my chain. I pick products and methods that protect the bike and the environment without adding extra work.
Adapting Maintenance for Wet Weather
I check and relube my chain more often after riding in rain, as water strips lubricant and speeds corrosion. I inspect the chain for surface rust and stiff links, then clean with a biodegradable chain cleaner or a mild degreaser that won’t harm drains or soil.
After drying the chain with a rag and low-pressure air, I apply a wet-weather chain lube formulated to resist water wash-off. I use a drip tray or a sock to catch runoff when I apply cleaner and lube, then dispose of used rags and fluids at a hazardous-waste or recycling center if required by local rules.
I also protect sprockets and bearings from salt by rinsing with fresh water after salty rides, then immediately drying and relubricating to prevent pitting and premature wear.
Cleaning After Off-Road Riding
I remove heavy mud and grit by rinsing the chain with low-pressure water first, then use a brush and biodegradable cleaner to get into links and rollers. I avoid high-pressure washers near bearings because force can push water into sealed areas and wash out grease.
Once clean, I dry the chain thoroughly with a rag and let the bike sit in a warm, ventilated spot if possible. I reapply a penetrating lube suited for off-road conditions—one that clings to chain surfaces and repels grit without attracting excessive dirt.
I collect and contain rinse water and used cleaning materials to prevent soil contamination. When I must discard solvent or oil-soaked rags, I follow local hazardous-waste rules to keep pollutants out of storm drains.
FAQs
How tight should the chain be?
I follow the motorcycle maker’s spec for slack and measure at the midpoint between sprockets. Too tight stresses bearings; too loose risks derailment. I adjust with the rear axle and keep alignment marks even.
Can I use any chain lube?
No. I use lubricants made for motorcycle chains. They resist fling-off and protect rollers and pins. Avoid heavy greases or household oils that attract dirt or fail at speed.
What about cleaning methods?
I clean with a soft brush and a dedicated chain cleaner or kerosene for O-ring chains, and avoid high-pressure washers. I dry the chain before lubing. For sealed chains, be gentler to protect the O-rings.
When should I replace the chain or sprockets?
I look for stiff links, excessive stretch, hooked sprocket teeth, or uneven wear. If one component is worn, I usually replace the chain and both sprockets together to prevent premature wear.
Conclusion
I keep chain care simple and regular so my bike stays safe and efficient. Small checks before and after rides catch issues early and save me time and money later.
I clean, inspect, lube, and adjust the chain on a schedule I can follow. I use a gentle brush and proper chain lube, avoid over-spraying, and replace worn parts when needed.
I pay attention to tension and sprocket wear because they affect ride feel and safety. When I see tight spots, rust, or missing O‑rings, I act right away.
Tips I follow:
- Check chain tension and alignment every 300–600 miles or after heavy rides.
- Lube after cleaning and after riding in wet or dusty conditions.
- Replace chain and sprockets as a set when wear becomes noticeable.
A small routine keeps my chain reliable and extends its life. I ride with more confidence when I know the drive system is well cared for.