
You can tell fast if your motorcycle needs a valve adjustment by the way it sounds and performs. If you hear persistent ticking or tapping from the engine, notice poor idle, hard starting, or a drop in power and fuel economy, those are clear signs the valves may need attention. I’ll show you what to listen for and when to act so you don’t leave a small problem to become a big repair.
I’ll walk you through simple checks you can do, when to follow the maker’s schedule, and when to bring the bike to a pro. Knowing these steps keeps your engine running smoothly and helps you avoid costly damage.
Key Takeaways
- Check for noise, rough idle, hard starts, or power loss as signs to inspect valves.
- Follow scheduled checks and do basic measurements to catch problems early.
- Get professional help if you’re unsure or if adjustments fall outside spec.
Understanding Valve Adjustment
I explain what valve clearance does, what goes wrong when it’s off, and the common valve systems you’ll see on motorcycles. Read these to spot problems and decide if you can check or need a mechanic.
Why Valve Clearances Matter
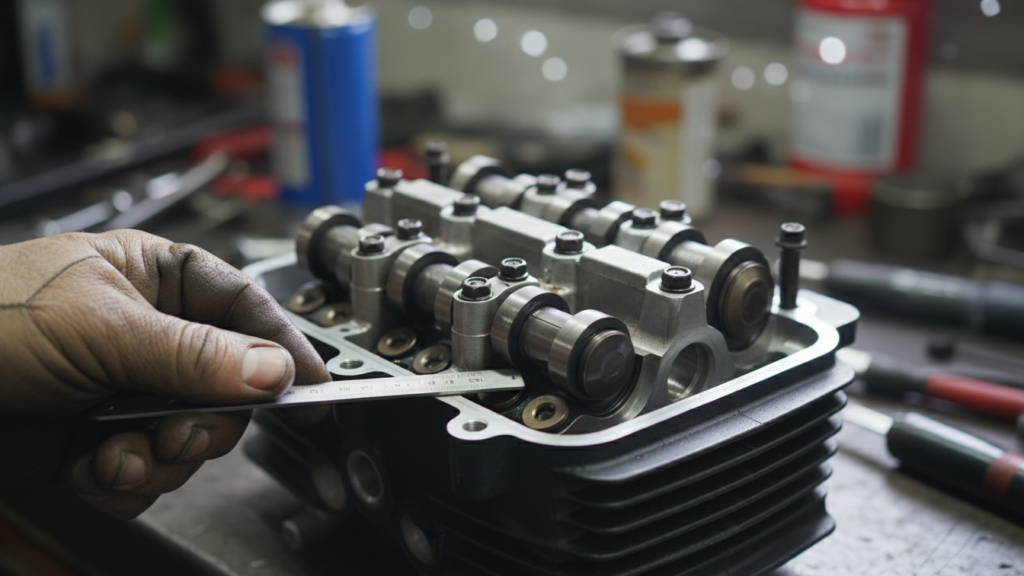
Valve clearance is the small gap between the valve stem and the cam or rocker that lets the valve fully close and open. I measure it with feeler gauges to match the motorcycle’s spec. Proper clearance ensures the valve seals tightly at the combustion chamber and opens enough for intake and exhaust flow.
If the gap is too large, you get noisy ticking, reduced cam timing accuracy, and loss of low-RPM power. If the gap is too small, valves can stay partially open, causing compression loss, misfires, or burned valves. Correct clearance protects the cam lobes, valve seats, and helps fuel efficiency.
I follow the OEM interval because heat cycles and wear change clearance over time. Checking at cold start conditions gives consistent readings. Simple tools and careful measurement often prevent costly repairs.
What Happens Without Proper Adjustment
Too-tight valves can overheat and burn since they won’t seat fully. I’ve seen engines lose compression or develop rough idle from burned valve faces, which may need valve jobs or head removal to fix.
Too-loose valves cause loud ticking and reduced engine smoothness. The extra lash changes the valve timing slightly, hurting torque and fuel economy. Persistent excessive clearance can also wear the rocker or cam contact points.
Ignoring adjustment may lead to sudden failures like bent valves in interference engines. Regular checks let me spot gradual drift and fix small issues before they become major repairs.
Types of Motorcycle Valve Systems
Most motorcycles use one of three systems: shim-under-bucket, shim-over-bucket, or screw-and-locknut (adjuster). Each needs a different procedure and tool set.
- Shim-under-bucket: I remove the cam to swap shims under the bucket. It’s precise but slower.
- Shim-over-bucket (shim-on-top): I change shims without full cam removal by lifting the bucket. Faster on many modern bikes.
- Screw-and-locknut (rocker adjuster): I use feeler gauges and a wrench to set clearance at the rocker arm. This is easiest for field adjustments.
Knowing your system helps you decide whether to do the job yourself or seek a shop. I always check the service manual for specs and torque values before adjusting.
Signs Your Motorcycle Needs Valve Adjustment
I watch for clear signs that valves are off-spec: trouble starting, ticking or tapping noises, a drop in power, and worse fuel economy. These symptoms point to valve clearance problems that affect how the engine breathes and runs.
Difficulty Starting the Engine
If my bike cranks but struggles to fire, I suspect valves. Tight valves can prevent the intake valve from opening fully, cutting the air-fuel mix. That makes the engine hard to ignite, especially when cold.
I also note if it takes multiple kicks or long cranking before it catches. A weak or inconsistent idle after starting is another clue. These issues often appear before complete failure, so I check valve clearances early.
If you want factory specs, I use the service manual or a site like the maker’s official support pages for exact lash tolerances. Correct measurement with feeler gauges tells me if adjustments are needed.
Unusual Engine Noise
A loud ticking or tapping from the top end signals excessive valve clearance. I listen with the engine warm, because clearances change with temperature and the noise becomes more obvious then.
Noise that varies with RPM or disappears at higher revs usually points to valve lash, not bearings or chain. I rule out loose rocker covers or cam chain rattle first, then check the valve train.
I often compare left and right cylinder sounds. Consistent, sharp ticking on one side tells me that side’s clearances likely need tightening. For guidance on diagnosing valve noise I consult trusted repair manuals and manufacturer tech notes.
Loss of Power or Performance
When my motorcycle loses midrange punch or won’t rev cleanly, valves can be the cause. Both overly tight and overly loose valves hurt volumetric efficiency and timing, reducing torque and top-end power.
I pay attention to hesitation on acceleration and a rough throttle response. These symptoms often show under load—climbing a hill or accelerating from 3,000–6,000 RPM. If spark and fuel delivery check out, valve clearance is a likely next step.
I confirm by measuring clearances against spec. If adjustments bring back crisp throttle response, the diagnosis was valve lash. I keep records of readings and changes for future reference.
Reduced Fuel Efficiency
A steady drop in MPG without other faults makes me check valves. Incorrect clearance alters the combustion process and can cause incomplete burns or poor intake filling, wasting fuel.
I track fuel use over several tanks to spot trends. If fuel consumption rises while riding habits stay the same, I inspect the valve train and perform a clearance check. Sometimes small adjustments restore economy without other repairs.
For broader maintenance tips that affect fuel economy, I consult manufacturer maintenance schedules and resources like federal fuel economy guides to rule out unrelated causes.
How to Check for Valve Adjustment Needs

I inspect the bike for a few clear signs: visible wear or oil leaks at the valve cover, noisy valve train, and engine running rough or misfiring. I focus on these practical checks to decide if I need to measure valve clearances.
Symptoms During Routine Inspection
I start with a visual check of the valve cover area. I look for oil seepage at gaskets, loose bolts, or scorch marks that suggest overheating. Any of these can hint at valve-head or rocker arm issues.
I also check the spark plugs and air filter. Fouled plugs or heavy carbon on the combustion chamber can point to valves not sealing properly. A strong smell of unburned fuel or excessive smoke from the exhaust raises my concern for valve timing or seating problems.
I feel the cam chain or belt tension if accessible. Slack or unusual wear there can change valve timing and cause clearance drift. I write down what I see and hear so I can compare values when I measure the clearances later.
Listening for Ticking or Tapping Sounds
I warm the engine to normal operating temperature because valve clearances change with heat. Then I idle the bike and put my ear near the valve cover while keeping it safe from moving parts.
A distinct, regular ticking or tapping that grows louder with RPM often signals excessive valve clearance. A dull, irregular clatter can mean worn cam lobes or rocker tips. I note whether the noise is present only when cold or persists when hot.
I also use a length of screwdriver as a stethoscope if I need better location. Placing the handle on the valve cover and the tip in my ear helps me tell if a particular cylinder or valve train area is noisy. That guides which valves I check first.
Analyzing Engine Misfires
I watch engine behavior under load and at idle for misfires or hesitation. If the bike stumbles when I twist the throttle or struggles under light load, I suspect valves that aren’t opening or closing correctly.
I remove and inspect spark plugs from affected cylinders. A plug showing lean, rich, or uneven deposits helps me pinpoint whether intake or exhaust valves may be the issue. I also scan for trouble codes if the bike has electronic diagnostics.
I perform a compression or leak-down test when misfires persist. Low compression or air loss through the valves confirms seating or timing problems. If those tests show valve leakage, I prepare to measure and adjust the clearances or consult a mechanic for further repair.
Recommended Valve Adjustment Intervals
I explain how to find the right interval and how riding changes that schedule. Follow manufacturer specs first, then adjust for how and where you ride.
Manufacturer Service Guidelines
I always start with the motorcycle’s service manual. It gives the exact valve clearance specs and a recommended inspection interval in miles or kilometers and hours. Common intervals range from 6,000 to 24,000 miles depending on make and engine type, but some bikes ask for checks every 3,000–6,000 miles early in life.
If you can’t find the manual, check the manufacturer’s website or a dealer service department. Record the date and mileage when you inspect or adjust valves so you follow the next due interval precisely. Use the exact clearances and torque values from the manual when you adjust.
Riding Habits and Their Impact
I change inspection frequency based on how I ride. Short trips, city stop-and-go, towing, or heavy loads increase wear and can require checks sooner than the manual states. High-revving track use or frequent hard acceleration also speeds valve wear.
If I notice valve noise, rough idle, or loss of power, I check the valves regardless of scheduled mileage. For daily commuter bikes I might check at the lower end of the manufacturer range. For long-distance cruisers with gentle use, I may follow the longer interval but still inspect periodically.
Risks of Ignoring Valve Adjustment
Ignoring valve adjustment can cause the engine to run poorly and lead to parts wearing out faster. Small clearance issues quickly turn into harder-to-fix problems that cost time and money.
Potential Engine Damage
If I let valve clearances go too tight, the valves may not fully seat. That causes hot combustion gases to leak past the valve face and can warp or burn the valve and seat. Intake valves that don’t seal let the air-fuel mix escape, reducing compression and causing misfires or rough idling.
If clearances stay too loose, the rocker arms and cam lobes take extra shock each cycle. That increases wear on camshafts, lifters, and tappets. Over time this wear can change valve timing and reduce engine performance. I check manufacturer specs on a site like Honda’s service pages or a trusted repair manual to avoid these outcomes.
Expensive Repairs
Small valve issues often start with a valve adjustment, which I can do with basic tools or have done for a modest labor charge. If I ignore them, the damage can require valve-seat machining, valve replacement, or even a head rebuild. Those jobs can cost several times more than routine maintenance.
Additionally, engine damage can cascade. A burned valve can break and send metal into the cylinder, damaging pistons and bearings. That can force an engine replacement. I compare repair estimates from a certified shop and use resources like the AMA or manufacturer service guides to plan repairs and avoid surprises.
Preparing for a Valve Clearance Inspection
I gather the right tools and follow safety steps before I check valve clearances. Good preparation saves time and prevents damage to the engine and to me.
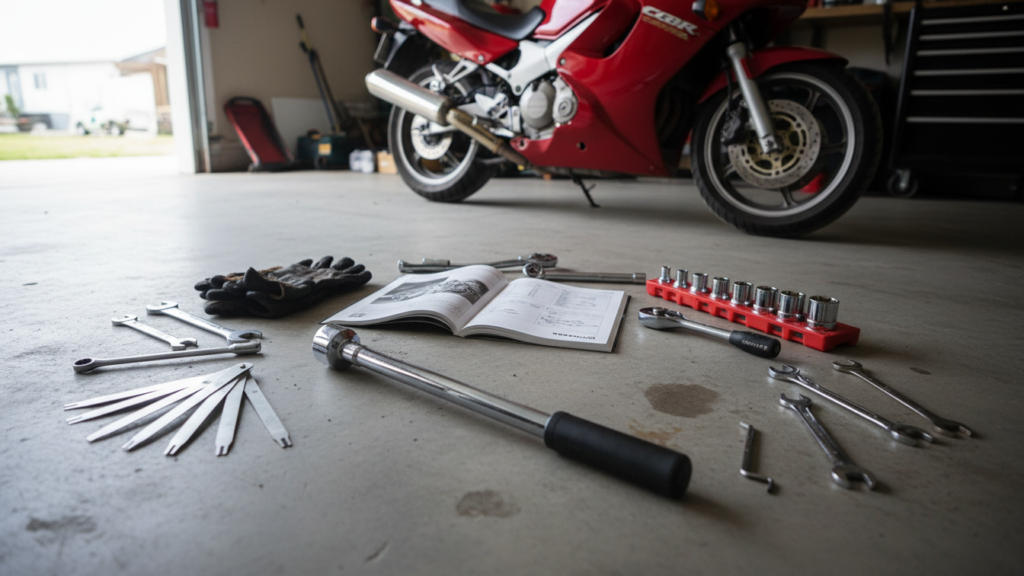
Tools Needed
I collect these items before I start:
- Feeler gauge set (metric and SAE if not sure which your bike uses). I need accurate thickness blades for each valve spec.
- Socket set and ratchet with extensions and the correct spark plug socket to turn the engine by hand.
- Torque wrench for reinstalling parts to factory torque values.
- Screwdrivers and Allen keys for removing covers and components.
- Magnetic tray or parts container to keep bolts and small parts organized.
- Clean rags and brake cleaner to wipe oil and debris from mating surfaces.
- Service manual or spec sheet for the exact valve clearance specs, cylinder firing order, and rotation direction.
I lay out tools on a clean surface and label any bolts if parts are similar. This prevents mix-ups when reassembling.
Safety Precautions
I disconnect the battery negative terminal before I touch anything near the electrical system. This avoids accidental starts and protects sensitive electronics.
I allow the engine to cool completely. Hot metal can burn me and will change clearance readings if warm.
I work in a well-lit, ventilated area and use gloves and eye protection. Gloves help keep oil off my hands and protect from sharp edges.
I block the bike steady with a center stand or paddock stand so it cannot tip while I rotate the crank. I also keep a fire extinguisher nearby when using cleaners or working with fuel lines.
I follow torque specs when reassembling and double-check gasket surfaces for debris to prevent leaks or damaged parts.
When to Seek Professional Help
I recommend seeing a mechanic when you hear persistent ticking or tapping that doesn’t change with temperature. Short tests can rule out simple issues, but steady noise often points to worn parts or misadjusted valves.
If the bike shows poor performance — hard starting, loss of power, or rough idle — I take it as a red flag. These symptoms can mean valves are out of spec or other engine systems are affected, and a pro can diagnose both quickly.
I advise professional help if the engine overheats or you notice oil burning and blue smoke. Those signs may mean valve guides, seals, or timing problems that need shop tools and experience to fix.
If you lack the right tools or the service manual for your model, I suggest a shop visit. Proper valve adjustment often needs feeler gauges, torque specs, and sometimes special shims or setting procedures.
I go to a mechanic when the job involves complex work like removing the head, replacing seals, or correcting timing. Those tasks carry risk and can cause costly damage if done wrong.
I also recommend professional checks at scheduled intervals set by the manufacturer. Dealers and experienced shops follow OEM specs and can spot secondary issues during the service.
Tips for Maintaining Proper Valve Health

I check valve clearances on a schedule that follows my motorcycle’s owner manual.
Regular checks catch small changes before they become big problems.
I listen for ticking or tapping at idle and during warm-up.
Noise often means the valve train is too loose, so I inspect sooner if I hear it.
I keep good records of mileage and service dates.
A simple log helps me know when the next valve check or adjustment is due.
I use the right tools and a factory or trusted service manual when I work on valves.
Correct feeler gauges, torque specs, and procedures matter for accurate clearance and reliable sealing.
I change oil and filters on time.
Clean oil protects cam lobes, rockers, and lifters from wear that can change valve clearance.
I watch for performance changes: rough idle, hard starting, or loss of power.
These often point to valve issues and mean I should measure clearances immediately.
I replace worn parts rather than just adjusting them tight or loose.
If seats, guides, or valves are damaged, an adjustment won’t fix the root cause.
I consider professional service when unsure or when my engine uses shims I can’t access easily.
Some jobs are quick for a shop and prevent costly engine damage later.
FAQs
Can I check clearances myself?
Yes, if I have the right tools and the service manual. I measure with feeler gauges and follow torque and shim specs. If I’m unsure, I take the bike to a mechanic.
How often should I check valves?
I follow the manufacturer’s service schedule first. High-revving or older engines often need checks more often than low-revving, modern designs.
Do valve adjustments fix every engine issue?
No. Valve adjustment only corrects valve clearance problems. If I hear knocking, see overheating, or get metal debris in oil, I stop riding and inspect further.
Will running with bad valve clearance cause damage?
Yes. Excessive clearance can reduce performance and cause noisy operation. Too-tight valves can burn seats or valves and lead to costly repairs.
What tools and skills do I need?
I use feeler gauges, basic hand tools, and sometimes shims or a micrometer. I also need patience and a clean workspace. Precision matters more than speed.
Conclusion
I watch for simple signs first: ticking noises, poor idle, hard starting, or a drop in power and fuel economy. These symptoms often point to valve clearance issues and tell me when to check the valves.
I follow the manufacturer’s service schedule when possible. Regular checks prevent bigger problems and save time and money later.
If I find loud ticking or unstable idle, I adjust the valves or take the bike to a mechanic. I avoid guessing—measured clearances and proper tools give reliable results.
When I’m unsure, I prefer a trained technician. A shop can spot worn parts or hidden damage that a basic check might miss.
Checklist I use:
- Listen for ticking or tapping.
- Note starting and idle behavior.
- Check performance and fuel use.
- Follow the service manual for intervals and specs.
I keep records of every check and adjustment. That history helps me spot trends and plan maintenance before failures occur.