
You keep your bike safe and smooth by cleaning and lubing its cables on a regular basis. Clean, inspect, and lubricate the cables so they move freely, prevent corrosion, and extend their life. You’ll notice better throttle response, easier clutch pulls, and fewer surprises on the road when the cables work right.
I’ll show you simple steps, the tools that work best, and quick checks to spot worn or damaged cables so you don’t waste time or risk failure. Follow a short routine and you’ll save money, avoid sticky controls, and ride with more confidence.
Key Takeaways
- Inspect cables for wear and dirt before doing any work.
- Clean cable housings and apply the right lubricant for smooth action.
- Reinstall, adjust, and check cable function after maintenance.
Why Cleaning and Lubricating Motorcycle Cables Is Essential
I keep my cables clean and lubed to ensure they work reliably, last longer, and feel smooth at the controls. Dirt, rust, and old grease reduce responsiveness and raise repair costs if I ignore them.
Improved Performance and Safety
Clean, well-lubricated cables give me precise control over the throttle, clutch, and brakes. When dirt or corrosion builds inside the sheath, the cable can stick or bind. That causes sudden throttle snatches, a clutch that doesn’t disengage smoothly, or delayed braking feel — all of which raise crash risk.
I pay attention to cable free play and how the lever returns. A light, even pull with no rough spots tells me the cable is in good shape. Using the correct lubricant and applying it inside the housing helps the inner wire slide freely and restores predictable control.
Preventing Premature Wear
Dirt and moisture act like sandpaper inside the cable housing. Over time they wear the inner wire strands thin and fray the ends. That weakens the cable and shortens its service life, forcing me to replace cables sooner.
Regular cleaning removes grit and old, gummy lubricant that traps contaminants. Lubrication adds a protective film that resists rust and reduces metal-on-metal wear. I inspect for corrosion and fraying after cleaning so I catch problems before they lead to a snapped cable.
Maintaining Smooth Operation
Smooth operation means consistent lever feel and predictable machine response. I clean and lube cables to remove stickiness that makes levers feel gritty or slow to return. This keeps my inputs linear and repeatable ride after ride.
I also focus lubricant where it matters: inside the sheath and on exposed pivot points. That prevents localized friction and helps seals and boots last longer. When cables run smoothly, routine adjustments stay in spec and my maintenance time drops.
Tools and Supplies Needed
I keep a small set of reliable items on hand so I can inspect, clean, and lube cables quickly and correctly. Choose the right lubricant, a safe cleaner, and a good applicator to save time and prevent damage.
Cable Lubricant Types
I prefer a few proven lubricant types depending on cable condition and environment. A light, penetrating spray or aerosol cable lube works well for quick jobs and for cables still routed on the bike. Look for products labeled for control cables or “penetrating cable lubricant.” For longer-lasting protection, I use a low-viscosity grease or a silicone-based fluid inside the cable housing when reinstalling—these resist water and reduce friction over time.
Avoid heavy gear oils that attract dirt. Synthetic lubricants often offer better corrosion protection and longer life than straight mineral oils. For technical reference on products and best practices, I consult Motion Pro and manufacturer pages for recommended lubricants.
Cable Cleaner Options
I start by removing loose dirt with a dry rag, then select a cleaner based on grime level. For light dust and road film, a microfiber cloth dampened with isopropyl alcohol removes residue without harming rubber or paint. If the cable has grease build-up, a mild degreaser or citrus-based cleaner lifts oils without harsh solvents.
I avoid strong solvents like pure acetone on rubber boots or painted parts. If internal cable corrosion is present, I run a diluted spray cleaner through the outer housing before relubing. For safety data and cleaner choices, I check product labels or authoritative maintenance guides such as Motorcycle.com.
Specialized Tools and Applicators
A few tools make the job repeatable and clean. I use a cable luber (Motion Pro-style) for injecting fluid into the housing; it seals around the housing and feeds lubricant directly to the inner cable. A long-reach needle oiler or syringe works for tight spots and small amounts. I also keep basic hand tools: pliers, a 10mm wrench for lever nuts, and a small flathead to open cable ends.
Other helpful items: a shop rag, disposable gloves, and a length of thin wire or brake cleaner nozzle to flush debris. Using the proper applicator prevents over-lubrication and keeps the bike tidy.
How to Inspect Motorcycle Cables Before Maintenance
I will check the cable outer layers, ends, and moving action for wear, proper tension, and any contamination that could block lubrication or cause binding.
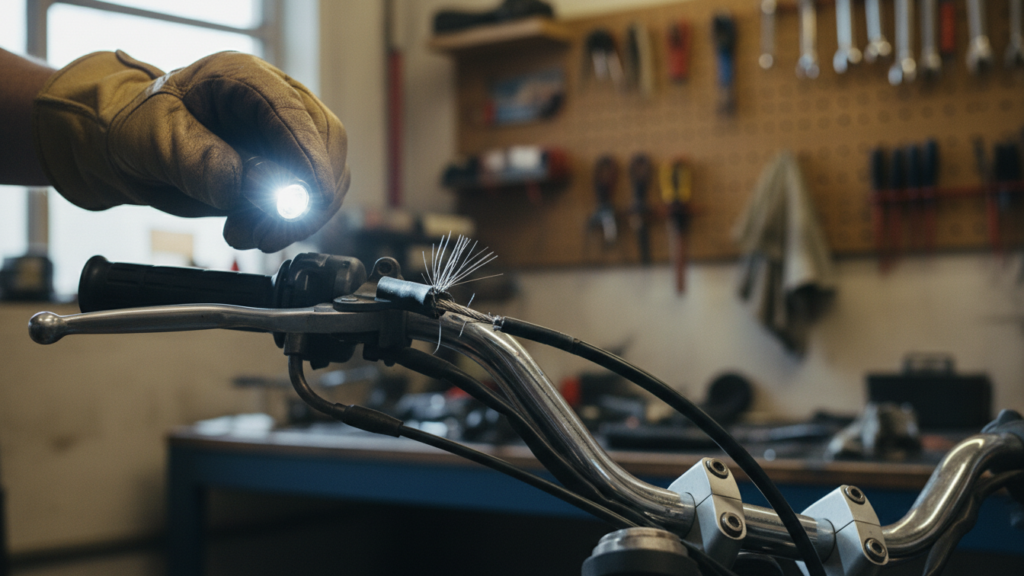
Checking for Fraying and Damage
I start at one end and work toward the other, visually scanning the exposed inner strands for broken wires or sharp burrs. If I see any frayed strands, kinks, or flattened sections in the inner cable, I mark the cable for replacement; fraying weakens the cable and can fail under load.
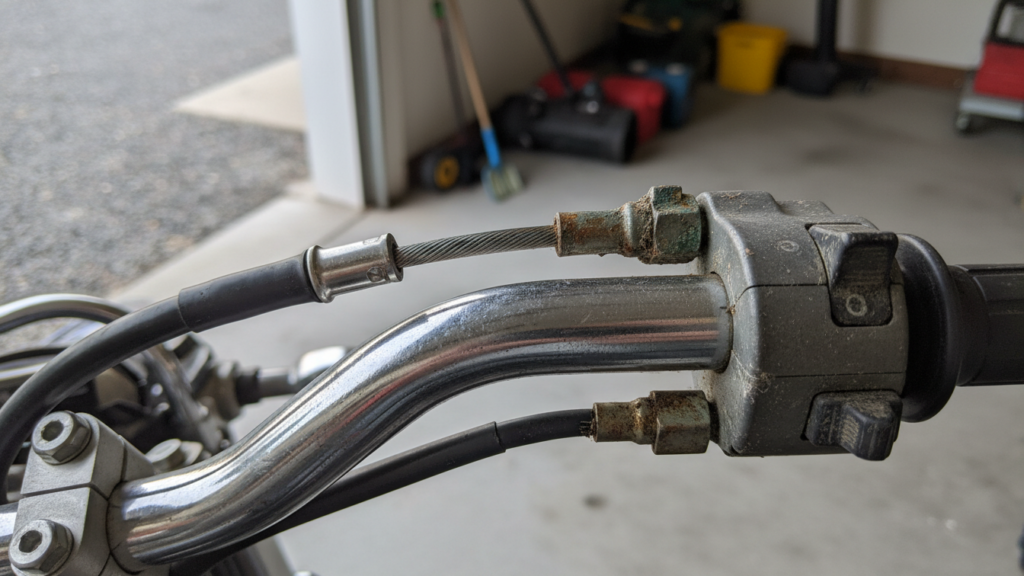
I also inspect the cable ends, ferrules, and nipple fittings. I look for worn or ovalized nipples, split ferrules, or deformed end caps that can let the cable slip or cut into its housing. If any fitting is damaged, I plan to replace the fitting or the whole cable assembly before lubricating.
Assessing Cable Tension
I check free play at the control lever or throttle using the manufacturer’s spec when available. I measure the free play with a ruler or by feel: too little free play can cause stuck controls, and too much makes the control sloppy.
I move the control smoothly through its range and watch the cable action at the adjusters and mounts. If the cable binds, sticks, or changes tension during motion, that indicates internal roughness or housing damage that lubrication alone may not fix.
Identifying Signs of Dirt or Rust
I inspect the cable housing and exposed inner wire for surface rust, dirt build-up, or old hardened grease. Rust on the inner wire shows as brown or orange discoloration; that indicates corrosion that weakens the cable and often calls for replacement.
I look for grit at the housing ends and in the adjuster barrels. Dirt and old debris trap moisture and wear the wire fast, so I clean those areas before applying lubricant. If the cable has deep pitting or severe corrosion, I replace it rather than trying to lube it.
Removing Motorcycle Cables Safely
I explain how to unhook cables step-by-step and what to watch for to avoid scratches, kinks, or lost parts. Work on a clean, well-lit bench and keep small parts organized.
Step-by-Step Detachment Process
I begin by putting the motorcycle on a stable stand and shifting to neutral. I note the cable routing and take photos so I can reinstall the cable the same way.
I loosen the locknut at the lever or pedal with the correct wrench, then back off the adjuster to relieve tension. I unclip any retaining springs or cable ties along the frame before I try to remove the cable end.
I push the cable head out of its slot at the lever or actuator while supporting the lever to prevent sudden movement. I pull the inner cable gently through the housing, keeping the housing straight to avoid kinks.
I place all nuts, washers, and clips into a labeled tray or small bags so nothing gets lost. If the cable has an inline adjuster or ferrule, I note their positions and keep them with the cable.
Precautions to Avoid Damage
I always clean the area around the connection before loosening anything to stop dirt from entering housings. I use penetrating spray on seized locknuts and let it soak to avoid rounding heads when I turn them.
I avoid bending the cable sharply or using pliers on the inner wire; that can fray strands or break the core. I never pull the housing; I only withdraw the inner cable to protect the liner and ferrules.
I protect painted surfaces with a rag when working near frames or levers. If a cable end or ferrule looks worn, I mark it for replacement rather than reinstalling a part that could fail.
Thoroughly Cleaning Motorcycle Cables
I focus on removing dirt, grit, and old grease so cables can move freely and last longer. I inspect for frays, clean the housings and inner wires, and prepare cables for proper lubrication.
Cleaning Techniques for Different Cable Types
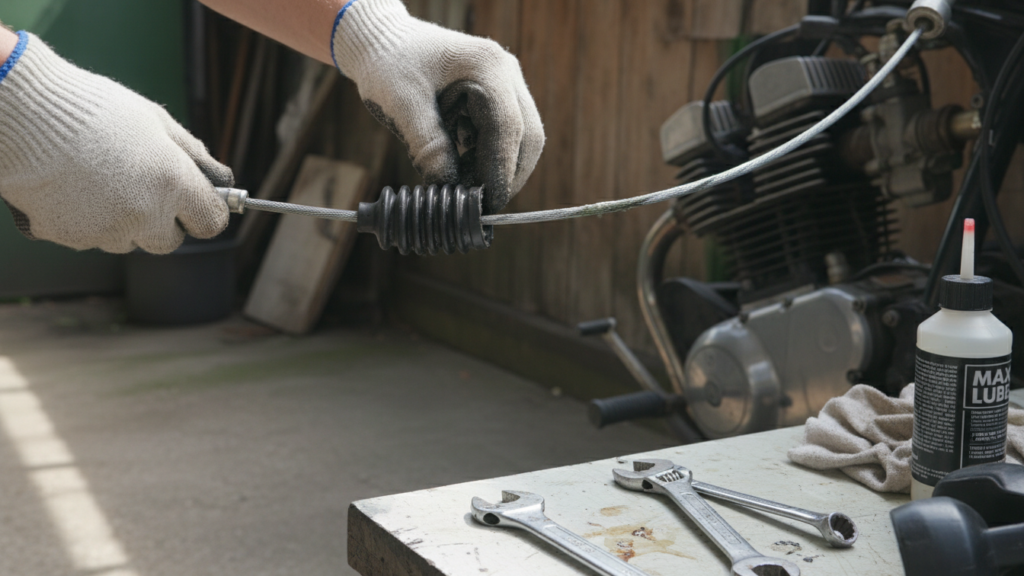
For standard wire-on-wire control cables, I start by loosening the adjusters and freeing the cable ends from levers. I use a soft rag and a mild degreaser (citrus or motorcycle-safe cleaner) to wipe the exposed inner wire. If the outer housing shows grit or oil buildup, I slide the inner cable back and forth while wiping to pull debris out.
For low-friction or Teflon-lined cables, I avoid harsh scrubs that might damage the liner. I brush lightly with a soft toothbrush and use a syringe or cable lube tool to flush solvent through the housing if needed. For stainless or coated cables, I inspect closely for corrosion and clean with a lint-free cloth and isopropyl alcohol.
If a cable shows fraying, kinks, or housing damage, I replace it instead of cleaning. A compromised cable can fail suddenly and is not safe to reuse.
Using Cable Cleaners Effectively
I use a dedicated cable cleaner or light solvent to dissolve old grease and grime. Apply solvent sparingly: spray into the housing entry or use a syringe to push a small amount through. Allow the solvent to break down deposits for 30–60 seconds, then actuate the cable to work the cleaner through.
For stubborn buildup, repeat the process and wipe the cable each time the inner wire extends. I avoid chain lube or heavy oils; they leave sticky residue. Motion Pro and other tool makers sell pressure cable lubers that also work for cleaning; they push fluid through the full length of the housing for a deeper clean. For safety data and product choices, I check manufacturer pages like Motion Pro or a service manual for my bike model.
Drying and Preparing for Lubrication
After cleaning, I remove excess solvent with a clean rag and run the cable back and forth to expel moisture. Compressed air on low pressure helps force remaining fluid out, but I keep the nozzle clear of small fittings to avoid damage.
I let cables air-dry for a few minutes in a warm, dust-free spot. Before lubing, I inspect the inner wire for smoothness and the housing for crushed or worn areas. If everything looks good, I position the cable so lubricant can be fed from the lever end toward the gearbox or actuator for best penetration.
Lubricating Motorcycle Cables Correctly
I focus on forcing the right lubricant into the cable housing, choosing a product that won’t gum up, and using only the amount the cable needs. Proper technique and the right lubricant keep the controls smooth and extend cable life.
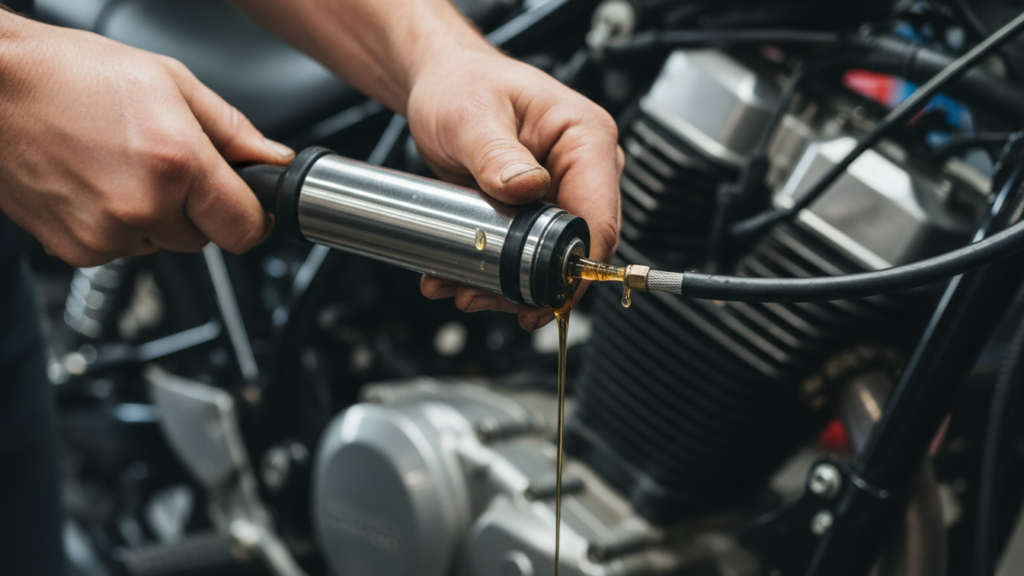
Applying Lubricant with a Cable Lubing Tool
I use a cable lubing tool because it forces lubricant through the housing and along the inner wire. First, I free one end of the cable from its anchor or adjuster so I can access the inner wire and housing end.
I attach the lubing tool to the exposed housing or to the cable end following the tool’s instructions. Then I pump the lubricant slowly while I pull the inner wire back and forth. This pushes fluid into the whole length and clears old grime.
If I don’t have a tool, I drip a few drops into the housing end and work the wire by hand to spread it, but that is less effective. I always wipe excess lube from the exposed wire and protect threads and boots from contamination.
Recommended Lubricants for Various Cable Types
I pick lubricants based on cable type and exposure. For steel inner wires in dry climates, a light cable-specific oil or PTFE spray works well. These flow easily and won’t gum up quickly.
For cables on bikes that see salt, water, or long storage, I choose a slightly heavier, water-resistant cable oil or a cable lube with corrosion inhibitors. Avoid heavy chain lube; it attracts dirt and thickens.
For Teflon-lined housings, use lower-viscosity oils so they don’t pool and slow the wire. For older unlined housings, thicker lubricants can help protect against rust, but I check for binding before finishing. I always follow the bike maker’s recommendations if available.
Avoiding Over-Lubrication
I apply only enough lubricant to coat the inner wire and wet the housing bore. Excess lube draws grit and creates drag. A few pumps with a cable luber or a small drip every few inches is usually enough.
After lubing, I cycle the lever or throttle many times to distribute the oil, then wipe away drips. I inspect rubber boots and seals and replace or reseat them so trapped lube doesn’t attract dirt. If a cable still feels sticky after proper lubing, I remove it and clean or replace it—more lube won’t fix a damaged wire or corroded housing.
Reinstalling and Adjusting Motorcycle Cables
I make sure cables sit in their exact routing and attach points before I adjust tension. I check for smooth movement, correct free play, and secure fasteners to avoid sloppiness or binding.
Reattaching Cables Securely
I route each cable along the original path and seat the ferrules fully into their housings and levers. For throttle and clutch, I reinstall the inner wire into the lever or twist grip, then press the cable end into the slot or notch so it cannot slip out.
I tighten the clamp bolts or locknuts to the torque the manual specifies, or snug them firmly if no spec exists. I avoid overtightening — that can crush the housing or pinch the wire. If a cable uses a small retaining clip or spring, I fit it so the cable cannot pull free under load.
I inspect the housing ends and ferrules again after tightening. If the cable has any sharp bends near tabs or mounts, I reposition the routing to a gentler curve to prevent premature wear.
Adjusting Free Play and Tension
I set initial free play using the adjuster at the lever or near the engine case. For a clutch cable I aim for the manual’s recommended free play — typically 2–3 mm at the lever fingertip — or just enough to ensure the clutch fully engages without dragging.
I turn the threaded adjuster to add or remove slack. Turning the adjuster out (counterclockwise) increases tension; in (clockwise) reduces it. I lock the adjuster with its locking nut once I reach the target measurement.
For throttle cables I ensure there is a small amount of play so the throttle snaps back naturally and doesn’t hold open. I double-check both cable-side and lever-side adjusters because some setups require fine-tuning at both ends.
Testing Smoothness and Operation
With cables attached and adjusted, I operate the control through its full range several times. I check for smooth travel, no sticking points, and consistent return spring action.
I listen and feel for any rough spots or binding. If I detect resistance, I back off tension and re-lube or inspect the housing for dirt, kinks, or damaged ferrules.
I also test under engine run conditions when needed: with the bike in neutral, I open the throttle and watch for steady return; I pull the clutch and shift through gears slowly to confirm proper disengagement and re-engagement. I retighten locknuts and recheck free play after final tests.
How Often to Clean and Lube Motorcycle Cables
I check and service cables on a schedule and when they show wear. My routine keeps controls smooth and prevents sudden failures.
Regular Maintenance Schedule
I inspect throttle, clutch, and brake cables at least once a month if I ride often. For road bikes I lubricate cables about every 6–12 months depending on use and conditions. If I ride in rain, salt, or dusty roads, I shorten that to every 1–3 months. I also wipe the outside of housings and ends each time I wash the bike.
When I remove a cable for a deep clean, I relube the inner wire and re-grease housings before reinstalling. I use a light cable lubricant or low-viscosity grease meant for cables. I keep a simple log of dates and conditions so I know when the last service happened.
Indicators That Service Is Needed
I service cables immediately if I feel stiffness, sticking, or a gritty feel at the lever. Frayed strands, kinks, visible rust, or excess slack tell me the cable needs attention or replacement. Sudden changes in lever free play or delayed return also signal a problem.
If I hear grinding inside the housing or notice inconsistent throttle response, I remove the cable to clean and inspect it. I never ignore small issues; they often worsen quickly and can affect safety.
Troubleshooting Common Cable Issues After Maintenance
I check cables right after lubing and again after a short ride to catch stiffness, noise, or slack early. Tighten or re-lube only the parts that need it, and replace cables if damage shows.
Persistent Stiffness or Drag
If a throttle or clutch still feels stiff after I’ve cleaned and lubed it, I first verify the lubricant reached inside the housing. I disconnect the cable at the lever and pull it through while applying a dedicated cable lube or thin penetrating oil; if the lubricant beads at the housing end, it reached the inner wire.
Next I inspect for kinks, rust, or sharp bends along the entire cable. Any visible fray, rust, or a flattened section means the cable binds and needs replacement. I also check routing at the handlebars, frame, and engine for tight bends or contact points that pinch the housing.
If lubrication and routing look correct but stiffness remains, I free the inner wire by working the lever many times to work lube deeper. If movement improves only slightly, I measure free play and adjust per the manual. Persistent drag after those steps means replacement is the safest fix.
Cable Noise and Vibration
When I hear clicking, rattling, or squeak from a cable, I isolate the source by operating the control slowly while listening near the lever, housing, and engine mount. Noise at the lever usually points to dry contact or a loose ferrule; I tighten fittings and add a small drop of light oil at the pivot.
If vibration or chafing sounds come from where the housing contacts the frame, I add a short sleeve of heat-shrink tubing or rubber grommet to stop metal-on-metal contact. I also check end fittings and adjusters for looseness or worn seats; replacing a worn nipple or ferrule often removes chatter.
For persistent high-frequency noise, I verify the inner wire is not rubbing inside a compromised housing. I compress the housing slightly and see if noise changes; if it does, replacing the housing and cable assembly solves the issue.
Tips for Prolonging Motorcycle Cable Life
I focus on regular checks, correct lubrication, and gentle adjustments to keep cables working smoothly and lasting longer. Small habits and the right products make the biggest difference.
Proper Routine Practices
I inspect cables every month and after wet or salty rides. I look for fraying, kinks, rust, and worn housings. If I find any damage, I replace the cable rather than try to fix it.
I lube throttle, clutch, and brake cables at least once a year, or more often if I ride in rain or on salted roads. I use a cable-specific lubricant or light penetrating oil and a cable luber tool when possible for even distribution.
I clean the exposed cable and housing ends before lubing. I wipe away dirt, apply lube at the top, and work the control back and forth to pull lubricant through. I also protect cable ends with fresh rubber boots or gaiters to keep grit out.
Avoiding Common Mistakes
I never apply heavy grease inside the housing; it attracts dirt and causes sticking. Thick greases also slow cable movement and can gum up in cold weather.
I avoid over-tightening cable adjusters. Too much tension stresses the cable and causes premature wear. I set free play to the manufacturer’s specs and recheck after a short ride.
I don’t ignore cable routing. I keep cables clear of sharp edges, hot exhaust parts, and tight bends. Proper routing reduces friction and prevents chafing that leads to failure.
FAQs
What lube should I use?
I prefer a dedicated cable lubricant or a chain-and-cable lube with molybdenum disulfide. Avoid WD-40 as a long-term lubricant because it mainly cleans and evaporates.
How do I know a cable needs replacing instead of lubing?
If I see frayed strands, deep kinks, rust, or visible inner wire damage, I replace the cable. Lubing won’t fix structural wear.
Can I clean and lube without special tools?
Yes. I use a rag, a small brush, and a simple cable lube tool or a straw applicator. A cable luber makes the job cleaner and forces lube through the housing.
How much lube do I apply?
I apply enough to coat the inner wire but avoid heavy drips. Wipe excess from the outer housing and pivot points to prevent dirt buildup.
Is adjustment needed after lubing?
I always check cable free play and make minor adjustments if needed. Proper slack ensures safe, responsive controls.
Conclusion
I recommend checking cables regularly and greasing them at least once a year or sooner if they feel sticky. Small steps now prevent bigger problems later.
I clean housings, inspect for wear, and replace damaged parts before I lube. If a housing or cable shows fraying or corrosion, I replace it rather than try to fix it.
I use the right lubricant and a cable lube tool when I can. That keeps the inner wire moving freely and reduces wear on fittings and controls.
I adjust cable slack to the factory spec after lubing so controls feel correct. Proper adjustment makes shifting and braking safer and more precise.
If a cable still binds after cleaning and lubing, I remove and replace it. New cables are inexpensive compared with the risk of a failed control on the road.
Key takeaways:
- Inspect, clean, and replace damaged parts.
- Use a proper cable lube and apply it correctly.
- Adjust slack to spec after lubing.
I follow these steps every season to keep my bike reliable and responsive.