
You use signs to stay safe and make fast choices on the road. I’ll help you spot the few signs you must recognize instantly so you can react correctly under pressure. Know the stop, yield, speed limit, no-entry, and warning signs by shape and color so you can act without thinking.
I’ll show why those signs matter, how to read them at a glance, and which ones riders often miss. Learn these and you’ll ride with clearer choices and fewer surprises.
Key Takeaways
- Memorize a small set of shapes and colors to respond quickly.
- Focus on regulatory, warning, and prohibitive signs for safety.
- Practice spotting temporary and special signs during rides.
Essential Regulatory Signs
I highlight the traffic signs that riders must spot and obey instantly. These signs control right-of-way, speed, and access on the road, so seeing them early keeps everyone safer.
Stop Signs
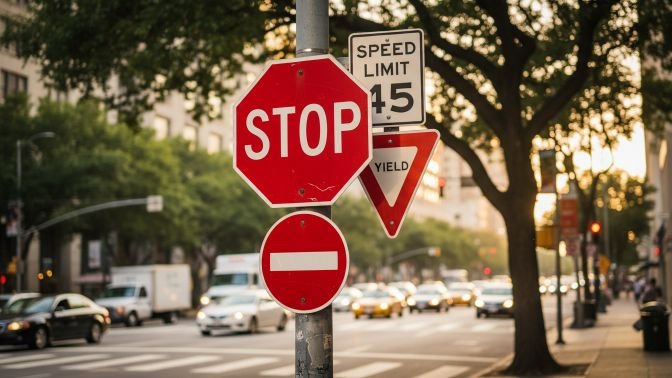
A stop sign means I must come to a complete stop at the marked line or before entering the intersection. I check left, right, then left again for pedestrians and vehicles before moving.
At a four-way stop, I yield to the first vehicle that arrived. If two vehicles arrive at the same time, I yield to the vehicle on my right.
I treat an uncontrolled intersection with the same caution: slow down, prepare to stop, and yield if other road users have the right-of-way. Running a stop sign can cause crashes and legal penalties.
Yield Signs
A yield sign tells me to slow and prepare to stop if needed to let others pass. I do not always stop; I only stop when another road user has the right-of-way or when traffic conditions require it.
I merge smoothly into traffic when it is safe, matching speed with gaps. If a pedestrian or bicyclist is crossing, I give them priority.
I stay extra alert in poor visibility or heavy traffic, because judging gaps becomes harder and yielding late can lead to collisions.
Speed Limit Signs
Speed limit signs show the maximum legal speed for that stretch of road under ideal conditions. I adjust my speed below the posted limit when weather, road surface, visibility, or heavy traffic make high speeds unsafe.
Construction or school zones often have reduced limits; I follow those lower numbers and watch for workers and children. Radar enforcement and fines increase in those areas.
I also use speed limits to decide safe following distance: higher speed needs more space to stop, so I increase my gap as speed climbs.
No Entry Signs
A No Entry sign marks roads or lanes where vehicles must not enter. I never drive past one; doing so risks head-on collisions and legal penalties.
These signs appear at one-way street exits, restricted access zones, or private drives. I watch for additional signs that show who may enter, like buses or emergency vehicles.
If I miss a No Entry sign, I stop safely, turn around when clear, and choose an alternate route rather than reversing into traffic.
Critical Warning Signs
I focus on signs that demand immediate attention and quick, safe action. These signs warn of people, vehicles, and road shape changes that require slowing, scanning, and readiness to stop.
Pedestrian Crossing Signs
I treat pedestrian crossing signs as signals to slow and look carefully. These signs often show a walking figure or the words “Pedestrian Crossing” on a yellow or fluorescent yellow-green background. When I see one, I scan both sides of the road, reduce speed, and prepare to stop for anyone waiting at the curb or already on the crosswalk.
In urban areas, crossings can appear without signals, so I check for children, cyclists, and people using mobility aids. When a crossing includes flashing beacons or a marked school crossing, I stop if pedestrians are present. The Federal Highway Administration offers guidance on crosswalk safety and sign standards that I follow for best practices.
School Zone Signs
I treat school zone signs as a strict speed-control area that I must obey at posted times. These signs display lower speed limits and often show flashing lights or time plates indicating when reduced speeds apply. I slow to the posted limit, watch for children near buses and sidewalks, and expect unpredictable movements.
I scan for crossing guards, crossing markings, and school bus stop arms. Many states enforce fines for violations in school zones, so I stay extra cautious. For detailed rules and local variations, I check state DMV resources, such as the California DMV’s page on school zones and bus laws.
Railroad Crossing Signs
I treat railroad crossing signs as a command to stop, look, and listen before proceeding. Crossings use round yellow advance-warning signs, crossbuck signs, and sometimes gates with flashing red lights. If lights are flashing or gates are down, I stop and wait at least 15 feet from the tracks until signals clear.
I never drive around lowered gates or try to beat a train. Trains are wider than tracks and travel faster than they appear. When visibility is poor, I open my window and listen for train horns. The Federal Railroad Administration posts safety tips I use to reinforce safe behavior at crossings.
Sharp Curve Ahead Signs
I treat sharp curve ahead signs as a prompt to reduce speed to a safe level shown on a supplemental plaque or to the road conditions. These signs are diamond-shaped with a black curve arrow on yellow. I brake before entering the curve, avoid sudden steering inputs, and maintain a steady speed through the turn.
If a chevron alignment sign or advisory speed plaque is present, I follow that guidance closely, especially in wet or icy conditions. For motorcycles and bicycles, I give extra space and enter slower to maintain traction and balance.
Important Prohibitive Signs
I focus on signs that ban specific actions because they protect riders and other road users. These signs tell you exactly what you must not do and where you must not do it.
No U-Turn Signs
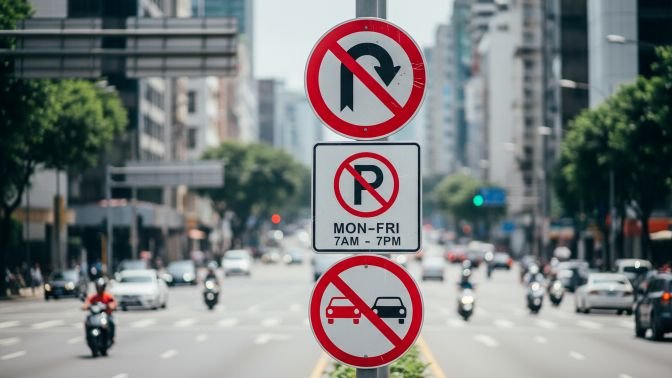
I treat No U-Turn signs as absolute: they ban turning around at that location. The sign usually shows a U-shaped arrow with a red circle and diagonal line. If you see one at an intersection or median opening, do not attempt a U-turn there.
No U-Turn zones often exist where visibility is poor or traffic moves fast. Making a U-turn in those spots can cause head-on or side collisions. Police can ticket you for ignoring the sign, and your insurance may not cover crashes caused by illegal maneuvers.
If you miss a planned U-turn, I look for a legal alternative: use the next intersection, a designated turnaround, or a parking lot where turning is allowed. On multi-lane roads, move into the correct lane early and signal well before you turn.
No Parking Signs
No Parking signs tell me where I cannot leave my vehicle unattended. The sign may list hours, days, or exceptions such as “No Parking 7 AM–6 PM” or “No Parking Except Sundays.” Follow the exact times and restrictions shown.
Common reasons for no parking include keeping bus stops, driveways, fire hydrants, and emergency lanes clear. Parking in a No Parking zone can lead to fines or towing. If the sign includes arrows, they indicate the length of the restricted area.
When I need to stop briefly, I check whether the sign allows standing or loading. Some areas permit short stops for passenger drop-off but not for leaving the vehicle. Always read signs closely before leaving your bike or vehicle.
No Overtaking Signs
No Overtaking signs ban passing slower vehicles on that stretch of road. The symbol often shows two cars side-by-side with a red circle or diagonal line. I do not pass until I see a sign that ends the restriction or a clear, legal passing zone.
These zones appear on narrow roads, curves, hills, and near intersections where passing would be dangerous. Overtaking in these places raises the risk of head-on collisions. Law enforcement may fine drivers who overtake in prohibited areas.
If a slower vehicle blocks my lane, I maintain a safe following distance and wait for a legal passing opportunity. Use patience and signal clearly when the restriction ends and it is safe to pass.
Vital Guide Signs
I focus on the signs that tell you where to go, which lane to use, and when to leave the highway. Recognizing these quickly keeps traffic moving and prevents last-second maneuvers.
Direction Signs
I watch green or blue rectangular signs with white text and arrows for routes, cities, and distances. They often show mileage to upcoming towns and the direction of major roads. A simple example: “I‑95 North — 12 mi” with an arrow tells me the highway and how far it is.
They also include route shields (interstate, U.S., or state numbers). I use those shields to confirm I’m on the right highway or to follow a signed detour. On local streets, brown or green signs point to parks and landmarks; I glance at them for navigation without stopping.
Lane Usage Signs
I read lane usage signs to know which lanes go straight, turn, or merge. These rectangular signs often show arrows over lane diagrams. For example, a sign with two straight arrows above left and a curved arrow above the right lane means only the right lane turns.
I look for displayed times or vehicle type restrictions on these signs, like “2–7 PM” or “Buses Only.” They help me pick the correct lane well before intersections. Overhead signs on multi-lane roads are especially important; they eliminate guesswork by showing exact lane rules for each lane.
Exit Signs
I check exit signs early to plan when to leave a highway. The standard green exit sign shows the exit number, road name, and distance (e.g., “Exit 22 — Main St — 1/2 mile”). I start moving into the exit lane when the sign shows 1/2 mile or the overhead lane arrows indicate lane change.
I also watch for auxiliary signs like “Exit Only” and ramp speed signs. “Exit Only” means the lane will leave the highway; I avoid that lane if I intend to continue. Ramp advisory speeds tell me a safe speed for the curved exit ramp, and I slow down before the ramp to match that advisory.
Key Informational Signs
I focus on signs that tell riders where things are and how far away they lie. These signs help plan stops, estimate arrival time, and find fuel or help quickly.
Distance Markers
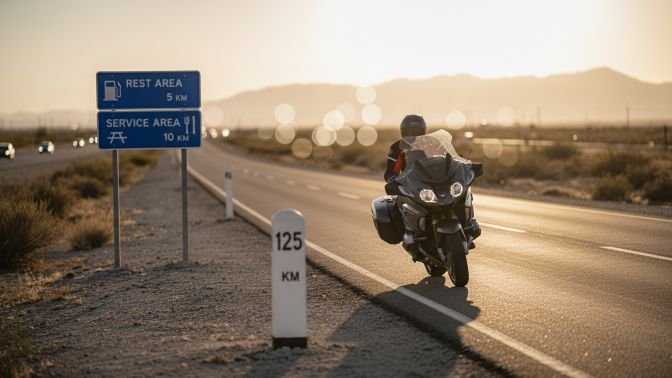
Distance markers show how far you are from towns, exits, or key points. I look for green signs with white numbers on highways and white signs on the shoulder that count down miles to an exit or state line.
Read them from top to bottom: the top line usually lists the destination, the bottom line gives miles remaining. Use them to judge when to change lanes for an exit or to time a rest stop. On rural roads, mileposts help if you must report a breakdown; giving the nearest milepost lets responders find you faster.
I watch for sequential markers that decrease as I approach a destination. If markers skip numbers, note the nearest intact one for accurate location reporting.
Rest Area Signs
Rest area signs are blue with white symbols and text. I watch for the symbol of a bench or restroom and the distance note beneath, such as “Rest Area 2 miles.”
These signs often list available facilities: restrooms, picnic areas, pet exercise areas, and sometimes phone service. I check the sign early so I can safely merge to the right lane before the exit. On long trips, I use rest area signs to plan breaks every 2–3 hours to reduce fatigue.
If a sign shows a truck symbol or height restriction, I treat that as a cue that the area may have limits or separate parking zones for larger vehicles.
Service Area Signs
Service area signs point to fuel, food, lodging, and repair services. They use blue backgrounds with icons for gas pumps, forks, beds, or wrenches, often paired with brand names or distances.
I scan these signs when my fuel gauge hits a quarter tank or when I need food or mechanical help. The signs can list which services are available at the upcoming exit or a distance like “Services 1 mile.” For motorcycles, I watch for notes about limited parking, low clearances, or whether pumps are unattended.
If the sign shows a tow truck or garage icon, I note it for emergency repairs. I use service signs to pick exits that match my needs rather than stopping at the first available option.
Advisory and Temporary Signs
I want riders to spot orange signs fast and know what actions to take. These signs warn of changing road conditions, lane shifts, workers, and detours so you can slow, change lanes, or stop safely.
Road Work Ahead Signs
I treat orange diamond and rectangular signs as immediate red flags. They often say “ROAD WORK AHEAD,” “MEN WORKING,” or show lane-merge symbols. When I see them, I reduce speed, increase following distance, and scan for cones, flaggers, and slow-moving equipment.
Key points to watch:
- Colors and shapes: orange background with black symbols or text.
- Common messages: lane shifts, rough surface, shoulder work, or reduced lanes.
- Flaggers and temporary signals: obey them even if they differ from normal traffic lights.
I use government resources like the Federal Highway Administration for official standards and the DMV for local rules. Those sources help me learn exact sign meanings and legal duties when passing work zones.
Detour Signs
Detour signs guide me around closed roads using clear arrows and route markers. They usually use orange backgrounds and will show a word like “DETOUR” plus arrows or a temporary route number.
When I follow detour signs, I:
- Watch for short, unfamiliar turns and reduced speeds.
- Expect changes in lane widths and temporary intersections.
- Keep an eye on signage spacing; arrows may repeat every few hundred feet.
If I need local specifics, I check my state or local transportation website for planned closures and mapped detours. Doing that lowers surprises and helps me pick safer alternate routes.
Special Situation Signs
I’ll point out signs that warn about sudden, unusual road hazards and tell you how to respond fast. These signs usually mean you must slow down, scan the road, and be ready to stop or steer around trouble.
Animal Crossing Signs
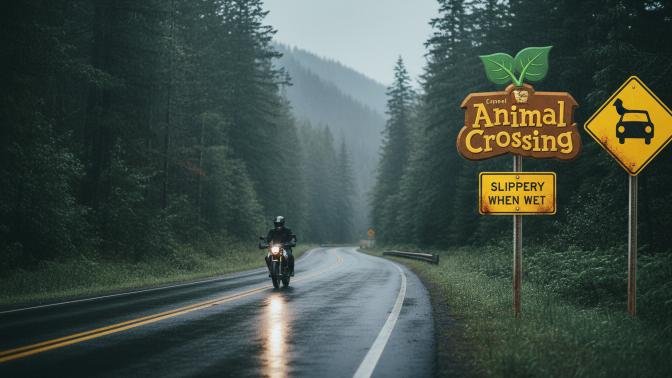
Animal crossing signs warn that animals often cross or move along this stretch of road. I look for yellow diamond signs with a deer, elk, or other animal symbol; sometimes they include times or seasons when crossings are more likely.
When I see one, I reduce speed and increase my scanning distance. I watch the road shoulders, ditches, and tree lines for movement, since animals can leap into the lane without warning.
At night, I use my high beams when safe to improve visibility, but I dim them for oncoming traffic. If an animal appears, I brake firmly and stay in my lane; swerving can cause a worse crash with other vehicles or fixed objects.
If the sign shows a herd symbol or “next X miles,” I stay extra alert for groups. I also expect smaller animals after seeing a larger-animal sign; where deer are common, rabbits or foxes often follow.
Slippery Road Signs
Slippery road signs indicate surfaces that reduce tire traction, like wet, icy, or oily pavement. I watch for the yellow diamond sign that shows a car with skid marks, often paired with a distance plaque or advisory speed.
On wet roads I slow smoothly and avoid sudden steering or braking. I use gentle braking and downshift on slippery hills rather than hard stops. If I feel a skid, I steer into the skid and ease off the brakes until I regain control.
In freezing conditions I assume bridges and shaded areas freeze first. I add more following distance and avoid cruise control. If the sign says “When Wet” or shows a distance, I keep caution for that entire zone and expect abrupt changes in grip.
FAQs
What about signs for lane use and turns?
I tell riders to watch for arrows, no-turn, and merge signs. They tell you where to go and when to change lanes.
How can I remember signs quickly?
I use simple grouping: regulatory (must obey), warning (be careful), and guide (directions). Flashcards and short rides focused on one group help a lot.
Are there signs unique to motorcyclists?
Some signs warn of slippery roads, low shoulders, or rough pavement that affect bikes more. I pay special attention to those and reduce speed.
What if I miss a sign?
I look for the next safe chance to follow rules or correct my path. If needed, I pull over in a safe spot to recheck directions or get my bearings.
Quick checklist I use:
Stop and yield signs: obey immediately.
Speed limit: match road and weather.
Warning signs: expect hazards.
Temporary signs: treat as highest priority.
Conclusion
I want riders to recognize key traffic signs without pausing. Quick recognition cuts reaction time and lowers crash risk.
I recommend memorizing stop, yield, speed limit, school zone, and pedestrian crossing signs first. These signs appear often and demand immediate choices.
I also urge riders to learn warning and regulatory signs for curves, lane changes, and merging. Knowing these helps me plan speed and position before hazards arrive.
I practice scanning signs every time I ride. Repetition builds instinct and reduces the mental load during complex traffic.
I keep a small checklist when studying:
- Stop / Yield
- Speed limits / School zones
- Pedestrian / Bicycle crossings
- Curve / Merge / Lane control
I use short practice rides and flashcards to test myself. That method keeps my recognition fast and reliable.
I encourage riders to refresh sign knowledge yearly. Road layouts and laws change, so regular review keeps me safe and law-abiding.