
You can do a lot of motorcycle maintenance yourself if you want to save money and learn your bike. I’ll show what tasks are safe for most people, what tools you need, and when to call a pro. You can handle routine checks, fluid changes, chain care, and simple adjustments at home, while leaving complex engine or electrical work to experienced technicians.
I’ll walk you through practical steps, clear warnings, and quick tips so you avoid common mistakes. Expect straightforward guidance, real examples of what you can try, and clear signs when a shop is the better choice.
Key Takeaways
- Many regular maintenance tasks are safe and easy to do at home.
- Use the right tools and follow clear steps to avoid damage or injury.
- Know when to stop and get professional help for complex repairs.
Understanding DIY Motorcycle Maintenance
I explain what you can do at home, why it helps, and where you should stop and get professional help.
What DIY Motorcycle Maintenance Involves
I focus on routine work that keeps the bike safe and running. Common tasks I do at home include checking and setting tire pressure, changing engine oil and filter, cleaning and lubing the chain, inspecting brake pads and fluid, tightening fasteners, and replacing air filters. These tasks need basic tools: tire gauge, torque wrench or simple wrenches, oil pan, funnel, chain lube, and a service manual for torque specs and intervals.
Some jobs need specific steps or attention to detail. For oil changes I follow the correct oil grade, warm the engine, drain fully, replace the filter, and torque the drain plug. For chain work I clean with a brush, let it dry, then apply lube to the inside of the rollers.
Benefits of Doing Maintenance Yourself
I save money by avoiding shop labor on routine items like oil and chain service. Typical DIY oil change costs only parts and oil; labor at a shop can cost several times more. I also learn the bike’s condition, so I spot small issues early — worn brake pads, leaks, or loose bolts.
Doing maintenance myself gives me control over parts and fluids. I choose quality filters, the right oil spec, and the exact torque settings. That control often improves reliability and can extend component life. Plus, routine checks reduce the chance of roadside failures.
Potential Risks and Limitations
I know I can make mistakes that cause damage or safety risks. Over-tightening fasteners can strip threads; under-tightening can cause parts to fall off. Using the wrong oil grade, incorrect torque, or improper brake-bleeding technique can harm the engine or brakes.
Some jobs are not DIY-friendly. Valve adjustments, fork rebuilds, major electrical diagnostics, and engine internals need special tools and experience. When a task affects safety (brakes, steering, suspension) or requires precise calibration, I take the bike to a qualified technician.
Essential Tools and Equipment
I recommend a focused set of tools, a few specialized items, and basic safety gear. These let you handle common tasks like oil changes, chain service, brake checks, and small repairs without wasting time or risking damage.
Basic Tool Kit Requirements
I keep a small, well-organized kit that covers most routine jobs. It includes:
- Metric socket set (8–19 mm) and a 1/4″ and 3/8″ ratchet.
- Combination wrenches (8–19 mm) and a set of Allen keys (metric).
- A quality torque wrench for wheel and engine-fastener specs.
- Screwdrivers (flat and Phillips) and a pair of needle-nose pliers.
- Spark-plug socket, feeler gauge, and a tire pressure gauge.
I also carry a motorcycle shop manual or a model-specific PDF. The manual gives torque numbers and service intervals I use every time. A small parts tray and labeled bags keep fasteners organized during disassembly.
Specialized Tools for Motorcycle Maintenance
Some jobs need more than the basics. I add these as my skills grow:
- Rear paddock stand or center stand adapter for wheel removal and chain work.
- Chain tool and chain breaker or a rivet master for chain replacement.
- Brake-bleeding kit and DOT fluid reservoir clamp for safe brake service.
- Compression tester and multimeter for engine diagnostics.
- Impact driver for stuck screws and a magnetic pickup tool for dropped bolts.
For complex jobs I reference manufacturer procedures on sites like the Motorcycle Safety Foundation or the OEM service page to avoid mistakes. Buying a few specialized tools saves time and prevents damage compared with trying improvised methods.
Safety Gear and Workspace Setup
I treat safety and workspace layout as essential tools too. I wear nitrile gloves, safety glasses, and ear protection when needed. A fire extinguisher rated for flammable liquids should sit within reach.
My workspace has a flat, well-lit surface and an oil tray or mat. I use sturdy jack or lift rated for my bike’s weight and always chock wheels. Proper ventilation matters for solvent and exhaust fumes; I open doors or use a fan when I run the engine. For more detailed safety practices and disposal rules, I consult resources like local waste management guidelines and the EPA’s household hazardous waste page.
Routine Maintenance Tasks You Can Do
I focus on tasks that save money and keep the bike safe: fluids, filters, chain care, and battery checks. Each task needs simple tools, attention to detail, and steady intervals.
Oil and Filter Changes
I change oil every 3,000–5,000 miles or per the manual for my bike. I warm the engine for a few minutes, secure the bike on a stand, then drain oil into a pan. I remove the old filter, clean the mount surface, and fit a new filter with a light coat of oil on the gasket to seal properly.
I check and replace the crush washer on the drain plug if needed, torque the plug to spec, and refill with the correct oil grade and amount. I run the engine briefly, recheck level with the dipstick, and inspect for leaks after a short ride.
Tools and parts I use: socket set, oil drain pan, funnel, new filter, correct oil, torque wrench, gloves, and rags. I dispose of used oil and filters at a recycling center.
Air Filter Replacement
I inspect the air filter every 6,000–12,000 miles or more often in dusty riding. I remove the seat or air box cover, lift out the element, and hold it up to the light. If light doesn’t pass through or it’s oily or torn, I replace it.
For foam filters, I clean with mild solvent, let them dry, then lightly oil with filter oil before reinstallation. For paper filters, I swap the old for a new one only; do not oil paper elements. I make sure the sealing surface and box are clean and the clamp or screws are tightened to avoid unfiltered air.
I always use the correct replacement part number and check the intake duct for cracks or loose clips while the box is open.
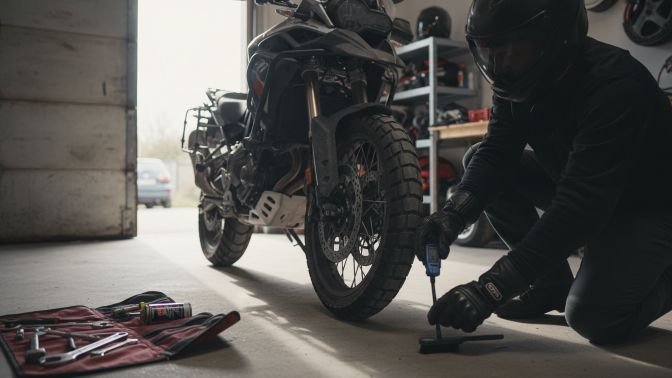
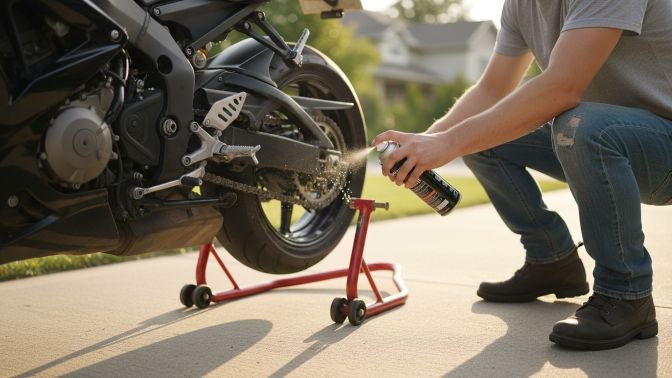
Chain Cleaning and Lubrication
I clean the chain every 300–600 miles or after riding in rain or dirt. I put the bike on a rear stand, rotate the wheel, and use a brush plus a dedicated chain cleaner to remove grit and old lube. I avoid harsh wire brushes that can damage O-rings.
After drying, I apply chain lube to the inside of the chain while slowly turning the wheel so lube penetrates rollers and O-rings. I wipe excess off to prevent fling. I check and set chain slack per the manual, measure wear with a ruler or chain gauge, and replace the chain and sprockets as a set when stretch exceeds spec.
Carry a rag, brush, cleaner, and lube in my tool kit to do quick touch-ups after wet rides.
Battery Maintenance
I check battery terminals monthly for corrosion and tightness. I switch the bike off, disconnect terminals starting with negative, clean posts with a brush and baking soda paste if corroded, rinse, dry, and apply dielectric grease or anti-corrosion spray.
For conventional batteries I check and top up electrolyte with distilled water when levels are low. For sealed AGM or lithium batteries I follow the manufacturer’s charging instructions and don’t open them. I keep a multimeter to check resting voltage; ~12.6V indicates a full 12V lead-acid battery. I use a smart charger to maintain charge during storage and replace batteries that fail to hold proper voltage after charging.
Advanced DIY Motorcycle Repairs
I focus on the tasks that save money and keep the bike safe: hydraulic brakes, spark plug replacement, and coolant system care. Each job needs the right tools, a clean workspace, and careful step-by-step work.
Brake System Servicing
I inspect pads, rotors, lines, and fluid regularly. Start by checking pad thickness and rotor condition. If pads are below the manufacturer minimum or rotors are scored, replace them. Use the correct pad compound for your riding style.
For hydraulic systems I bleed the brake to remove air using a proper bleed kit and fresh DOT-rated fluid. I follow the bike maker’s specs for fluid type and torque values. When replacing lines, I prefer OEM or stainless-steel braided lines to avoid swelling and improve lever feel.
Tools I use: torque wrench, bleed kit, catch bottle, new seals if calipers come apart, and rubber gloves. Dispose of brake fluid safely and avoid contact with painted surfaces. For detailed procedures and torque specs I consult the service manual or a trusted source like the Motorcycle Safety Foundation and manufacturer pages.
Replacing Spark Plugs
I change spark plugs at service intervals or when misfires, hard starting, or poor throttle response appear. First, I let the engine cool and remove the plug caps carefully to avoid wire damage. I clean around each spark plug hole to keep debris out of the combustion chamber.
I use the correct heat-range plug specified in the manual and set the gap with a feeler gauge before installation. Tighten plugs to the recommended torque—too loose causes poor sealing; too tight can strip threads. If threads in the head are damaged, I stop and repair them with a helicoil or seek shop help.
Signs of fouling tell me about engine condition: oil on the plug suggests valve or guide wear; black, sooty plugs point to a rich mixture; white insulator can mean lean running. I cross-check symptoms with a service manual and resources like manufacturer bulletins.
Coolant System Upkeep
I service coolant every two years or per the manual, and I inspect hoses and clamps for cracks and leaks. To drain, I run the engine briefly to warm the fluid, then open the drain plug and remove the radiator cap to speed flow. I capture and dispose of old coolant responsibly.
When refilling I use the specified coolant type and mix ratio. I fill slowly and burp air from the system by running the bike and moving hoses or using the bleed screw if present. Overheating signs such as boiling, white smoke, or hot spots on the head call for immediate checks of thermostat, water pump, and radiator fins.
I replace the thermostat or water pump if they fail, following torque specs and gasket replacement steps. For detailed diagrams and coolant recommendations I refer to the bike’s service manual and trusted sources like manufacturer support pages.
Knowing Your Limits

I’ll point out the jobs I handle safely and the ones I don’t. I know when a task needs only basic tools and when it needs a shop, so I avoid wasting time or risking damage.
When to Seek Professional Help
I take my bike to a mechanic for work that affects safety or requires special tools. Examples include valve clearance adjustments on many modern engines, fork damper servicing, full clutch replacements on wet multi-plate systems, and any work that needs calibrated torque settings beyond a basic wrench.
I also get professional help when the job requires dealer software or ECU reprogramming, or when the repair manual calls for factory-specific procedures. If I lack a service manual, the right tools (engine hoist, hydraulic press, or snap-ring pliers), or confidence to perform a step correctly, I stop and call a shop.
If the bike shows issues while riding — sudden loss of power, wheel lockup, or brake fade — I avoid trial-and-error fixes and have it inspected immediately.
Signs of Complex Mechanical Issues
I watch for symptoms that point to complex faults rather than routine maintenance. Persistent oil leaks that worsen after a short ride, metal particles in the oil filter, or sudden drops in oil pressure usually mean internal engine work is needed.
Other red flags include rhythmic vibration that changes with RPM (possible bent crank or damaged connecting rod), grinding in the gearbox, and brake pulsation with a new pad install (warped rotor or caliper issue). Electrical faults that reset fuses, blow relays, or require tracing harness chafing also go beyond simple DIY checks.
I document the symptoms, note when they occur, and give that information to the mechanic. Clear, specific details help them diagnose faster and avoid unnecessary repairs.
Staying Safe When Working on Your Motorcycle
I focus on stable support, correct lifting, and basic accident prevention before I touch tools. I always use the right gear and clear space to reduce risk.
Proper Lifting and Support Techniques
I never lift a bike by myself without planning the lift and having a solid anchor point. For light bikes I use a padded stand or a purpose-built center stand; for heavier bikes I use a motorcycle jack rated for my bike’s weight.
I position the jack under the frame or engine cradle—points the manufacturer lists—never under flimsy plastics or the exhaust. I raise the bike slowly, checking that passenger pegs, luggage racks, and side covers clear the ground. Once raised, I place quality jack stands or blocks under the frame as secondary support.
I always chock the wheels and engage the transmission in gear to keep the bike from rolling. If I remove a wheel, I add extra blocking at the swingarm or fork. I wear gloves and safety boots while lifting to protect my hands and feet.
Preventing Common Accidents
I keep a well-lit, uncluttered workspace to avoid trips and falls. I sweep oil and coolant spills immediately and keep a small spill kit and absorbent pads handy.
I disconnect the battery before doing electrical work to prevent shorts and sparks. I use insulated tools for battery tasks and secure loose clothing and long hair away from moving parts.
For tasks that create dust or fumes—brake cleaning, solvents, or engine work—I wear a respirator and work outdoors or under ventilation. I always follow torque specs and use a torque wrench to avoid stripped bolts and parts coming loose while riding.
Resources for Learning Motorcycle Maintenance
I focus on sources that give step-by-step instructions, model-specific specs, and clear visuals. I pick tools that match the task: detailed manuals for teardown and courses or videos for hands-on techniques.
Repair Manuals and Guides
I start with the factory service manual for my bike when I need exact torque figures, wiring diagrams, and service intervals. OEM manuals show factory procedures and specs. They can pin down things like valve clearances, torque settings, and electrical connector locations.
I also use aftermarket repair manuals (Haynes, Clymer) for step-by-step photos and easier language. These often include common troubleshooting tips and part diagrams that help with routine jobs like brake bleeding and carburetor sync. I keep a printed copy near my workbench and a PDF on my phone for quick reference.
When I need a quick answer, I consult the owner’s manual for fluid types, tire pressures, and routine checks. For older or rare models, I look for scanned manuals or community-shared PDFs.
Online Tutorials and Courses
I watch short, focused videos for tasks that need a visual guide — chain adjustment, oil change, or brake pad replacement. YouTube channels with clear step-by-step footage let me pause and replay tricky moments. I favor creators who show tools, torque values, and how to check their work.
For structured learning, I enroll in online courses that cover basics like engine systems, carburetors vs. fuel injection, and electrical troubleshooting. Courses with quizzes and downloadable checklists help me track progress and practice safely. I also join model-specific forums and social media groups to ask targeted questions and verify tips from experienced owners.
I save playlists and course notes so I can review procedures before I start a job. I cross-check any online advice with a service manual before making adjustments that affect safety.
Legal and Warranty Considerations

I explain how DIY work can affect warranty coverage and what local rules might require. Read both parts so you know when I can safely do maintenance and when I should use a dealer or a certified shop.
Impact on Your Warranty
I check the warranty documents before I start any work. Manufacturers often require maintenance at set intervals and may ask for records or receipts to prove it was done.
I can perform routine tasks like oil changes or brake pad replacement without voiding the warranty in many cases, provided I use correct parts and follow the service schedule. If a repair causes damage, the manufacturer may deny warranty claims for that specific issue.
I keep clear records: dated service logs, parts invoices, and photos. If a manufacturer disputes a claim, these documents help show I followed specs. For complex work tied to a claim, I consider using an authorized dealer to avoid denials.
Local Regulations and Requirements
I check local laws before doing any work that affects safety or emissions. Some regions require certified inspections, and tampering with emissions systems can carry fines or fail inspections.
In some countries, consumer protection rules prevent manufacturers from forcing dealer-only service for warranty validity. However, rules vary by state and country, so I verify the exact laws where I live.
I confirm licensing needs for disposal of fluids and for repairs that need professional certification. Following local codes keeps me legal and protects my standing with insurers and the manufacturer.
Tips for Successful DIY Motorcycle Maintenance
I start every job by reading the owner’s manual. It tells me the right fluids, torque specs, and service intervals for my bike. I follow those numbers to avoid mistakes.
I keep a small, organized tool kit and basic spare parts on hand. Good items are a torque wrench, socket set, tire gauge, chain lube, and a service stand or paddock bobbins. I replace worn tools so they don’t fail during a job.
I work in a clean, well-lit space with flat ground. Clear space helps me find parts and reduces the chance of losing fasteners. I lay parts out in order so I know where they go when I reassemble.
I use checklists for common jobs like oil changes, chain adjustment, and brake checks. Checklists cut the chance of skipping steps and let me track what I’ve done. I also note dates and hours on a maintenance log.
When a task feels beyond my tools or skill, I stop and consult a mechanic. I don’t risk safety or expensive damage to save time. For complex items such as valve shims, steering head bearings, or major electrical diagnostics, I get professional help.
I take pictures during disassembly. Photos help me remember wire routes and bolt locations. They also make reassembly faster and reduce guesswork.
I keep safety gear like gloves and eye protection close by. Clean hands and clear vision help me work accurately. I also dispose of fluids responsibly at a proper recycling center.
Bold tip: practice patience. Small, careful steps save money and keep the bike safe.
FAQs
How do I know when to hire a pro?
If a job needs special tools, deep engine knowledge, or affects safety (like valve adjustments or brake system repairs), I take it to a mechanic. Mistakes on critical systems can be costly or dangerous.
What basic tools should I buy first?
I suggest a torque wrench, metric socket set, screwdrivers, pliers, a chain ruler, and a tire pressure gauge. A shop manual or factory service guide is also essential.
Can I save money doing my own work?
Yes, routine jobs like oil changes and brake pad swaps cut shop costs. I still budget for parts, fluids, and quality tools.
How often should I check the bike?
I check tires and lights before every ride, chain and fluid levels weekly, and perform scheduled services per the owner’s manual. Regular checks prevent small issues from becoming big problems.
Is it safe to learn from online guides and videos?
I use reputable sources and cross-check with my manual. Hands-on practice in a safe, flat area and basic safety gear reduce risk while I learn.
What about warranty or dealer concerns?
I follow the warranty rules in my manual. Many routine DIY jobs don’t void warranties if I keep records and use approved parts or fluids.
Conclusion
I believe many motorcycle maintenance tasks are within reach for a willing rider. Small jobs — like checking tire pressure, changing oil, lubing the chain, and swapping filters — save money and teach you how your bike works.
I also know when to call a pro. Anything involving major engine work, complex electrical systems, or safety-critical repairs should go to a trained mechanic. My safety and that of others depends on sound repairs.
I recommend starting with simple tasks and a good service manual. Basic tools, gloves, and a clean workspace make projects easier and safer. Keep records of what you do so you can track wear and spot patterns.
If you want a quick checklist to get started, use this:
- Check fluids and tire pressure.
- Inspect brakes and lights.
- Clean and lube the chain.
- Change oil and filter as recommended.
I encourage regular checks over doing everything at once. Small, consistent maintenance prevents bigger problems and keeps riding safe and fun.