

You want a quick, sure way to check for motorcycle oil leaks and avoid getting stranded or damaging the engine. Start by cleaning the engine and surrounding area, run the bike briefly, then inspect with a flashlight and look for fresh oil trails, wet spots, or drips under seals, gaskets, drain plugs, and the oil filter. If you spot wet oil after a short run or find puddles under the bike, you likely have an active leak that needs attention.
I’ll show you how to pinpoint where the oil comes from, what to inspect first, and simple fixes you can try before calling a shop. Follow the steps and you’ll know whether you can handle the repair or need professional help.
Key Takeaways
- Clean the engine, run the bike briefly, and inspect for fresh oil to confirm a leak.
- Check seals, gaskets, drain plugs, and the oil filter as the most common leak sources.
- Small fixes and regular checks prevent bigger engine damage and costly repairs.
Why Checking for Motorcycle Oil Leaks Is Essential
I inspect oil leaks regularly because they affect engine life, rider safety, and the environment. Finding a leak early saves parts, prevents accidents, and avoids messy fines or cleanup.
Potential Engine Damage
I know low oil or contaminated oil wears bearings, camshafts, and piston rings fast. A small drip can become a slow starvation issue; oil pressure drops and metal-on-metal contact increases. That leads to overheating, scored cylinders, and ultimately engine seizure if not fixed.
I check oil level, look for fresh wet spots on the crankcase, and run the engine briefly to spot the source. Replacing worn gaskets, seals, or a stripped drain plug early prevents costly repairs like a rebuilt engine or replacing a seized crankshaft.
If I see milky oil, I suspect coolant contamination from a head gasket failure. I treat that differently than an external leak because internal contamination damages bearings and can ruin the engine quickly.
Safety Hazards
Oil on tires or brake components cuts traction and braking performance immediately. I wipe surfaces and inspect the wheels, brake discs, and pads whenever I find oil under the bike. Even a small smear on a tire can cause a slide on corner entry.
Leaking oil on the exhaust creates a fire risk and bad smoke that can impair vision. I check for oil dripping onto headers or mufflers and avoid riding until the leak stops. Night riding worsens the danger because I might not see slick patches in time to react.
I also consider roadside incidents: a sudden drop in oil pressure while riding can leave me stranded on a busy road or cause a crash. Spotting leaks before a ride reduces those risks.
Environmental Impact
Oil that drips onto streets or soil contaminates water and harms wildlife. I clean up spills promptly and use absorbent pads or kitty litter to prevent runoff into drains. Even small leaks add up over time and contribute to pollution.
Proper disposal matters. I collect used oil and contaminated rags in sealed containers and take them to a recycling center. That stops oil from entering storm drains and complies with local waste rules, avoiding fines.
When I maintain seals and tighten fittings, I reduce my bike’s environmental footprint and keep public spaces cleaner for other riders and pedestrians.
Common Signs of Motorcycle Oil Leaks
I watch for a few clear, reliable signs that tell me oil is leaving the engine: puddles or wet spots, a burning oil smell, and a falling oil level on the dipstick. These signs point to different leak sources and help me decide whether to inspect seals, plugs, or the oil filter next.
Visible Oil Spots Under the Motorcycle
Finding fresh dark spots under the bike is the most direct sign I look for. Park the motorcycle on a clean, flat surface and check for drops or a trail from the engine area to the ground. Look under the clutch cover, oil pan, drain plug, and around the oil filter—those are common leak points.
If spots are only on the rear tire or swingarm, the leak can be from the final drive or axle seals instead. Use a flashlight to trace where the oil first appears on the engine or frame. Clean the area with degreaser and run the engine briefly; new drips will show the exact source. For more on tracing leaks and cleaning the engine area, I reference guides from the Motorcycle Safety Foundation and manufacturer service manuals.
Burning Oil Smell
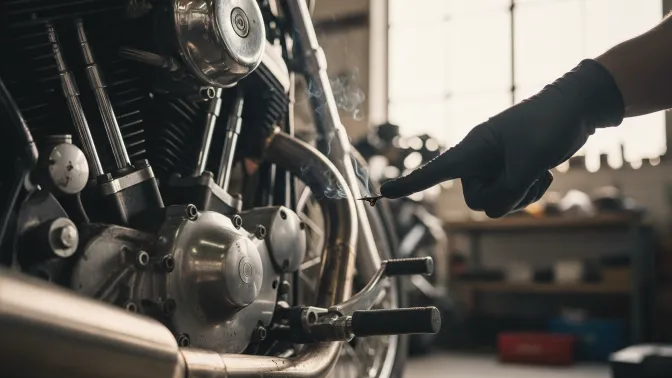
A strong oil-burning odor while riding signals oil is hitting hot engine parts. I pay attention if the smell appears after a short ride or when accelerating. Oil on the exhaust header, cylinder head, or hot frame parts will produce a distinct burnt scent and sometimes light blue-gray smoke.
To find the source, I stop when cool and inspect the exhaust, header flange, and rear of the engine for fresh oil residue. Tightening loose bolts or replacing a leaking valve cover gasket often stops the smell. If the exhaust shows heavy oil deposits, I treat it as higher priority because prolonged burning can damage exhaust components and increase fire risk. OEM service pages (such as from Honda or Yamaha) explain gasket and exhaust inspection procedures I follow.
Low Oil Levels
I check the oil level with the bike upright and warm, following the owner’s manual method. A consistently low reading on the dipstick or sight glass, after topping to spec, tells me oil is escaping somewhere. Note how quickly the level drops: a small slow loss often points to a minor seal leak or drain plug issue. A rapid loss suggests a larger breach or internal problem like a blown gasket.
I record oil use over a few rides and mark the date and miles. If I add more than a liter between services, I treat it as urgent. When levels fall and other leak signs are absent, I also inspect for oil mixing with coolant or excessive exhaust smoke, which can indicate internal engine failure and needs professional diagnosis.
How to Inspect Your Motorcycle for Oil Leaks
I focus on clean, close-up checks so I can spot oil where it shouldn’t be, listen for engine changes, and examine the bike’s underside. I use light, feel, and simple tools to find the source.
Visual Inspection Techniques
I start by cleaning the engine area with a rag and a degreaser so fresh leaks stand out. I then run the engine for 2–5 minutes to circulate oil and warm seals; warmth makes oil more visible.
I use a flashlight to scan these key areas:
- Gasket seams around the clutch cover and crankcase.
- Oil filter and drain plug for wetness or fresh drips.
- Oil lines and banjo bolts for seepage where hoses meet metal.
I touch suspect spots with a clean finger or paper towel to confirm oil rather than old grime. If I find wet oil, I mark the area with a small piece of tape and note whether it’s fresh (shiny, runny) or old (dry, crusty).
Listening for Unusual Sounds
I listen to the engine both idle and at slightly higher RPMs after a brief warm-up. I pay attention to ticking, knocking, or a sudden change in tone that can mean oil pressure problems.
A low oil level or leaking pressure can cause metallic clatter from lifters or valvetrain parts. I compare sounds to how the bike normally runs; a new or louder noise helps pinpoint when and where to inspect visually.
If I hear odd noises, I stop the bike and recheck the oil level and filter tightness. I avoid riding further until I confirm oil pressure and no active leaks, because continued operation can worsen damage.
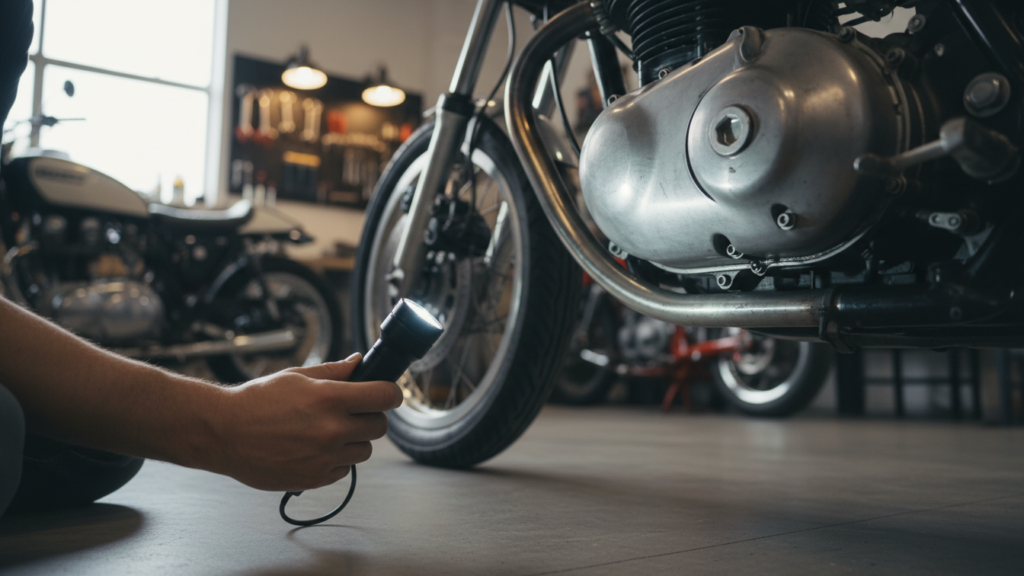
Checking the Undercarriage
I park on level ground and use a flashlight to inspect beneath the engine, frame rails, and centerstand area. I look for fresh drips on the ground and trace them upward to the leak source.
I examine the sump, skid plate bolts, and transmission case seams closely. I check areas where oil pools: behind the rear wheel, under the engine mount, and near the chain or shaft drive.
If I spot oil on bolts or fasteners, I clean the area and run the bike briefly to see where new oil appears. For hard-to-reach spots, I use a mirror or smartphone camera under the bike to get a clear view before deciding on a repair.
Key Areas Where Oil Leaks Commonly Occur
I focus on the parts that actually drip or let oil into places it shouldn’t. Check seals, fasteners, and visible lines first because they show the clearest signs of a leak.
Engine Gaskets and Seals
I start by checking the gaskets and seals around the engine because they handle a lot of heat and pressure. The crankshaft seals (front and rear main) and camshaft seals often harden or crack with age. A rear main seal leak usually shows oil between the engine and transmission bell housing or a steady drip under the center-rear of the engine.
Head gaskets and cylinder head seals can leak oil internally or externally. External leaks show oil pooling around the head or dripping near the exhaust. Internal leaks may cause oil in the cooling system or blue smoke from the exhaust.
What I look for: wetness, fresh oil beads, crusted oil residue, and the smell of burning oil. I clean the area, run the engine briefly, then recheck to track the source.
Oil Filter and Drain Plug
I always inspect the oil filter and drain plug because they are common, easy-to-fix sources. A loose or cross-threaded drain plug will drip from the oil pan seam. A stripped thread often leaves a slow, steady leak that worsens over time.
The oil filter can leak if it’s not tightened properly, if the gasket is damaged, or if oil spills during filter changes and pools. I check the filter base for wetness and look for oil on the lower frame or swingarm below the filter.
Quick checks: tighten the drain plug to spec, replace crush washers or use the correct gasket, and replace the oil filter with one that matches the model. After any service, I run the bike and recheck both parts.
Valve Cover
I inspect the valve cover and its gasket next because valve covers sit on top and often develop leaks at the gasket line. Heat causes the rubber or cork gasket to shrink and crack over time. On V-twin or twin-cylinder bikes, there may be two valve covers to check.
Leaks here typically appear as oil seeping down the cylinder head and frame. I look for wet oil around the cover edges, near the spark plug wells, and on the top of the engine. Oil in the spark plug wells can lead to misfires, so I treat that as higher priority.
If the cover bolts are loose, I torque them to spec. If the gasket is flattened or brittle, I remove the cover, clean the surfaces, and replace the gasket.
Oil Cooler Lines
I check oil cooler lines and fittings because they handle pressurized oil and are exposed to road debris. Rubber hoses age and crack; banjo bolts and fittings can loosen. A small pinhole in a hose often sprays oil and can be tricky to spot at a glance.
I trace lines from the oil filter or cooler to the engine and look for damp spots, blistering, or fresh oil spray on nearby components. Tightening fittings can stop some leaks, but I replace any hose with cracks or hardening immediately.
When replacing lines, I use OEM or high-quality braided hoses and new crush washers on fittings. After installation, I pressurize the system by running the engine and watch for leaks for several minutes.
Step-by-Step Guide to Diagnosing an Oil Leak
I will focus on cleaning the engine, using a UV dye to trace the leak, and watching the engine run to see where oil appears. Those steps let you pinpoint the leak source and decide whether you can fix it or need a shop.
Cleaning the Engine Surface
I start by removing loose dirt and oil so I can see fresh leaks. I use a degreaser made for engines and a stiff brush. Spray the degreaser onto the engine, let it sit for a few minutes, scrub the surfaces around the valve cover, oil pan, drain plug, oil filter, and head gasket, then rinse with low-pressure water or wipe with clean rags.
I dry the area with compressed air or towels. Pay special attention to seams, fasteners, and crevices where oil pools. I also place cardboard under the bike to catch drips and to help spot fresh oil during testing.
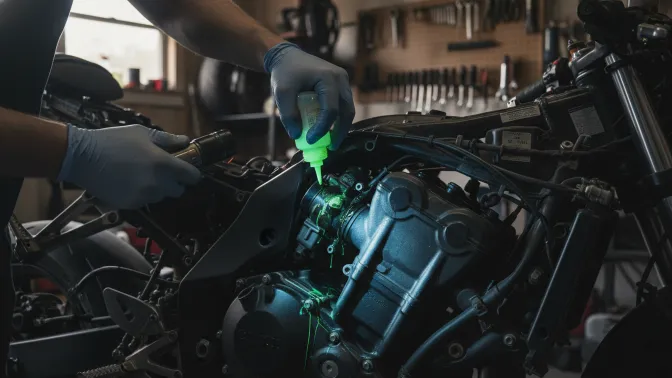
Applying UV Leak Detection Dye
I pick a UV dye compatible with motorcycle oil and the engine type. Add the dye into the engine oil through the oil fill or crankcase following the product dose. Use only the amount stated on the bottle; too much dye can hinder oil performance.
Run the engine briefly to circulate the dye, then shut it off and let it sit. Wear gloves and safety glasses when handling dye. The dye makes even small leaks visible under a blacklight, so it reveals slow seepage that might not show up as an obvious puddle.
Starting and Monitoring the Engine
I start the engine and let it idle for 5–10 minutes, watching for visible fresh oil or the dye glowing under the blacklight. Rev the engine gently a few times to increase oil pressure; some leaks show only under higher pressure. Check common leak points: oil filter base, drain plug, cam cover gasket, shaft seals, and mounting bolts.
I inspect again after a short ride, as vibration and heat expand gaps that open leaks. Use the blacklight in dark or shaded areas and photograph any glowing spots. If I find a leak at a gasket or seal, I note the exact location and severity before choosing repair or professional service.
Preventative Maintenance Tips
I focus on steady routines that stop leaks before they start: regular oil service, correct bolt torque, and close checks of seals and gaskets. Small, frequent checks save time and prevent costly repairs.
Regular Oil Changes
I change oil on the schedule in my owner’s manual and use the oil grade the manufacturer specifies. Fresh oil and a clean filter reduce sludge and pressure spikes that can push oil past seals. I also check the drain plug and crush washer each time and replace the washer if it looks flattened or damaged.
When I change oil I note the level and color, and I look for metal flakes or milky discoloration that can signal internal problems. I keep a simple record of dates, miles, and oil type. For guidance on oil grades and intervals, I consult the motorcycle maker’s website or a trusted source like the AMA (American Motorcyclist Association) for general advice.
Proper Fastener Torque
I tighten drain plugs, oil filter caps, and sump bolts to the torque values in the service manual. Over-tightening strips threads or crushes gaskets; under-tightening leaks. I use a calibrated torque wrench and set it to the exact value listed for each fastener.
I inspect threads and replace damaged bolts or washers. For aluminum engine cases, I use a torque pattern and small steps to avoid warping. If a bolt head shows rounding or corrosion, I replace it rather than risk improper torque later.
Inspecting Seals and Gaskets
I regularly inspect valve cover gaskets, crankcase seals, camshaft seals, and axle seals for hardening, cracks, or oil wetness. I run the engine briefly and look with a flashlight to find fresh seepage before it becomes a drip. Pay special attention to areas where parts join, like the base of the cylinder head and the oil pan seam.
If a gasket looks old or flattened, I replace it with the correct OEM or high-quality aftermarket part and use gasket sealant only when the manual recommends it. For parts and spec checks I reference manufacturer service pages or reliable repair guides such as those at Motorcycle Maintenance and Repair resources (example) to confirm part numbers and procedures.
What to Do If You Find an Oil Leak
I focus on quick safety steps, practical temporary fixes, and clear notes to show a mechanic. Act fast to avoid engine damage and keep records so repairs go smoothly.
Deciding Between DIY Repairs or Professional Help
I first check the leak source and scope. If oil drips from a loose drain plug, a cracked oil pan, or a failing gasket I can see and reach, I may tighten the plug or replace an easy-to-access gasket myself. I only attempt repairs when I have the right tools, a service manual, and a clean, level workspace.
I choose professional help when the leak is under the engine, at the clutch or transmission area, or when the repair needs lifting the bike or removing major parts. I also hire a pro if leaks persist after basic fixes, if the bike uses pressurized oil systems, or if I’m unsure about torque specs or sealant use.
Quick checklist I use:
- Visible, small leak + simple fix = DIY possible.
- Hard-to-reach source, major disassembly, or safety concern = professional.
Temporary Fixes to Minimize Damage
I stop riding the bike if the leak leaves steady puddles or the oil level drops quickly. Short rides can be risky, so I top off the oil to the recommended level to protect the engine for short moves only.
I use these temporary fixes:
- Tighten loose drain or oil filter fittings with correct torque.
- Clean the area with degreaser to monitor new leaks.
- Apply automotive-grade thread sealant or replace a leaking O-ring if I have the exact part.
- Use an oil catch pan and rags under the bike to prevent environmental damage.
I avoid overfilling oil or using questionable “stop leak” additives as a long-term solution. These fixes buy time to get proper parts or professional service without causing extra harm.
Documenting the Issue for Service
I photograph the leak from several angles and time-stamp each image with my phone. I also take a short video showing oil drops or wet areas to capture active leaks that might not show after cleaning.
I log important details:
- When I first noticed the leak and how fast the oil level fell.
- Oil type and last change mileage.
- Any recent work or impacts to the bike.
I bring photos, logs, and any parts I removed to the shop. Clear records speed diagnosis, reduce labor guesswork, and help me get accurate repair estimates.
Long-Term Solutions and Oil Leak Prevention

I focus on fixes that last and habits that stop leaks before they start. The steps below cover parts, oil choices, and inspection routines you can use to keep oil where it belongs.
Upgrading to Quality Gaskets
I replace worn gaskets with OEM or high-quality aftermarket parts that match my bike’s model and engine specs. Cheap gaskets often fail after a few heat cycles; I choose materials like multi-layer steel (MLS) for head gaskets or Viton for oil-resistant seals when appropriate.
When installing, I clean mating surfaces with solvent and a plastic scraper. I torque bolts in the manufacturer’s sequence and steps using a calibrated torque wrench. I also replace crush washers and O-rings on drain plugs and oil lines during service to prevent repeat leaks.
If a case half or cover was warped, I check flatness and have it resurfaced or replaced. These steps cost more up front but cut down repeat repairs and oil loss.
Choosing the Right Oil
I use the oil grade and viscosity the manufacturer specifies in the owner’s manual. Using the wrong viscosity can raise pressure and stress seals, or let oil flow where it shouldn’t. For older engines with loose tolerances, I might pick a slightly thicker oil within spec to reduce seepage.
I avoid stop-leak additives as a long-term solution. They can swell seals temporarily but may gum up oil passages or foul sensors. If I must use a seal conditioner, I follow product instructions and monitor oil condition closely afterwards.
I also change oil and filter at the intervals recommended for my riding style. Fresh oil keeps seals supple and reduces sludge that can hide leaks or clog breather systems.
Routine Inspections
I inspect my motorcycle for leaks every time I wash it and do a quick check after every ride during hot weather. I look under the engine, around the drain plug, oil filter, valve cover, and cam chain covers for fresh oil, not old stains.
I use a UV dye and lamp when a leak is small or intermittent; dye shows the source quickly without major disassembly. I keep a log of oil level drops between fills to spot slow leaks early.
I tighten fasteners to spec and replace any cracked hoses, brittle clamps, or degraded grommets. Regular inspections let me catch small issues before they turn into big repairs or engine damage.
FAQs
What should I do before inspecting for leaks?
I wash the motorcycle first so old grime doesn’t hide fresh oil. Then I run the engine briefly and park on clean cardboard to catch drips and pinpoint the source.
Which tools help find small leaks?
I use a flashlight, mirror, clean rags, and a spray bottle with water and detergent to break surface tension. For hard-to-see places, I use UV dye and a UV lamp; it shows oil paths clearly.
When is a leak a DIY fix versus needing a mechanic?
Small leaks from hose clamps or loose bolts I can usually tighten or replace. If the leak comes from seals, gaskets, crankcases, or internal parts, I recommend a mechanic to avoid engine damage.
How often should I check for oil leaks?
I check visually before every ride and do a more thorough inspection after long trips or after maintenance. Regular checks prevent low oil levels and costly repairs.
Conclusion
I recommend checking for oil leaks regularly and making it part of my routine after rides and before long trips. A quick visual check and a touch with a clean rag can tell me a lot in a minute or two.
I keep the engine area clean so fresh leaks show up easily. Running the engine briefly and using a flashlight helps me spot slow seepage I might miss when the bike is cold.
When I find a leak, I trace it to the source and decide if I can fix it myself or need a mechanic. Small issues like loose drain plugs or hose clamps are often simple fixes, while worn gaskets or seals may need professional attention.
I use a basic checklist: clean the area, run the engine, inspect with light, and mark any wet spots. That short routine saves time and prevents bigger problems down the road.
If I’m unsure about the cause or the repair, I get expert help rather than guessing. That protects the engine and keeps my bike safe to ride.