
You can check your motorcycle’s spark plugs with a few simple tools and a bit of care. Start by removing the plug cap, using a socket to lift the plug out, and inspecting the electrode and porcelain for wear, deposits, or damage. If the electrode is worn, gap is wrong, or heavy deposits cover the plug, the plug needs cleaning or replacement.
I’ll guide you step-by-step so you can spot common problems, avoid engine issues, and keep your bike running smoothly. Follow clear safety steps, use the right gap and torque when reinstalling, and you’ll save time and money on routine tune-ups.
Key Takeaways
- Use basic tools and safe steps to remove and inspect plugs.
- Look for wear, wrong gap, or heavy deposits to decide on cleaning or replacing.
- Reinstall with correct gap and torque to maintain engine performance.
Understanding Motorcycle Spark Plugs
I explain what spark plugs do, the common plug types you’ll see, and the clear signs a plug needs attention. Read these details to inspect, pick, and judge plugs with confidence.
Role of Spark Plugs in Engine Performance
I use spark plugs to ignite the air-fuel mix in each cylinder at the right moment. The plug creates a spark across a small gap when the ignition coil sends high voltage. That spark starts combustion, which produces the engine’s power and drives the piston.
A healthy plug gives steady, strong sparks that help the engine start quickly, idle smoothly, and accelerate without hesitation. If a plug fouls or the gap changes, the spark weakens. That causes misfires, rough idling, lower power, and worse fuel economy. Electrode shape, gap size, and material affect spark energy and longevity.
I check the plug’s condition and gap to confirm timing and combustion quality. Proper plug choice and maintenance keep emissions down and extend the life of coils and catalytic parts.
Types of Motorcycle Spark Plugs
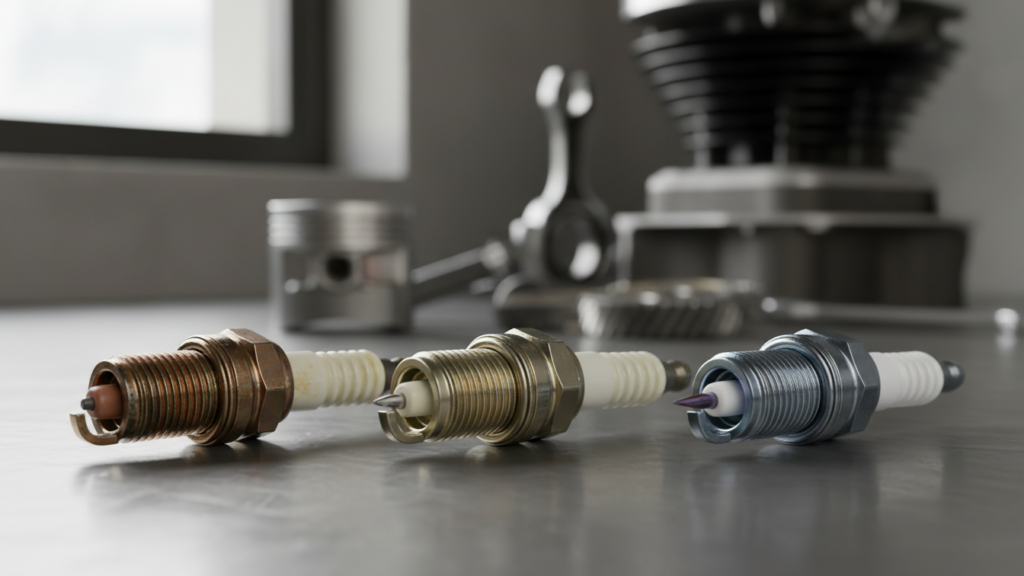
I see three common plug electrode materials: copper, platinum, and iridium. Copper plugs have thicker electrodes and conduct well, but they wear faster. Platinum is harder and lasts longer. Iridium has the smallest tip and the longest life, often used on modern bikes.
Plugs also differ by heat range and thread size. Heat range controls how fast a plug sheds burn-off heat. Use the heat range your bike manual specifies; too cold causes fouling, too hot causes pre-ignition. Thread size and reach must match the engine to seal the combustion chamber. Gapping varies by bike — many modern plugs come pre-gapped, but I always check with a feeler gauge.
I keep a small kit: correct replacement plugs, a gap tool, and anti-seize for shallow threads. That prevents damage and ensures reliable starts.
Signs of Spark Plug Wear
I inspect plug color and electrode shape to judge wear. Normal combustion leaves a light tan or grayish deposit on the insulator. A black, sooty deposit means a rich mixture or weak spark. Oily deposits signal oil entering the combustion chamber. White, blistered insulator or melted electrodes point to overheating or detonation.
Electrodes round off and gaps widen with use. If the gap grows beyond spec, spark strength drops and misfires rise. Cracked ceramic, corroded threads, or burned electrodes all mean replace the plug. Also watch for hard starting, rough idle, poor throttle response, and increased fuel use — these are performance clues tied to plug health.
I replace plugs on schedule and after severe symptoms to restore reliable ignition.
Preparing for a Spark Plug Check
I will make safety my top priority, gather the right tools, and find the exact spark plug location before I touch the engine. These steps save time and prevent damage or injury.
Safety Precautions
I always work on a cool engine. Hot parts can burn me and damage the plug threads if I force them. I wait at least 30 minutes after riding, or longer for high-performance engines.
I disconnect the battery negative terminal to prevent accidental sparks. If the bike has fuel injection, I also turn off the fuel valve or remove the fuel pump fuse to reduce fire risk. I keep a fire extinguisher rated for gasoline nearby when I work with ignition parts.
I wear gloves and safety glasses. Gloves protect my hands from oil and sharp edges, while glasses stop debris from getting into my eyes. I also work in a well-ventilated area to avoid breathing fumes and place rags under the bike to catch spilled fluids.
Required Tools and Materials
I prepare these basic tools: a spark plug socket (usually 5/8″ or 13/16″), a ratchet, and a 6–12″ extension. I use a torque wrench for reinstallation to avoid overtightening the new plug.
I keep a spark plug gap gauge, a wire brush or soft cloth, dielectric grease, and a thread chaser or anti-seize (only if the manufacturer allows it). I also have replacement plugs that match the bike’s make and model—check the owner’s manual or NGK/Denso catalog online for the correct part.
I set a clean tray or magnetic parts dish to hold small fasteners. If I plan to test for spark, I use an inline spark tester and insulated pliers. Having everything ready prevents mistakes and speeds the job.
Locating the Spark Plug on Your Motorcycle
I look at the cylinder head area for the plug well, usually under the ignition coil or connected to thick spark plug wires. On single-cylinder bikes the plug sits near the top center of the engine. On inline twins and multi-cylinder engines plugs line up on the cylinder head surface.
For modern bikes with coil-on-plug systems, I remove the ignition coil cover or unplug the coil to access the plug. For older bikes with plug wires, I pull the high-tension lead straight off by the boot, not by the wire.
If I can’t find the plug, I check the owner’s manual or the manufacturer’s service site (for example, Honda service information or the NGK technical pages). A model-specific diagram saves time and prevents damage from prying in the wrong place.
Removing Motorcycle Spark Plugs

I give the bike time to cool, disconnect the battery if needed, and gather a spark plug socket, ratchet, extension, anti-seize, and rags. I work in good light and keep parts organized to avoid cross-threading or dropping debris into the cylinder.
Disconnecting the Spark Plug Wire
I always pull the spark plug boot, not the wire. Grasp the boot firmly at its base, twist slightly, and pull straight off to avoid damaging the lead. If the boot is stuck, I use a pair of pliers with a rag to protect the rubber and twist while pulling.
Before I touch the plug, I disconnect the battery on bikes that are sensitive to accidental sparks. I also clean around the plug hole with compressed air or a shop rag to stop dirt from falling into the cylinder when the plug comes out.
If the bike has individual coil-on-plug units, I remove the coil mounting bolt first and lift the coil straight up. I label wires or take a photo when multiple leads are present to ensure correct reassembly.
Using a Spark Plug Socket Properly
I use a 5/8″ or 13/16″ spark plug socket with a rubber insert or magnetic ring to hold the plug. The rubber keeps the plug from falling when I lower it into a tight well. I attach an extension to reach deeply seated plugs.
I loosen the plug with steady, even pressure. If a plug is very tight, I break it loose with short, controlled motions rather than jerking. When removing, I turn slowly to avoid cross-threading. I always feel for the final threads to be smooth.
When installing, I hand-thread the plug two to three turns first. Then I torque to the manufacturer’s spec or use a measured quarter-turn method for new plugs. I apply a tiny amount of anti-seize on the threads only if the manual allows it.
Inspecting Spark Plug Condition After Removal
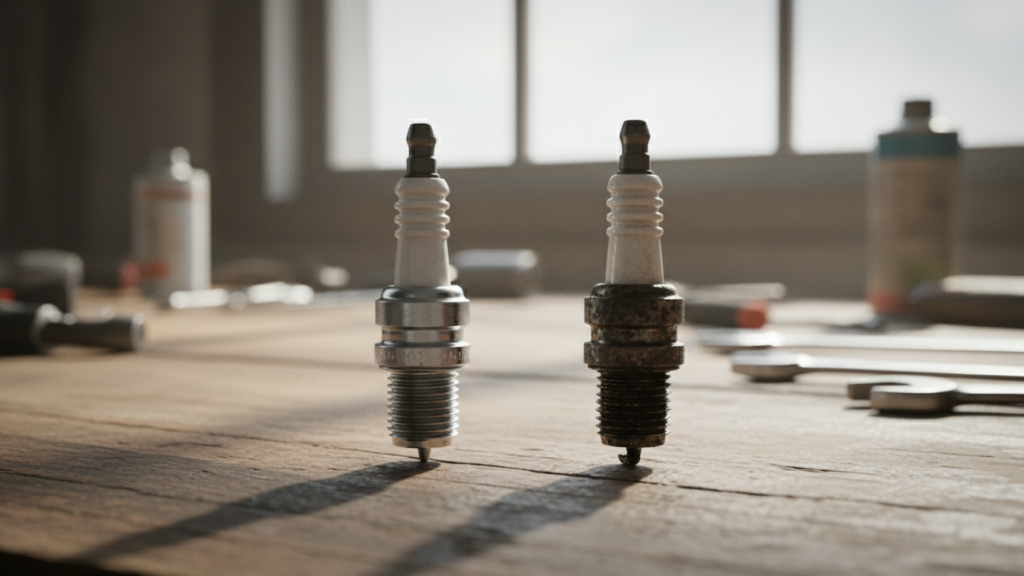
I hold the plug by the ceramic, not the electrode, and wipe off heavy oil or carbon with a rag. I compare the plug tip color and deposits to reference charts: light tan means normal, black and sooty indicates a rich mixture, and oily wet plugs suggest oil burning.
I check the electrode gap with a feeler gauge and compare it to manufacturer specs. If the gap is out of range or the electrode is rounded, I replace the plug. I also inspect the threads and ceramic for cracks or damage—any cracked plug gets replaced immediately.
If plugs show the same abnormal wear across cylinders, I investigate fuel, ignition timing, or valve issues. I record the plug condition and mileage for future reference and put each plug back in its original cylinder if I plan to reuse them.
Inspecting Spark Plug Health
I focus on the plug’s color, deposits, and electrode shape to judge condition. I look for black soot, wet oil or fuel, and uneven or rounded electrodes to decide if cleaning or replacement is needed.
Checking for Carbon Fouling
Carbon fouling looks like dry, black soot on the ceramic insulator and electrode. I clean light fouling with a wire brush and check ignition timing, air filter condition, and fuel mixture if soot returns.
If the deposit is thick and flaky, I replace the plug. Thick carbon reduces spark energy and can cause misfires and poor throttle response. I also check for a weak spark and inspect the ignition coil and leads when fouling recurs.
Use a gap tool after cleaning to confirm the electrode spacing matches the manufacturer spec. If the ceramic is cracked or the electrode is badly worn, replacement is safer than cleaning.
Identifying Oil or Fuel Contamination
Oil-fouled plugs have dark, wet-looking deposits that smear when touched. I see this when valve guides, seals, or piston rings leak oil into the combustion chamber.
Fuel-fouled plugs look wet and black after over-rich running or a stuck choke. I let the engine warm up, then recheck; transient wetting can clear after normal running.
If I find oil on a plug, I inspect the cylinder compression and look for blue smoke at the exhaust. With persistent fuel fouling I check carburetor float level or fuel injector operation and the air intake for leaks or blockages.
Examining Electrode Wear and Gap
Electrode wear shows as rounded or thinned center and ground electrodes. I measure the gap with a feeler or gap tool and compare it to the spec in my owner’s manual.
A larger-than-spec gap causes hard starting and misfires. A smaller gap weakens the spark and reduces power. If electrodes are eroded, pitted, or the gap can’t be set properly, I replace the plug.
I also check for uneven wear that can indicate ignition timing issues or a lean-running condition. New plugs restore reliable spark and consistent idle when wear is the problem.
Assessing When to Replace or Clean Spark Plugs
I look at mileage, riding style, and spark plug condition to decide if a plug needs cleaning or replacement. I focus on wear patterns, carbon or oil fouling, and the plug gap when making my call.
Evaluating Spark Plug Lifespan
I check the motorcycle owner’s manual for the factory interval. Many motorcycles need attention between about 3,000 and 10,000 miles depending on the engine and plug type. High-performance or small-displacement bikes often require earlier checks, while some modern iridium plugs can last much longer.
I track real-world signs too. If I notice poor starting, misfires, or a drop in fuel economy before the interval, I inspect the plugs sooner. I also consider my riding: short trips and stop-and-go traffic foul plugs faster than steady highway miles.
Interpreting Inspection Findings
I remove the plug and compare it to a reference chart or use these simple checks:
- Electrode wear: rounded or eroded center electrode means replacement.
- Color: light tan to gray = normal; black, sooty = rich or carbon fouling; oily = oil entering the combustion chamber.
- Deposits: heavy crust or melted ceramic = replace.
I measure the gap with a feeler or gap tool. If the gap is out of spec and the electrode is worn, replacing the plug is safer than attempting to re-gap. Small carbon deposits I clean with a wire brush or carb cleaner and re-check the condition.
Choosing Replacement Spark Plugs
I match the plug to the bike using the manual part number or a trusted parts lookup. I prefer OEM or high-quality aftermarket brands that list compatibility. Choose the correct heat range—the manual’s recommendation is usually best.
I pick plug materials based on use: copper for older bikes, platinum or iridium for longer life and stable gaps. I always torque new plugs to the specified value and set the gap to the exact measurement in the manual before reinstalling.
Reinstalling or Replacing Spark Plugs
I make sure the gap, torque, and wire connection are correct before I finish the job. A wrong gap, overtightened plug, or loose wire can cause poor running or damage.
Setting the Correct Spark Plug Gap
I check the gap with a feeler gauge or a gap tool specified for the plug and bike model. Most modern motorcycles list the gap in the owner’s manual or on a service sticker; common gaps range from 0.020″ to 0.040″ (0.5–1.0 mm).
If the gap is too small the spark can be weak; too large and the plug may misfire.
To adjust, I bend the ground electrode gently with the tool until the correct clearance reads on the gauge. I avoid touching the center electrode with pliers or hard tools to prevent damage.
If the plug is worn, rounded, or has damaged electrodes, I replace it rather than try to adjust the gap.
Properly Tightening the Spark Plug
I start by threading the plug in by hand to avoid cross-threading. If the plug is difficult to start, I back it out and realign before continuing.
Hand-tight plus a torque wrench to the manufacturer’s spec gives best results; typical torque values range from 10–25 Nm depending on bike and plug type.
If I don’t have a torque wrench, I snug the plug with a 1/8 to 1/4 turn after hand-tight for new plugs, and about 1/16 turn if the plug has a crush washer and is reused. I avoid overtightening because it can strip the head or crack the plug ceramic.
If the head is aluminum and threads feel loose, I stop and get a torque wrench or professional help.
Reconnecting the Plug Wire
I inspect the plug cap and wire for cracks, corrosion, or loose fittings before reconnecting. A dirty or damaged cap can cause weak spark or arcing.
I push the boot fully onto the plug until I feel or hear a click on modern boots, or until it seats firmly on older types.
If the wire uses a spring terminal, I make sure the spring sits evenly around the plug’s center electrode. I apply a thin film of dielectric grease inside the boot to repel moisture and ease future removal.
Finally, I start the engine and listen for steady idle and smooth throttle response to confirm a good connection.
Post-Inspection Steps

I will walk you through the key actions after inspecting spark plugs: making sure the bike starts cleanly and then watching how the engine behaves over the next ride. These steps confirm your inspection work and catch issues that need more attention.
Testing Motorcycle Startup
Reinstall the spark plug using the correct torque and a new gasket if required. I hand-thread the plug first to avoid cross-threading, then tighten with a torque wrench to the manufacturer’s spec. Reconnect the plug wire or coil and make sure the ignition kill switch is set to run.
Crank the engine and note how it starts. A good plug gives an immediate, strong start with steady revs at idle. If the engine hesitates, backfires, or needs choke longer than normal, I recheck the plug gap, wiring, and coil. If the plug looks fouled again after a short run, I compare its condition to plug-reading guides from manufacturers like NGK or Bosch for next steps.
If the bike won’t start, I pull the plug and check for a visible spark against the cylinder head (hold the plug boot securely). No spark points to ignition or wiring faults, not the plug itself. I then inspect the kill switch, fuse, and CDI/ECU connectors before replacing parts.
Monitoring Engine Performance Changes
I track engine behavior across the next 10–30 miles to confirm repairs. Pay attention to idle stability, throttle response, fuel smell, and fuel economy. Write down differences: quicker throttle response, smoother idle, fewer stalls, or improved MPG all signal successful maintenance.
Listen for misfires under load and check for uneven power at midrange RPMs. If I notice roughness only at high RPM, I test for clogged carb jets or fuel injector issues next. For persistent problems, I consult service manuals or trusted sites like the AMA for diagnostic steps (https://www.americanmotorcyclist.com).
Keep a log of plug appearance after each inspection. Recurrent carbon deposits, oil fouling, or overheating marks tell me whether to adjust air-fuel mix, replace valve seals, or inspect cooling systems. Regular monitoring helps me catch small issues before they become major repairs.
Maintenance Tips for Prolonging Spark Plug Life
I focus on simple, repeatable actions that prevent fouling and wear. Regular checks and using the right fuel cut down on misfires and keep engines running efficiently.
Regular Inspection Intervals
I inspect spark plugs every 3,000 to 6,000 miles on street bikes and after each race or track day for performance bikes. If your engine runs rich, idles poorly, or uses oil, I check plugs sooner. Visual checks take 5–10 minutes per plug.
When I remove a plug, I look for electrode wear, heavy carbon, oil fouling, and correct gap. I use a feeler gauge to confirm the gap matches the service manual and replace plugs showing rounded electrodes, deep deposits, or cracked porcelain. I torque new plugs to the spec—usually 10–20 ft‑lb for many motorcycles—to avoid damage.
I keep a small toolkit ready: socket with rubber insert, torque wrench, feeler gauge, and a wire brush for light cleaning. I record mileage and symptoms each time. This helps me spot trends before failure.
Using Recommended Fuel Types
I always use the octane rating and fuel type the manufacturer specifies. Using lower octane can cause detonation and overheating, which shortens plug life. Higher-than-necessary octane rarely helps and can be wasteful.
If my bike has a high-compression engine or forced induction, I choose the higher-octane fuel listed in the manual. For bikes with carburetors, I avoid ethanol blends above E10 when possible; ethanol can attract moisture and cause deposits. For fuel-injected bikes, I use a quality gasoline and add a fuel-system cleaner every 3,000–5,000 miles to cut deposit buildup.
I store fuel in a sealed container and run the bike occasionally during storage to prevent varnish. Clean, correct fuel reduces misfires and keeps spark plugs cleaner longer.
FAQs
Can I clean and reuse a plug?
Light carbon deposits can be gently cleaned with a brass brush, but deeply fouled or damaged plugs should be replaced. I replace plugs that show heavy wear, oil fouling, or a cracked insulator.
How do I read plug condition?
A normal plug shows a light tan or grayish color on the insulator. Black, oily, or white and blistered deposits each point to different issues like rich running, oil leaks, or overheating. I match symptoms to the plug’s appearance.
Is checking the gap important?
Yes. I check the gap with a feeler or gap tool and adjust to the manufacturer’s spec. A wrong gap can cause weak spark and poor performance.
What about safety?
I always work on a cool engine, disconnect the battery if needed, and avoid force when removing plugs. Proper care prevents damage to threads and ignition parts.
Conclusion
I showed simple steps to check motorcycle spark plugs so you can spot common issues fast. Visual inspection, gap checking, and testing for spark give clear clues about wear, fouling, or ignition faults.
If a plug looks damaged, cracked, or heavily sooted, I recommend replacing it rather than cleaning it. I also suggest checking your owner’s manual for the correct gap and replacement interval to keep performance and fuel economy steady.
Keep basic tools in your kit: a socket, gap gauge, wire brush, and a plug tester or multimeter. Regular checks every few thousand miles or when you notice rough idle or hard starts help prevent bigger engine problems.
I trust this guide makes the checks less confusing and helps you feel more confident doing routine maintenance. If you follow these steps, your bike will run cleaner and start more reliably.