

You want your bike to start on the first warm day, not after a long battle with a dead battery. Keep the battery charged, store it in a cool dry place or on a smart charger, and check it every few weeks to prevent sulfation and freeze damage. I’ll show simple steps that save time and money so you can ride when the weather lets up.
Winter care does not need to be complicated. I explain how to pick the right charging gear, how to store the battery safely, what quick checks to do during cold spells, and when it’s smarter to replace the battery than try to revive it. Follow the short, clear steps that fit into your routine and protect your bike all season long.
Key Takeaways
- Keep the battery topped up and use a smart charger or tender.
- Store the battery in a dry, moderate-temperature spot if you remove it.
- Check voltage and terminals regularly and replace weak batteries before cold sets in.
Understanding Motorcycle Battery Types
I explain why battery chemistry matters for cold starts, storage, and how much maintenance each type needs. You’ll learn which batteries handle low temperatures better and what I do differently for each.
Lead-Acid vs. Lithium-Ion Batteries
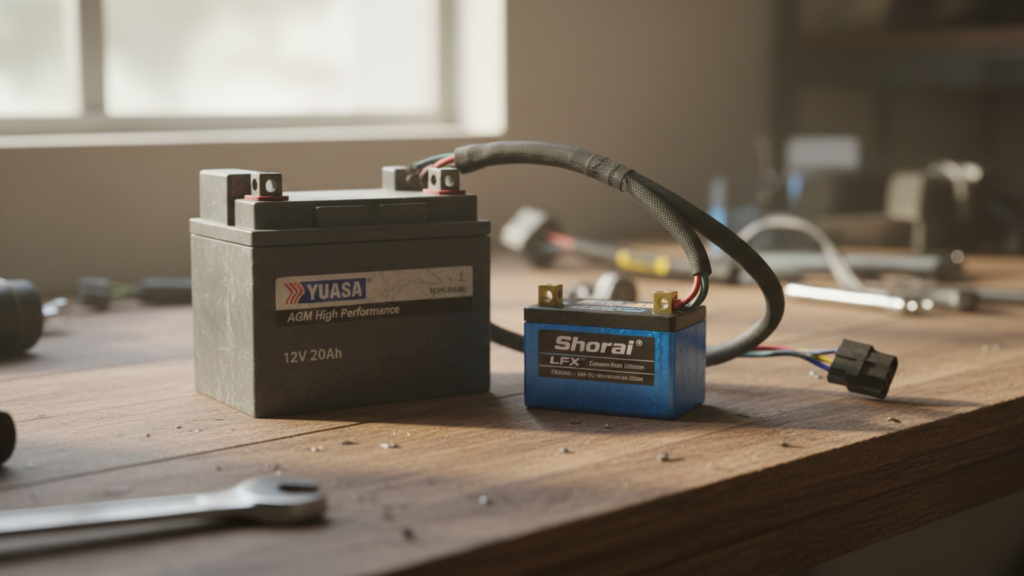
Lead-acid batteries (flooded, AGM, or gel) use heavy plates and liquid or absorbed electrolyte. They deliver strong cold-cranking amps (CCA) at a low cost, but cold slows their chemical reactions and lowers capacity. Flooded cells need fluid checks; AGM and gel are sealed and resist vibration better. These batteries self-discharge faster in storage, so they need more frequent charging.
Lithium-ion (LiFePO4) batteries weigh less and hold charge longer. They keep voltage steadier in cold weather but can lose effective capacity at very low temps and may need a battery management system (BMS). Li-ion gives consistent starting power and faster recovery after charging, but cost is higher and some chargers are incompatible.
Battery Maintenance Requirements
For lead-acid I check specific gravity or electrolyte levels monthly if the battery is removable. I clean terminals, tighten clamps, and apply dielectric grease to reduce corrosion. I keep them on a smart float charger or tender during storage to prevent sulfation and loss of capacity.
For lithium-ion I still check terminals and BMS status, but I don’t top up fluids. I store Li-ion at about 40–60% charge in a cool, dry place and avoid full storage charge that stresses cells. I use a charger designed for LiFePO4 to prevent overcharge and monitor voltage monthly.
Preparing Your Motorcycle Battery for Winter
I focus on three key steps: clean the terminals, inspect the battery case and cables for damage, and check electrolyte or maintenance-free status. Doing these tasks now prevents corrosion, slow drains, and costly replacements.
Cleaning Battery Terminals
I always start with the negative (-) terminal first, then the positive (+). I wear gloves and eye protection. I disconnect the cables and use a wire brush or terminal cleaner to remove white or green corrosion until the metal looks shiny.
If corrosion is stubborn, I mix baking soda with water and apply it to neutralize acid, then rinse with a little water and dry with a cloth. I avoid soaking other parts of the bike. After cleaning, I apply a thin coat of dielectric grease or a terminal protector to slow future corrosion.
I reconnect the positive terminal first, then the negative. Tighten the clamps snugly but don’t over-torque them. For step-by-step photos and safety tips, I reference battery-safety guidance from manufacturers like Battery University or the Motorcycle Safety Foundation.
Inspecting for Damage
I visually inspect the battery case for cracks, bulges, or leaks. Any swelling or fluid seepage means the battery is unsafe; I replace it rather than risk failure in cold weather. I check the cable insulation for cuts, exposed wire, or loose connectors.
I also wiggle the terminals and cable ends to ensure a firm fit; a loose connection can mimic a dead battery. If I find rust on hold-down brackets or a loose tray, I clean and tighten those fasteners. For sealed or lithium batteries, I consult the owner’s manual for specific signs of damage and warranty tips from the OEM.
Checking Electrolyte Levels
For lead-acid batteries with removable caps, I remove caps and inspect each cell. The plates should be covered by fluid. If any cell shows low fluid, I add distilled water only until the plates are just submerged. I avoid overfilling.
I check specific gravity with a hydrometer if I want a precise state-of-charge reading. For sealed, maintenance-free, or AGM batteries, I do not open cells. Instead, I test voltage with a multimeter; a resting voltage under about 12.4 V signals the need for charging or replacement. For detailed procedures and safety rules, I refer to resources like the SAE or manufacturer manuals.
Storage Best Practices During Cold Months
I keep the battery charged, stored in a dry, cool place, and protected from big temperature swings. These steps reduce sulfation, prevent freezing, and make sure the bike starts reliably in spring.
Removing the Battery from the Motorcycle
I disconnect the negative (-) terminal first, then the positive (+) to avoid sparks. I use the right tools and wear gloves; some batteries have built-in handles or straps that make removal easier.
Once out, I clean the terminals with a wire brush and a little baking soda solution if there is corrosion. I dry the battery completely before storing it. If the battery is sealed (AGM or gel), I still check for cracks or swelling and replace it if damaged.
I label the battery or take a photo of its orientation so I reinstall it correctly. I cap the terminals or cover them with nonconductive tape to prevent shorts while handling or storing.
Choosing the Right Storage Location
I store the battery indoors on a shelf above floor level to avoid cold floors and possible flooding. A closet, utility room, or heated garage works well if temperatures stay between 32°F and 77°F (0–25°C).
I keep the battery away from direct sunlight, heat sources, and devices that produce sparks. I place it on a nonmetallic surface—plastic tray or wooden board—to prevent accidental grounding.
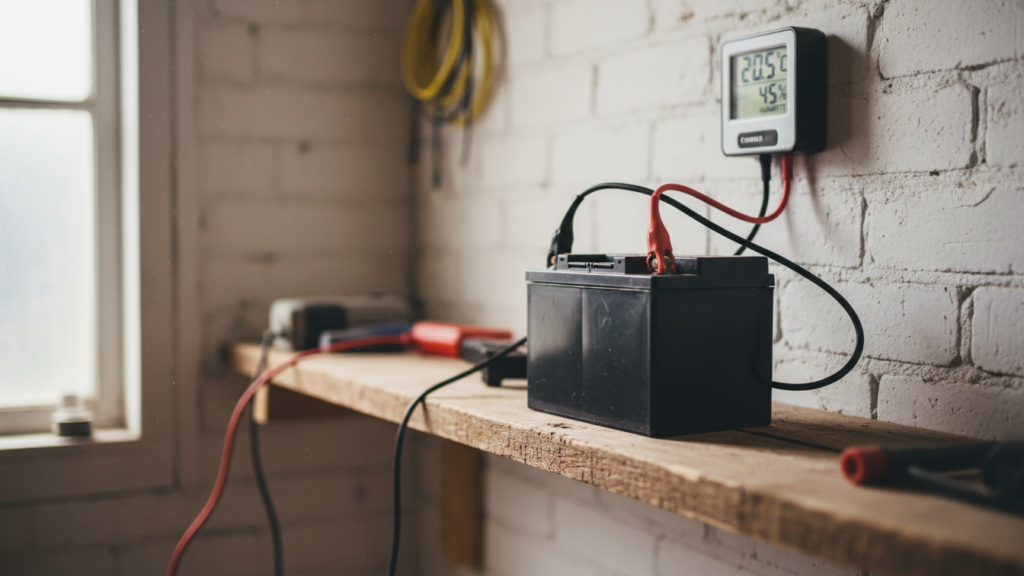
If I expect long storage, I connect a smart battery tender that maintains a float charge. I plug the tender into a GFCI outlet and use a tender rated for my battery chemistry (lead-acid vs. AGM).
Protecting Against Moisture and Temperature Fluctuations
I use a breathable cover or brown paper wrap to protect against dust and light moisture while allowing some air flow. I avoid sealed plastic bags that trap humidity and can cause corrosion.
I check the battery weekly for surface moisture, condensation, or temperature swings. If the room gets below freezing, I move the battery to a warmer spot or add a small space heater with a thermostat to keep temperatures stable.
I monitor charge level with a multimeter or the tender’s indicator and recharge to full if voltage drops below 12.4V for a 12V battery. Keeping the battery charged reduces sulfation and the risk of capacity loss.
Proper Battery Charging Techniques
I focus on the exact steps and tools that keep a motorcycle battery healthy through cold months. You will learn how to charge slowly, maintain charge safely, and prevent damage from too much voltage.
Using a Trickle Charger
I recommend a trickle charger when I store a bike for weeks or months. A trickle charger supplies a low, steady current (typically 0.5–2 amps) that brings a battery to full charge without heating it. This prevents sulfation and keeps the battery at a safe state of charge.
Before connecting, I clean the terminals and check electrolyte levels on serviceable batteries. I attach the charger clamps to the correct terminals—positive to positive, negative to frame or battery ground—and I avoid connecting directly to metal parts that can short.
I check the charger gauge periodically. If the charger has no automatic shutoff, I remove it once the battery reaches full voltage (about 12.6–12.8V for a resting lead-acid battery). For sealed AGM or gel batteries, I follow the manufacturer’s voltage recommendations to avoid damage.
Utilizing a Battery Tender
I use a battery tender for long-term storage because it combines charging and float maintenance. A tender senses battery voltage and switches to a low float current when the battery is full, usually keeping voltage around 13.2–13.6V for lead-acid types. This prevents both undercharge and overcharge.
I choose a tender matched to my battery type and size. Smart tenders often have settings for standard lead-acid, AGM, and lithium batteries. I connect the tender the same way as a charger, and I leave it on for the whole off-season if the bike sits in a cool place.
If I must start the bike occasionally, I disconnect the tender first. I also inspect the tender’s indicator lights to confirm charging status and wiring integrity. Proper tender use minimizes the need for full charging cycles and extends battery life.
Avoiding Overcharging
I prevent overcharging by using smart chargers or tenders with automatic shutoff or float modes. Overcharging raises battery temperature and can evaporate electrolyte or warp plates, shortening battery life.
I monitor charging voltage and current. For typical 12V lead-acid batteries, I keep bulk charging below 14.8V and float around 13.2–13.6V. For AGM, I follow the maker’s spec—AGM often tolerates slightly higher absorption voltages but needs careful float control.
If a manual charger has no automatic control, I set a timer and check the battery voltage with a meter. I never leave a manual charger attached unattended for long periods. If the battery gets hot or the electrolyte level drops, I stop charging immediately and inspect for faults.
Periodic Battery Maintenance Throughout Winter
I check the battery every 1–2 weeks and record voltage and charging actions. My focus is on keeping the battery at proper charge and catching drops early so the battery stays healthy.
Regular Battery Charge Checks
I use a smart maintainer or trickle charger whenever the bike sits for more than a week. I attach the charger per the manufacturer’s instructions: positive to positive, negative to negative, and I prefer a maintainer with automatic float mode to avoid overcharging.
I look for these signs when I inspect the charger and battery: charger LED shows “float” or “charged,” no excessive heat at the battery case, and clean terminal connections. If the charger indicates a fault or the battery runs warm, I stop charging and test the battery separately.
I keep a log with date, resting voltage, and charger time. That record helps me spot a slow self-discharge or a failing cell before it leaves me with a dead battery.
Monitoring Voltage Levels
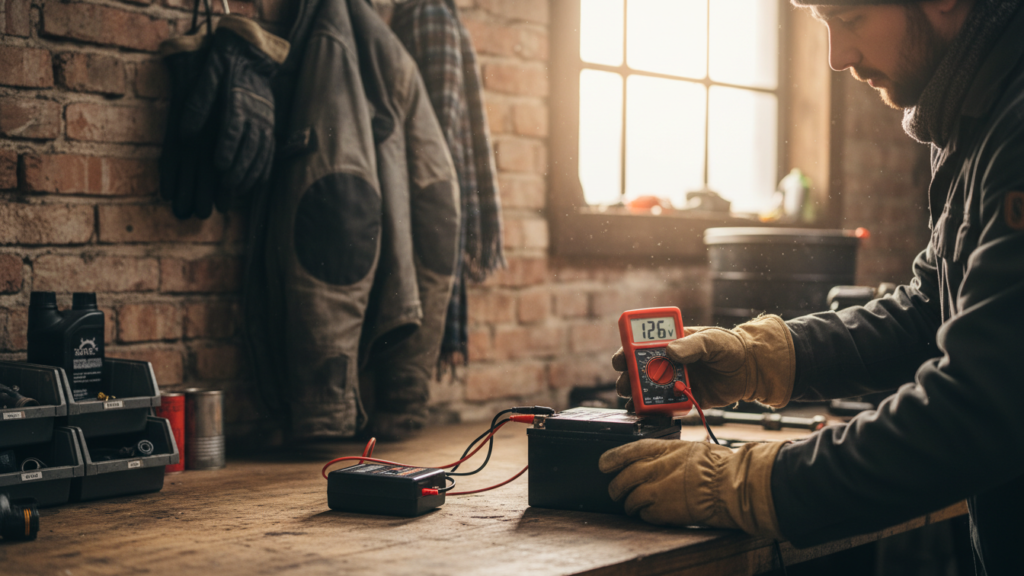
I measure resting voltage with a digital multimeter after the bike has been off for at least one hour. A healthy 12V lead-acid battery shows about 12.6–12.8 volts at rest. If I see 12.4 V or lower, I consider a full charge and further testing.
I also check under-load voltage when possible. Cranking voltage should not drop below about 9.6 V on a cold start for a healthy battery. If it does, I plan a capacity test or replacement.
I keep a simple table in my notes:
- Resting voltage: 12.6–12.8 V = Good
- Resting voltage: 12.4–12.6 V = Top up charge
- Resting voltage: <12.4 V = Full charge + test
Regular checks and quick action on low readings prevent freeze damage and loss of capacity.
Signs of Battery Problems in Cold Weather
Cold makes battery issues show up quickly. I will point out the main warning signs to watch for so you can act before damage gets worse.
Difficulty Starting the Motorcycle
If the engine cranks slowly or not at all, the battery is likely weak. In cold weather a healthy 12.6V lead-acid battery still struggles; if my starter turns over very slowly or I hear a single click, I check battery voltage with a multimeter first. A reading under about 12.4 volts when the bike is at rest means the battery needs charging or testing.
Short rides in winter often fail to recharge the battery, so I look for repeated hard starts after two or three rides. I also note if lights dim noticeably when I try to start; that shows the battery can’t supply required current. If charging doesn’t fix the problem, I inspect for a failing cell or excessive sulfation and consider load testing or taking the battery to a shop like an auto electrical specialist or using guidance from Battery University for testing methods.
Corrosion and Discoloration
White or greenish powder around terminals signals corrosion, which raises resistance and reduces charging efficiency. I regularly inspect the positive and negative posts for buildup and clean them with a baking soda solution and a wire brush if needed. I wear gloves and avoid getting solution inside the battery case.
Discoloration, cracked casings, or dried electrolyte stains mean the battery has been stressed or frozen. If I see bulging or hairline cracks, I remove the battery and store it indoors; continued use risks leaks and permanent damage. For guidance on safe handling and corrosion prevention, I consult resources like the Motorcycle Safety Foundation and manufacturer service manuals.
Battery Replacement Considerations
I focus on picking the right battery size, type, and cold-cranking ability for reliable winter starts. I also handle safe disposal and recycling to meet legal and environmental rules.
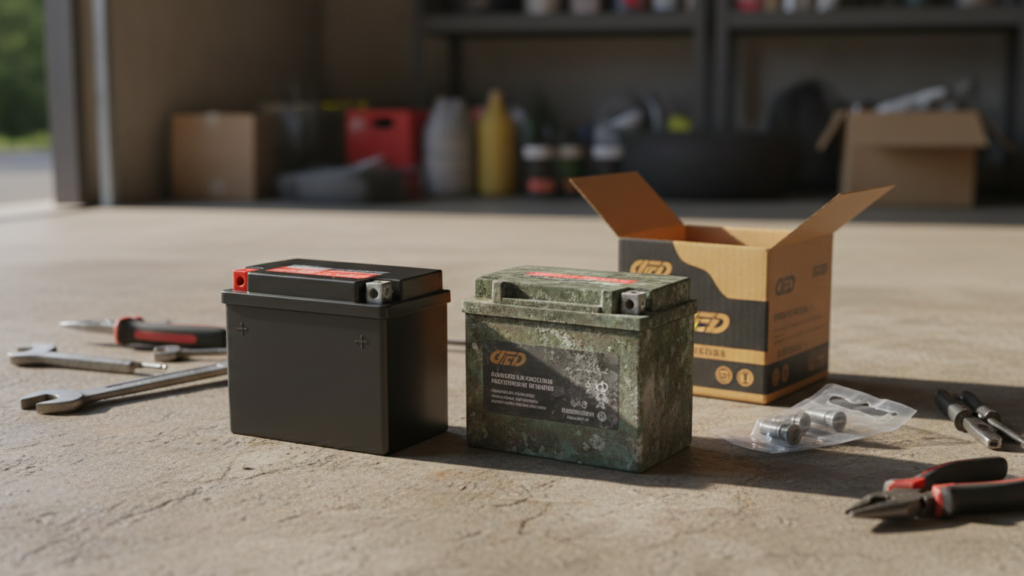
Choosing the Right Replacement
I match the battery group size and terminal layout to my motorcycle’s manual to avoid fit and wiring problems. I check reserve capacity (minutes) and cold cranking amps (CCA); for cold climates I choose a battery with higher CCA to ensure strong starts in low temperatures. I prefer AGM or lithium options over standard flooded lead-acid for better cold performance and lower self-discharge, but I confirm my bike’s charging system supports lithium before switching.
I look at warranty length and brand reputation. A 2–4 year warranty and clear cold-weather specs matter. Before buying, I compare dimensions, polarity, and whether the battery needs initial charging or a smart charger for storage.
Disposal of Old Batteries
I treat old motorcycle batteries as hazardous waste because they contain lead and acid. I never throw them in household trash. I take the battery to a certified recycler, an auto parts store that accepts batteries, or a municipal hazardous waste center.
I drain and store the battery upright in a sealed plastic container while transporting, and I wear gloves and eye protection if there’s visible corrosion. Many retailers offer a core credit when you return your old battery, which lowers the cost of a replacement.
Preparing the Battery for Spring Use
I start by inspecting the battery and terminals for corrosion, cracks, or swelling. I clean terminals with a wire brush or baking soda paste and rinse with water, then dry completely.
I check the state of charge with a multimeter or a charger that shows voltage. A healthy 12V lead-acid battery reads about 12.6–12.8V at rest; anything below 12.4V needs charging.
I use a smart charger or battery tender to bring the battery to a full charge. These devices top off slowly and prevent overcharging, which helps avoid sulfation and prolongs life.
If the battery is removable, I test it under load or take it to a shop for a professional load test. Load testing shows if the battery can hold voltage while under stress and reveals cells that may be failing.
I inspect fluid levels on serviceable batteries and add distilled water only if needed. I never overfill; keep levels below the vent wells and wipe away spills.
I check mounting hardware and wiring for tightness and any signs of wear. Loose connections and frayed wires can cause charging problems or sudden failure.
Quick checklist:
- Clean terminals and dry them.
- Measure resting voltage.
- Fully charge with a smart charger.
- Perform a load test if possible.
- Top up distilled water for non-sealed batteries.
- Secure mounts and wiring.
After these steps, I reinstall the battery and confirm the bike starts and the charging system charges properly on a short ride.
FAQs
How often should I charge the battery?
I charge mine every 2–4 weeks with a smart charger. This prevents sulfation and keeps the battery ready without overcharging.
Can I use a regular charger instead of a smart charger?
You can, but a regular charger risks overcharging if left too long. I prefer a smart charger because it switches to maintenance mode automatically.
Will cold weather permanently damage my battery?
Extended low charge in cold weather can shorten battery life. Keeping the battery fully charged and using a tender reduces that risk.
What about cleaning and checking the battery?
I clean terminals and inspect for corrosion before storage. A quick voltage check with a multimeter helps me decide if the battery needs charging or replacing.
How do I know when to replace the battery?
If the battery won’t hold a charge after repeated charging or shows low resting voltage, I replace it. Age, frequent hard starts, and visible damage also signal replacement.
Conclusion
I recommend keeping the battery charged and clean before and during winter. A full charge slows down chemical wear and cuts the chance of freezing.
I use a smart charger or battery tender when the bike sits for days or weeks. These devices maintain charge automatically and protect against overcharging.
If I store the bike, I remove the battery when possible and keep it in a cool, dry spot above freezing. I also check fluid levels on serviceable batteries and clean terminals to prevent corrosion.
I avoid short cold trips that never let the battery recharge fully. Those rides stress the battery and speed up sulfation.
Quick checklist:
- Charge to full and hook up a smart charger.
- Clean and inspect terminals and cables.
- Remove and store the battery indoors if possible.
- Check fluid levels on non-sealed batteries.
Following these simple steps keeps the battery healthy and ready for spring. I find maintenance now saves time and money later.