
You want your bike to run smoothly and keep you safe on long rides. Check tires, brakes, chain/drive, lights, and fluid levels, and fix any worn parts before you leave. A thorough pre-ride service and a quick checklist will cut breakdown risk and make long miles comfortable and less stressful.
Pack smart, secure luggage, and tune your suspension and seating for comfort so you can ride longer without fatigue. Carry basic tools, spare parts, and clear route and paper/digital documents so you can handle minor repairs or paperwork on the road.
Key Takeaways
- Inspect and fix worn parts and fluids before you leave.
- Set up comfort and luggage so you can ride longer without strain.
- Carry tools, spares, and clear route plans for quick fixes and smoother travel.
Inspect and Maintain Essential Motorcycle Components
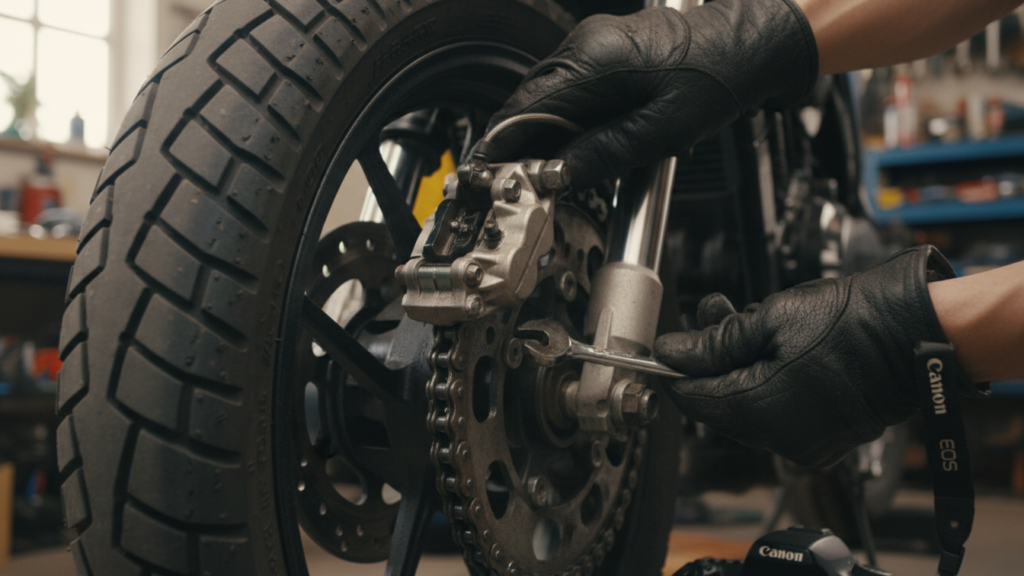
Check tire pressure, tread depth, brakes, chain condition, and lights. Fix any wear, leaks, or loose parts before you ride.
Check Tire Pressure and Tread
Use a reliable tire gauge when tires are cold. Inflate to the pressure listed on the swingarm or owner’s manual, not the maximum on the sidewall. Correct pressure improves handling, fuel economy, and tire life.
Scan the tread for uneven wear, cuts, bulges, or embedded objects. Measure tread depth: many tires need replacement under 1.6 mm (check your manual for exact spec). Replace both tires if one is old and the other shows similar age or mileage.
Also inspect the valve stems and caps. Tighten or replace a leaking valve and carry a spare tube or repair kit if your wheel requires it.
Assess Brake System Function
Check brake lever and pedal feel; they should be firm with consistent travel. Squeeze the lever and note any sponginess or drag—those are signs to bleed the system or inspect for leaks.
Look at brake pads through the caliper opening. Replace pads if the friction material is 2 mm or less, or if wear indicators show. Inspect rotors for warping or deep grooves and check rotor thickness against the spec in your manual.
Examine brake lines for cracks, swelling, or fluid leaks. Top up fluid to the correct level with the specified DOT type and note the last fluid change. If in doubt, have a pro perform a full brake bleed and inspection.
Inspect Chain and Sprockets
Clean the chain of grime with a chain cleaner and a brush. Rotate the wheel to inspect each link for tight spots, rust, or kinking. A stiff link needs attention or replacement.
Check chain slack at the midpoint of the swingarm travel. Adjust to the range listed in your manual—too tight strains bearings, too loose risks derailing. Lubricate the chain after cleaning, using a chain lube suited for your riding conditions.
Examine sprockets for hooked or worn teeth. If teeth look sharp, hooked, or uneven, replace both sprockets and the chain as a set to keep gear life balanced.
Test Headlights and Indicators
Turn on low beam and high beam to confirm both bulbs light and switch cleanly. Replace any dim or flickering bulbs and check beam alignment with a wall or service spec so you don’t blind other drivers.
Operate all turn signals and hazard lights. Replace burned-out bulbs or an LED module if a signal fails. Check the horn and brake light too; they are critical for safe communication on long rides.
Inspect wiring around the headlight, switches, and connectors for corrosion, chafing, or loose plugs. Secure loose wires with zip ties and carry spare fuses and bulbs on long trips.
Prepare Engine and Fluids
Keep the engine and fluid systems healthy to prevent roadside failures and maintain steady performance. Focus on oil condition, coolant level and quality, and hydraulic fluids for brakes and clutch.
Check Engine Oil Level and Quality
Check oil when the engine is warm and the bike is on level ground. Use the dipstick or sight glass to confirm the level sits within the maker’s recommended range. Top up only with the grade specified in your owner’s manual.
Inspect the oil color and smell. Fresh oil is amber; dark, gritty oil or a burnt smell means change it before a long ride. Also check for milky oil, which can indicate coolant contamination and needs immediate service.
Change the oil and filter if you’re near the service interval or if the oil looks degraded. Use OEM or high-quality synthetic oil for better thermal stability on long trips. Keep a spare quart and a small funnel in your luggage for emergency top-offs.
Inspect Coolant and Radiator
Check coolant level in the overflow tank and radiator when the engine is cold. The level should sit between the low and full marks. Use the exact coolant type specified by the manufacturer to avoid corrosion or boiling issues.
Look for leaks, swollen hoses, or soft spots. Squeeze hoses gently to check firmness; replace any brittle or soft hoses. Clean the radiator fins with low-pressure water or a soft brush to remove bugs and debris that reduce cooling efficiency.
If coolant is old (check service interval), flush and replace it. Properly mixed antifreeze and water (often 50/50) raise boiling point and prevent freezing. For more on coolant care, see resources from the Motorcycle Safety Foundation and manufacturer service guides.
Top Off Brake and Clutch Fluids
Check brake and clutch reservoirs for correct fluid levels and clean fluid. Fluid should be clear or slightly amber; dark, cloudy fluid means moisture contamination and reduced braking performance. Replace contaminated fluid immediately.
Use the brake fluid type specified (DOT 3, 4, or 5.1); never mix DOT 5 silicone with DOT 3/4 systems. Tighten reservoir caps and ensure seals and sight windows are clean to spot leaks quickly. Bleed lines if you notice spongy levers or a soft pedal feel.
Bring a small sealed bottle of the correct fluid and a simple bleed kit if you can perform roadside maintenance. For DOT fluid specs and safety data, consult manufacturer recommendations or the SAE standards page.
Optimize Luggage and Storage
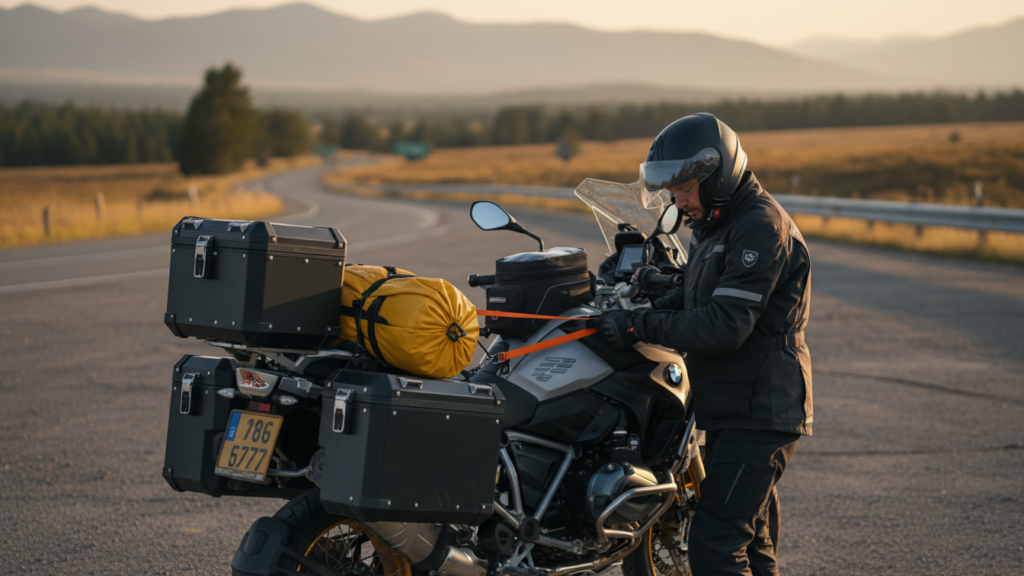
Keep luggage low, tight, and secure. Use hard or lockable soft cases for valuables and keep tools and rain gear within easy reach.
Secure Luggage Systems
Choose mounting hardware rated for your bike and weight. Use pannier racks that bolt to the frame or subframe and fasten top bags with quick-release mounts or cam straps. For soft luggage, attach at multiple points: lower straps to the rack, upper straps to passenger footpeg mounts or subframe loops. Add a cargo net or additional straps over the top bag to stop forward or lateral slip.
Lock or waterproof your main bags. Use keyed locks on hard cases and a waterproof dry bag inside soft luggage. Check fasteners after the first 20 miles and every fuel stop.
Balance Weight Distribution
Keep most weight low and centered. Place heavy items like tools, spare tubes, and battery packs in panniers near the bike’s centerline and as low as the rack allows. Light, bulky items—sleeping bag, clothes—go on the top or in a tail bag.
Aim for symmetry: equal weight left and right. If one pannier must be heavier, counterbalance with an item in the opposite bag or move clothing inside your tank bag. Small shifts in weight change handling, so test ride with a loaded bike at low speed and adjust before highway miles.
Pack Essential Tools
Carry a compact toolkit matched to your bike’s fasteners. Include: a set of combination wrenches (metric or SAE as needed), a multi-bit screwdriver, adjustable wrench, spark plug socket, tire irons, and a compact pump or CO2 inflator. Add a tire repair kit with plugs and a small can of sealant for tubeless tires.
Bring electrical tape, zip ties, spare fuses, and a roll of chain lube. Store tools in labeled pouches inside a pannier or tank bag pocket for quick access. Practice using the tools at home so you can make roadside repairs confidently.
Enhance Comfort for Long Rides
Small adjustments to your seat, bars, and grips plus the right riding clothes cut fatigue and soreness. Focus on fit, pressure points, and vibration control so you stay alert and comfortable for hours.
Adjust Seat and Handlebar Position
Move your seat or add a pad so your hips sit level and your knees bend about 90 degrees at the peg. If you sit too far forward you’ll overload your wrists; too far back strains your lower back. Try small changes: slide the seat 1–2 cm forward or back, then ride 15–30 minutes to test.
Raise or lower the handlebars so your shoulders aren’t hunched and your elbows remain slightly bent. Use handlebar risers or swap to a different bend if needed. Check reach: you should grip without locking your elbows and still easily operate controls.
Consider a gel or memory-foam seat cushion for pressure relief. Secure any added padding so it won’t shift while riding. Take notes of each change so you can return to the best setup later.
Install Comfort Grips
Choose grips with thicker diameter (about 1–2 mm larger than stock) to reduce hand cramping. Look for dual-density rubber or gel cores that absorb vibration without becoming too soft.
Install heated grips if you ride in cold weather; they reduce stiffness and let you use lighter gloves. Match grip length and throttle tube type to your bike—some models need a new throttle tube to fit aftermarket grips.
When fitting grips, use proper adhesive or grip glue and ensure the throttle returns freely. Test for slip and vibration on a short ride before a long trip.
Wear Appropriate Riding Gear
Pick a helmet with good ventilation and a snug fit to reduce neck fatigue. A lighter, well-vented full-face helmet can cut wind buffeting on long rides.
Choose a jacket with CE-rated armor and mesh panels or zip vents for airflow. Layer with a moisture-wicking base layer; it keeps you dry and helps regulate temperature.
Use gloves with padded palms and pre-curved fingers to reduce numbness. For seats and legs, wear riding pants with stretch panels and armor, and consider breathable touring boots that support your ankles without being stiff.
Test Electrical and Safety Systems
Make sure the bike starts reliably, lights work, and all safety gear and warning systems function before you leave. Focus on battery condition, charging behavior, fuse integrity, and wiring that could fail on the road.
Verify Battery Health
Check the battery voltage with a multimeter. A healthy, fully charged 12V battery should read about 12.6–12.8 V at rest. If it reads 12.2 V or lower, charge it and test again.
Load-test the battery if you can. Turn on the headlights and press the electric starter; voltage should not drop below 10 V while cranking. If it does, the battery may not hold a charge and could fail on a long ride.
Inspect terminals and cable clamps for corrosion, loose fittings, or green/white buildup. Clean with a wire brush and use a thin film of dielectric grease to slow re-corrosion.
If your bike has a maintenance-free or AGM battery, avoid overcharging and follow the manufacturer’s charging rate.
Check Fuses and Wiring
Locate the fuse box and carry spare fuses that match the amp ratings. Replace any blown fuses with the exact same rating to avoid damage. Keep a small, labelled fuse kit in your tool roll.
Scan visible wiring for chafing, exposed conductors, or melted insulation, especially near the steering head, engine mounts, and exhaust. Secure loose wires with zip ties and reroute any that contact sharp edges or hot parts.
Test all lights, horn, and turn signals. Have a friend press the brake and turn the bars while you confirm operation. If a circuit fails, trace from the fuse back along the wiring; use a test light or multimeter to find open or shorted sections.
Plan for Emergency and Repairs
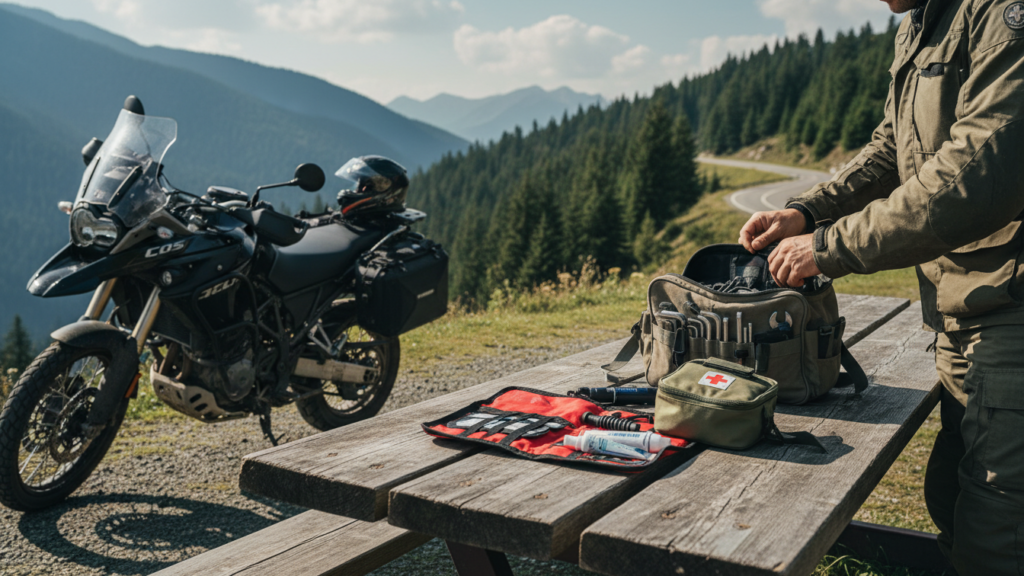
Carry a few key spares and a basic first-aid setup so you can fix common breakdowns and treat minor injuries quickly. Prioritize parts you can’t improvise and medical supplies for cuts, burns, and shock.
Carry Spare Parts
Bring spares that match your bike and the likely failure points. Include a spare inner tube or tubeless repair kit, tire plugs, a compact tire inflator or CO2 cartridges, and a spare chain master link sized to your chain. Add spare fuses, bulbs for headlights/taillights, clutch and brake levers (if your ride style risks bending them), and a small roll of electrical tape and zip ties for temporary repairs.
Keep a compact tool kit with the correct metric sockets and wrenches, a torque wrench or torque settings written down, pliers, screwdrivers, and a multi-tool. Store parts in weatherproof bags and label them. Know how to use each item; practice changing a tube, fixing a chain, and replacing a fuse at home. For longer trips, carry a digital copy of your bike’s manual and a photo of your VIN and key electrical diagrams. For roadside help, save the phone numbers for your roadside assistance and local mechanics along your route and bookmark motorcycle-specific repair guides like those on the Motorcycle Safety Foundation.
Prepare a First Aid Kit
Assemble a compact medical kit focused on the injuries most likely on rides: cuts, abrasions, burns, and sprains. Include adhesive bandages in multiple sizes, sterile gauze pads, medical tape, and a few sterile dressings. Add an antiseptic wipe or solution, antibiotic ointment, and burn gel. Pack trauma shears, nitrile gloves, and a small CPR face shield.
Include over-the-counter pain relievers, antihistamine tablets, and any personal prescription medicines in labeled containers. Add a triangular bandage for slings, elastic bandage for sprains, and a few cold packs. Keep a list of emergency contacts, your blood type, and any allergies. Store the kit in an easy-to-reach, waterproof case and check it before every long ride. For first-aid guidance and training, consider resources from the Red Cross or local first-aid courses.
Finalize Documentation and Route Planning
Make sure your papers are current, easy to reach, and that your route includes regular fuel options and backups. Keep digital and paper copies, and mark fuel stops for the range of your bike.
Update Registration and Insurance
Check your bike’s registration and insurance dates at least two weeks before the trip. Renew anything that expires during the ride. Carry the physical registration and insurance card in a waterproof pouch on the bike.
Also store digital copies on your phone and a cloud account you can access without Wi‑Fi.
If you’ll cross state or country lines, confirm any extra permits or green cards required. Note emergency contact and policy numbers in a small notebook or phone note.
If your bike has modifications, verify they are declared to your insurer to avoid claim issues.
Bring your driver’s license, passport (if needed), and any medical cards. Keep one set of copies with a travel partner or left with someone at home.
Plan Refueling Stops
Know your bike’s real-world range with luggage and riding conditions. Multiply your tank range by 0.7 to build a safety buffer. For example, if your tank normally does 220 miles, plan stops every 150 miles.
Use apps and maps to mark gas stations along your route, and note 24‑hour stations on long stretches.
Identify backup stations at 25‑50 mile intervals in remote areas. When possible, plan stops at predictable places like towns rather than single roadside pumps.
Carry a small, approved fuel container only if legal and safe for your route; practice refueling procedures before you go.
Pre-Ride Check and Final Preparations
Start with a quick walkaround. Look for leaks, loose parts, and any obvious damage that could worsen on a long ride.
Check tires for proper pressure and tread depth. Squeeze the sidewalls and scan for cuts or embedded objects.
Test brakes and lights while the bike is on the sidestand. Make sure front and rear brakes feel firm and that headlights, brake light, and turn signals work.
Verify fluid levels: oil, coolant, and brake fluid. Top off what’s low and note any rapid drops that may signal a leak.
Inspect the chain or belt for correct tension and lubrication. A dry or loose chain can fail or wear quickly during long distances.
Adjust mirrors and controls for comfort. Confirm clutch and throttle free-play are within recommended limits.
Pack smart. Use a small checklist to keep documents, basic tools, tire repair kit, and first-aid supplies within reach.
Wear proper gear for the expected weather and terrain. Layer clothing and bring waterproofs; conditions can change on long routes.
Before you leave, plan fuel stops and rest breaks. Note alternative routes and tell someone your expected arrival time.
Quick checklist (tick off before departure):
- Tires: pressure & tread
- Brakes: function
- Lights: visibility
- Fluids: levels
- Chain/Belt: tension & lube
- Gear, tools, documents: packed
Start your ride only when all items are checked and you feel mentally ready.
FAQs
Q: How often should you inspect your bike before a long ride?
You should do a full pre-ride check the day before and a quick check the morning of departure. Focus on tires, brakes, lights, fluids, and chain or belt tension.
Q: What tools and spares should you carry?
Bring basic tools that match your bike, tire repair kit, spare fuses, clutch/brake levers (if space allows), and a compact pump. Pack items in a small, organized kit for quick access.
Q: How do you prevent rider fatigue?
Adjust your seat and handlebars for comfort, plan regular stops every 60–90 miles, and stay hydrated. Practice longer rides beforehand to build endurance.
Q: When should you service your bike at a shop?
Service major items (valves, tires, brakes, fluids) according to the manufacturer schedule or before any trip over several hundred miles. If you’re unsure about a noise or handling, have a mechanic check it.
Q: How should you pack luggage?
Distribute weight low and centered. Secure soft bags or a top box so nothing shifts, and keep essentials like documents, phone, and basic tools within reach.
Q: What about weather and route planning?
Check forecasts and plan alternate routes for bad weather. Carry layered clothing and waterproof gear, and note fuel stops in remote areas.
Q: Can you rely on roadside assistance?
Roadside help is useful but not guaranteed in remote areas. Carry repair basics and have emergency contacts and location-sharing ready.
Conclusion
You can reduce risk and ride more comfortably by checking your bike, gear, and plan before you go. Small tasks—like tightening bolts, checking tire pressure, and testing lights—save time and stress on the road.
Focus on comfort and control. Adjust your seating, mirrors, and suspension so you can ride hours without constant pain or numbness. Pack smart: balance weight, secure items, and carry basic tools and a tire repair kit.
Keep safety front and center. Wear quality protective gear, plan regular rest stops, and monitor weather and road conditions. Practice proper fueling and maintenance habits to avoid common breakdowns.
Use a simple pre-ride checklist and follow it every time. That habit makes preparation faster and more complete. When you prepare well, you spend less time fixing problems and more time enjoying the ride.