
You want cables that work when you need them, not when they decide to fail. I recommend checking and often replacing motorcycle cables every 3–5 years, or sooner if you ride a lot, ride in harsh conditions, or notice stiffness, fraying, or rough feel. That simple rule helps you avoid sudden failures and keeps control smooth.
I’ll show what to watch for, how riding and weather shorten cable life, and when to lube, inspect, or swap parts. You’ll learn quick checks that save time and keep you safer on every ride.
Key Takeaways
- Inspect cables regularly and replace them proactively within a few years or when signs of wear appear.
- Riding conditions and maintenance habits strongly affect how long cables last.
- Lubrication, proper adjustment, and choosing quality cables reduce the chance of sudden failure.
Recommended Replacement Frequency
I focus on three practical ways to decide when to replace cables: what the maker says, how many miles you’ve ridden, and how long the cable has been in service. These points help you pick a safe, cost-effective replacement window.
Manufacturer Guidelines for Cable Replacement
I always check the owner’s manual first. Many manufacturers list inspection intervals and sometimes a replacement interval for clutch, throttle, and brake cables. If the manual gives a mileage or time limit, I follow that exact number for warranty and safety reasons.
If the manual only says to inspect, I treat that as a required step at each scheduled service. I replace any cable that shows fraying, kinks, corrosion, or inner-wire binding even if it hasn’t hit a listed mileage. OEM recommendations take into account the bike’s design and cable routing, so they carry more weight than generic rules.
Mileage-Based Recommendations
I use mileage as a practical guide when the manual is silent. For typical street bikes I replace clutch and throttle cables between 20,000–40,000 miles if they show wear, though heavy riders or off-road use can shorten that span to 2,000–10,000 miles. For scooters and city riders, watch for 2,000–3,000 mile replacement suggestions from some sources.
I also track signs, not just miles. If the lever feels gritty, the cable binds, or shifting becomes inconsistent, I replace the cable immediately. Riding environment matters: salty roads and dirt accelerate wear, so I lower the mileage target for replacement in those conditions.
Time-Based Recommendations
I treat time as a backup to mileage. Even with low miles, I replace cables every 5–7 years in normal conditions because rubber housings and lubrication degrade with age. In humid or coastal areas I shorten that to 2–4 years due to corrosion risk.
I inspect annually for stiffness, rust, and outer-sheath cracks. If a cable shows any of these signs, I replace it right away rather than waiting for the calendar. Regular lubrication and keeping cables clean can extend life, but age-related replacement prevents sudden failures.
Types of Motorcycle Cables
I focus on the cables you use most when riding: how they work, where they wear out, and what to watch for. Each cable has a different job and different failure signs, so I cover what matters most for safe, smooth riding.
Clutch Cable
The clutch cable links the lever to the clutch mechanism and takes repeated pull-and-release actions every ride. I check the cable for frayed strands at both ends, corrosion where the inner wire meets the barrel or adjuster, and stiff spots that make the lever feel rough. If the lever travel increases or the clutch slips, that often points to cable stretch or internal wear.
I recommend regular lubrication with a cable-specific lubricant and inspecting the housing for cracks or kinks. If you see rust, fraying, or a hollow sound when you flex the outer housing, replace the cable. Manufacturer service manuals list proper slack and adjustment steps; follow those, or use Motion Pro’s cable maintenance guide for procedure details and specs.
Throttle Cable
The throttle cable controls engine speed and must move smoothly and return reliably to idle. I check for sticky response, uneven idle, or a throttle that does not snap closed. These symptoms usually mean dirt, fraying, or a damaged housing. Single-cable throttles and twin-cable setups (push-pull) need different checks: push-pull systems require both cables to be in sync.
Clean the cable routing, lube the inner wire with a light spray lubricant, and inspect the throttle tube and housing. Replace the cable if you find kinks, broken strands, or a binding feel. For safety-critical throttle work, follow guidance from authoritative sources like the Motorcycle Safety Foundation for proper checks and adjustments.
Brake Cable
Many modern bikes use hydraulic brakes, but motorcycles with drum brakes or older models use brake cables for the rear brake. I watch for fraying near the anchor points, corrosion from road salt, and loss of braking feel. A cable that stretches or sticks increases stopping distance and creates a safety hazard.
Inspect the cable run for pinch points and ensure the housing sits freely in its guides. Lubricate lightly and check the brake lever travel against the service manual’s specs. Replace immediately if you see broken strands, rust through the wire, or a housing split that lets grit in.
Signs That Motorcycle Cables Need Replacing
I watch for three clear signs that tell me a cable needs attention: slower response at the lever, visible fraying or housing damage, and a lever that feels stiff or sticky. Catching these early helps avoid sudden failures and keeps control predictable.
Reduced Responsiveness
If the clutch, throttle, or brake lever takes longer to produce a response, the cable may be stretching or binding. I notice this as a delay between my input and the bike’s reaction—gear shifts that miss, throttle that revs slowly, or a brake that doesn’t bite quickly. Small delays at low speed become dangerous at higher speed.
I test responsiveness by feeling the free play and watching engine or wheel response while on a short, controlled ride. If I must increase lever travel beyond normal adjuster limits to get a proper response, replacement is the safer choice.
Visible Fraying or Damage
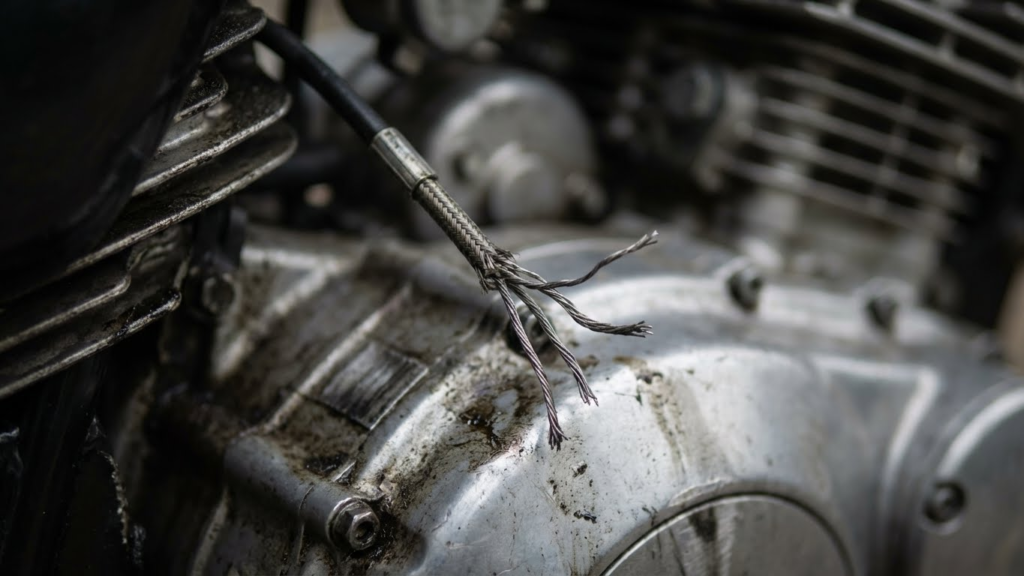
I inspect cables along their entire length and at both ends where wear concentrates. Frayed wires at the ends, kinks in the housing, exposed inner cable, cracked rubber boots, or crushed housing all mean the cable’s strength and smoothness are compromised.
If I see rust on the inner cable or broken strands near the nipple or adjuster, I replace the cable right away. Even a small visible fray can worsen quickly under load and lead to sudden failure while riding.
Stiff or Sticky Operation
A lever that feels heavy, rough, or that returns unevenly often shows the cable is corroded, dry, or the housing is full of grime. I feel stickiness as a catch or jump in lever travel, or as a lever that squeaks and doesn’t snap back smoothly.
I first try cleaning and lubricating the cable and housing. If stiffness returns quickly or lubrication has no effect, the internal wires are likely worn or corroded and I replace the cable rather than risk it seizing or breaking.
Factors Affecting Cable Lifespan

I focus on the key elements that make cables wear out faster: where you ride, how you care for cables, and how often you use the bike. Each factor changes how quickly inner wires corrode, housings wear, or cables stretch.
Riding Conditions and Environment
I notice coastal riding and wet climates shorten cable life the most. Salt air and road salt lead to rust on inner wires and housings within months if not cleaned and lubricated. Riding in heavy rain or through standing water forces moisture into cable ends and ferrules, which speeds corrosion and can cause sticking or snapping.
Dusty, sandy roads wear the outer housing and grind the inner wire, so I replace those cables sooner than street-only cables. High heat and direct sun dry out housings and make plastic or rubber end fittings brittle, which leads to cracks and dirt ingress.
Maintenance Habits
Regular maintenance makes the biggest difference I can control. I lube cables every few thousand miles with a compatible cable lubricant and use a cable-lube adapter to push oil through the housing. I also inspect ends, ferrules, and adjusters for fraying, kinks, and play during each service.
I replace rubber boots and plastic liners at the first sign of cracking. If a cable feels rough, sticky, or shows visible rust, I replace it immediately rather than waiting for a break. Proper routing and secure clamps reduce chafing and extend life.
Frequency of Use
How often I ride directly affects replacement intervals. A commuter who rides daily will see more stretch and wear than a weekend rider. Throttle and clutch cables on bikes ridden several thousand miles per year may need attention or replacement around 2,000–3,000 miles depending on conditions.
Short trips with frequent lever use, like heavy city traffic, cause more wear than long highway rides. I watch for increased free play or harder lever action as signs the cable has stretched or the inner wire is worn, and I schedule replacement based on those symptoms rather than a fixed calendar date.
Best Practices for Motorcycle Cable Maintenance
I focus on checking cable condition and keeping cables clean and lubricated. Do these two things regularly and you cut the chance of sudden failures and extend cable life.
Regular Inspection Procedures
I inspect cables every 1,000–3,000 miles and after any ride in heavy rain or dirt. I look for broken strands, kinks, flattening, or rust on both the inner cable and the housing ends. Pay close attention where cables bend at levers, the throttle tube, and where they pass through guides.
I check cable free play against the factory spec in the service manual. If the cable has excessive slack or you can see frayed wires, I replace it immediately. I also test operation under load — pull the clutch or twist the throttle while the engine is off to feel for sticking or rough spots.
I wipe cables clean with a rag and use a bright light or magnifier for detailed inspection. If a housing end or ferrule is damaged, I replace that part, since a bad ferrule can cut the inner cable quickly.
Proper Lubrication Techniques
I lubricate cables every 3,000–6,000 miles or sooner if movement feels stiff. Use a lubricant made for control cables — a light cable lube or PTFE-based product works well. Avoid heavy greases that attract dirt, and do not use penetrating oils like WD-40 as sole long-term lubes.
I remove the cable from one end or use an in-line cable luber to inject lubricant into the housing. Work the cable back and forth to distribute lube along the full length. Wipe away excess lube at both ends to prevent grime buildup.
I follow manufacturer recommendations found in the service manual and check resources like Motion Pro for tool choices or Motorcycle Safety Foundation guidance for safe procedures. Proper routing and secure clamps keep the lubricant working and prevent premature wear.
How to Replace Motorcycle Cables Safely
I focus on the exact tools, clear steps, and final adjustments you need to swap throttle, clutch, or brake cables without guessing. Follow each step in order and check each fastener and cable end as you go.
Required Tools and Materials
I gather these items before I start: a set of metric sockets and wrenches, screwdrivers (Phillips and flat), needle-nose pliers, cable luber or light cable lube, a replacement cable that matches length and end fittings, rags, and a small container for parts. I also keep a torque wrench if the manual lists torque specs.
Bring replacement ferrules or end caps and small zip ties. I wear gloves and eye protection. A service manual or OEM cable diagram helps me confirm routing and free play specs. Having everything ready saves time and prevents mistakes.
Step-by-Step Replacement Process
I first park the bike on a level surface and secure it with a stand. I disconnect the battery if changing a throttle or brake cable that could affect electronics.
I loosen the cable adjusters at the lever and engine end to create slack. I remove any fairing or clamps that block access. I note the cable routing and take a photo for reference. I free the cable from the throttle tube or lever, then pull it from the housing at the engine or caliper end. I thread the new cable through the same path, ensuring the outer housing seats fully in each stop. I attach the cable ends to the lever and the actuator, making sure the cable head seats correctly in its notch.
I trim or replace ferrules as needed. I test smooth operation by moving the lever or throttle and watching the actuator work. If binding or kinks appear, I re-route or replace the housing.
Post-Replacement Adjustments
I set initial free play at the lever following the service manual—usually a few millimeters at the throttle and a finger’s gap for the clutch. I use the adjusters near the lever and at the actuator to achieve correct slack.
I lubricate the inner cable with a cable luber or light penetrating oil if the cable design allows. I secure loose housing with the original clamps or new zip ties, keeping bend radii gentle to avoid binding.
I check for smooth return and full range of operation. I test-ride slowly in a safe area and re-check adjusters and fasteners after the first ride. If I feel any sticking, fraying, or inconsistent response, I stop and inspect the routing and seating again.
Potential Risks of Delaying Cable Replacement
Delaying cable replacement raises two main concerns: immediate rider safety and growing repair costs. I focus on what can fail, how it fails, and the likely financial ripple effects.
Safety Hazards
A worn clutch or brake cable can snap without warning. I’ve seen cables fray from corrosion or inner wire breakage; when that happens, clutch disengagement or braking can fail at a critical moment. That increases the chance of losing control during gear shifts, stopping, or low-speed maneuvers.
Stiff or binding cables reduce control precision. I notice delayed clutch take-up and jerky throttle response when cables gather grit inside their housings. This makes emergency stops harder and raises crash risk.
Inspect cables for fraying, rust, kinks, or heavy corrosion on end fittings. Replace immediately if you find any of these signs, because riding with compromised control systems puts you and others at real risk.
Increased Repair Costs
A broken cable can damage adjacent parts. I’ve repaired seized levers, warped clutch plates, and worn cable housings after a cable failed and caused extra stress on controls. Those secondary repairs often cost several times more than a cable replacement.
Neglect also shortens component life. Dirty, unlubricated cables wear housings, perches, and pivot pins faster. Routine cable replacement every few years or at manufacturer intervals prevents cascade failures that lead to parts-and-labor bills.
Budget-wise, a quality cable and simple labor usually run low compared to the cost of fixing clutch or brake systems. I recommend replacing cables before they reach the point of causing further mechanical damage.
Choosing Quality Replacement Cables
I focus on fit, build, and long-term value when picking replacement cables. Good choices cut friction, resist corrosion, and match your bike’s routing and end fittings.
OEM vs Aftermarket Options
I choose OEM cables when I need exact fit and original end fittings. OEM parts match factory routing and often drop right in, which lowers installation time and fitment issues. They usually cost more, but I pay that for guaranteed compatibility on modern bikes with unique adjusters or sensors.
Aftermarket cables can offer better value or improved materials. I look for brands that state exact dimensions and show photos of ends and adjusters. Trusted aftermarket lines sometimes add braided sleeves or Teflon liners for smoother action. I avoid no-name, very cheap cables unless they list specs and have good reviews from riders with the same model.
Material Durability Considerations
I check the inner core and outer housing before buying. A Teflon- or nylon-lined inner sleeve reduces friction and cable wear, so I prefer it for throttle and clutch cables. Stainless-steel inner wires resist rust; galvanized wires are cheaper but corrode faster.
For outer housings, I pick braided stainless or reinforced nylon when I want kink and heat resistance. Braided housings also help stop compression under load, which keeps lever feel consistent. Ends, ferrules, and nipples should be solid brass or stainless; cheap pressed metal ends can deform and cause slippage.
FAQs
What are the signs a cable needs replacement?
Watch for fraying, kinks, sticky or stiff action, and visible rust. If a lever feels gritty or the throttle snaps back poorly, that cable likely needs replacing.
Can I just lubricate instead of replacing?
Lubrication helps and can extend life, but it won’t fix frayed wires or a damaged outer housing. I replace any cable with visible damage or persistent performance issues.
Should I replace all cables at once?
Not always. I replace only the worn or damaged ones, but on older bikes with multiple aging cables, doing them together saves time and prevents near-future failures.
How often do professional mechanics replace cables?
Mechanics inspect cables during regular service and often recommend replacement when wear signs appear. Frequency varies by riding conditions and maintenance habits.
Is DIY replacement safe?
Yes, if you follow the service manual and use the right parts. I advise using quality cables and testing adjustments before riding.
What about the cost?
Cables are relatively inexpensive compared to brakes or engine parts. I consider cost small compared to the safety benefit of reliable controls.
Conclusion
I recommend checking cables regularly and replacing them when wear shows or performance falls. Visual frays, kinks, heavy lever pull, or sticky action mean it’s time to act.
I change cables on a schedule based on use: light riders can stretch checks to yearly, while heavy or salty-road riders should inspect every few months. For many bikes, replacing cables every 2,000–3,000 miles is a sensible guideline when riding often.
I lubricate cables at least once a year and after wet rides to extend life. Proper routing and correct tension cut down on wear and sudden failures.
I keep spares and basic tools for roadside fixes. A snapped cable can leave you stuck, so quick field repairs or a timely shop visit reduce risk.
Key actions I follow:
- Inspect visually and feel for stiffness.
- Lubricate annually or as needed.
- Replace immediately if damaged or performance drops.
I prioritize simple checks and timely replacements to keep control and safety high.