
Keeping your motorcycle helmet clean is important for your safety, comfort, and the helmet’s lifespan. Dirt, sweat, and bugs can build up over time, making your helmet less comfortable and possibly affecting its performance. To properly clean a motorcycle helmet, you need to carefully clean its outside shell, visor, and removable inner padding using gentle soap and warm water, avoiding harsh chemicals that can damage the materials.
I’ve found that removing the inner liner before washing helps get rid of sweat and odor better while protecting the helmet’s interior. Cleaning the visor carefully keeps your view clear and helps you stay safe on the road. Taking time to maintain vents, straps, and accessories ensures everything stays in good shape.
Regular cleaning doesn’t take much time but makes a big difference in keeping your helmet fresh and reliable. I’ll walk you through simple, step-by-step instructions that help you clean your helmet safely and effectively so it lasts longer.
Key Takeways
- Clean the helmet shell, visor, and liner with mild soap and warm water.
- Remove and wash inner padding to remove sweat and odor.
- Keep vents and straps clean for better comfort and safety.
Why Cleaning Your Motorcycle Helmet Matters
Keeping your motorcycle helmet clean affects how well it protects you, how long it lasts, and how comfortable it feels when you wear it. Dirt, sweat, and grime can reduce visibility and damage materials over time. Cleaning helps maintain safety features, preserves the helmet’s condition, and improves your riding experience.
Safety Benefits
A clean helmet ensures that important safety features work as they should. Dirt and debris can build up on the visor, reducing visibility and increasing the risk of accidents. Smudges or scratches also make it harder to see clearly, especially in poor weather or low light.
Inside the helmet, sweat and oils can weaken the foam liner. The liner absorbs shock during crashes, so any damage lowers its effectiveness. Regular cleaning removes sweat, bacteria, and buildup that might affect the helmet’s protective ability. I always make sure to clean both the inside and outside to keep safety at the highest level.
Longevity of Materials
Motorcycle helmets are made with several materials like EPS foam, plastic shells, padding, and adhesives. When dirt and grime sit on these materials for a long time, they can break down or weaken. Sweat, in particular, is acidic and can cause the foam and padding to degrade faster.
By cleaning my helmet regularly, I stop damage before it starts. This helps keep the shell firm and the foam intact. The straps and padding also stay strong and comfortable. Proper cleaning delays the need to buy a new helmet, making sure my gear lasts as long as possible.
Impact on Comfort
Wearing a dirty helmet can cause discomfort while riding. Inside, sweat and grime build up odors, making the helmet smell bad. This can also irritate your skin or cause itching. A clean helmet feels fresher and improves airflow by clearing out dirt from vents and liners.
Cleaning removes sticky residue that can make the helmet feel heavy or clogged. Soft, clean padding creates a better fit, which is important for long rides. When my helmet is clean, I feel more focused and less distracted by discomfort during every ride.
Essential Supplies and Preparations
Before cleaning your motorcycle helmet, gather the right supplies and take some simple steps to prepare. Using the proper products and following careful preparation ensures you protect your helmet’s materials while cleaning it thoroughly.
Recommended Cleaning Products
I always use gentle cleaning products made for helmets or delicate surfaces. Mild soap, like baby shampoo or a gentle dish detergent, works well for washing the outer shell and visor. These soaps clean dirt and bugs without harming the helmet’s finish or coatings.
For the interior, I use a soft microfiber cloth and foam or spray cleaners designed for helmet liners. These products help remove sweat and odor safely without damaging padding. If your helmet has removable liners, hand washing them with mild detergent in cool water is best.
A soft brush or toothbrush is useful for cleaning small vents and crevices. Avoid harsh chemicals or abrasive tools. Certified products from helmet brands or specialized shops like Snell Memorial Foundation ensure safety and effectiveness.
What to Avoid
It’s important to avoid products that can ruin your helmet. Never use solvents, bleach, alcohol, or household cleaners like furniture polish. These can weaken helmet materials or strip protective coatings. Harsh chemicals may also irritate your skin later.
Abrasive scrubbers or rough cloths can scratch the visor and shell. Avoid machine washing the helmets or liners unless your manufacturer explicitly allows it, as this can damage the shape or padding.
Also, avoid hot water, since heat can deform foam inside the helmet. Instead, stick to cool or lukewarm water when cleaning. Using improper tools or products risks reducing your helmet’s protective qualities, so I take great care to avoid these mistakes.
Preparation Steps
Start by removing all detachable parts, including the visor, interior liner, and cheek pads. This makes cleaning easier and lets you treat each part properly.
Next, gently dust off loose dirt with a soft brush or cloth. This prevents scratching during washing. Check your helmet’s manual for any specific advice, as some helmets need special care or cleaning products.
Dry your helmet in a cool, shaded area after washing. Avoid direct sunlight or heating devices, which can warp plastic or damage adhesives. Proper preparation helps extend the life of your helmet and keeps it safe.
For more details, I recommend checking manufacturer instructions like those from the Snell Foundation or helmet brands.
Removing and Preparing The Helmet Liner
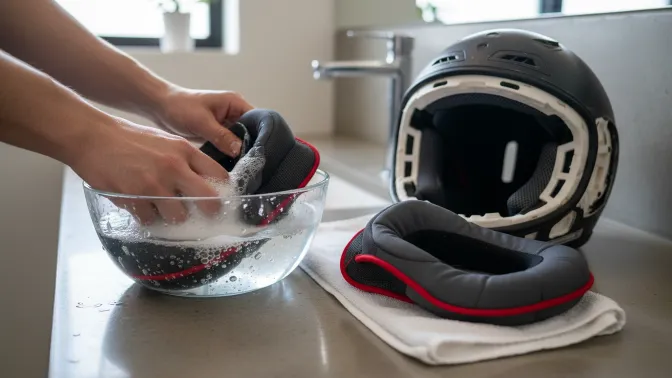
To clean a motorcycle helmet properly, taking off the liner carefully is essential. I focus on removing the padding without damage, washing it right, and drying it thoroughly to keep the helmet fresh and safe to use.
Detaching Internal Padding
First, I check how the liner is attached. Most helmets use snaps, zippers, or Velcro. I handle each part gently to avoid ripping or breaking any pieces. I start by undoing any straps holding the padding in place.
Then, I slowly pull out the liner and any cheek pads. If the helmet manual is available, I follow its instructions closely because some liners detach differently. When done correctly, the padding comes out easily without force.
Cleaning Removable Liners
Once the liner is out, I look for cleaning directions. Usually, I hand wash the padding with mild soap and lukewarm water. I avoid harsh chemicals to prevent damage.
If the liner is machine-washable, I place it in a mesh laundry bag and use a gentle cycle with wool detergent. This protects the foam and fabric. I focus on removing sweat, dirt, and odor. I rinse thoroughly to remove soap residue.
Drying Steps
After washing, I press the liner gently to remove extra water. I never wring it out because that can deform the foam.
I air dry the liner in a cool, shaded area away from sunlight or heat sources. Direct heat might shrink or crack the padding. The drying process can take several hours or overnight.
I make sure the liner is completely dry before putting it back to prevent moisture buildup inside the helmet.
How To Clean The Helmet Shell
Cleaning the helmet shell takes care and attention to avoid damage. Using the right tools and methods helps remove dirt, bugs, and grime while keeping the helmet’s finish intact. I focus on gentle washing, careful bug removal, and polishing for a clear look.
Washing The Exterior
I start by soaking a soft microfiber cloth in warm water. Then, I drape it over the helmet for about 10-15 minutes. This loosens dust and dried mud without scrubbing too hard. After soaking, I gently wipe the shell with the cloth, using a mild soap if needed. I avoid harsh chemicals or abrasive sponges to prevent scratches or fading.
It’s important to clean the entire surface evenly. I pay special attention to vents and edges where dirt can build up. After washing, I use a dry microfiber cloth to remove any leftover moisture. This prevents water spots and keeps the shell smooth.
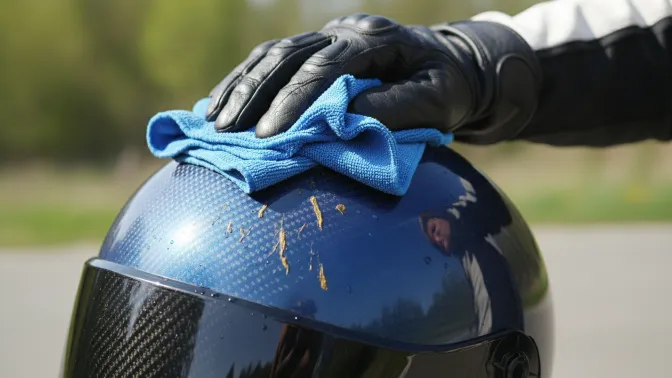
Dealing With Bugs and Grime
Bugs can stick firmly to the helmet surface, especially after a long ride. I use the warm wet cloth method first to soften the bug remains. If bugs still stick, I apply a little mild soap directly to the area and let it sit briefly before wiping.
For stubborn grime, I avoid scraping with sharp objects. Instead, I use gentle circular motions with the cloth. Sometimes, repeating the soak and wipe cycle is necessary. Bug residue left on the helmet can harden and damage the paint if not removed carefully.
Polishing and Finishing Touches
Once clean, I add a finishing polish to the shell. I choose a polish made for plastic or painted surfaces. I apply a small amount to a clean microfiber cloth and rub it in with light circular motions.
Polishing restores shine and adds a thin protective layer. It also helps repel future dirt and bugs. Finally, I wipe the helmet down once more with a dry cloth to remove any excess polish. The shell should look bright and smooth, ready for the next ride.
Visor and Face Shield Cleaning
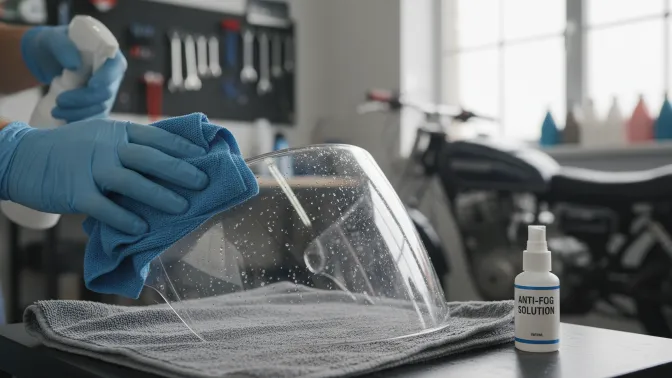
Keeping the visor or face shield clean requires careful handling to avoid damage. Using the right methods protects its coatings and keeps your vision clear. I focus on how to remove the visor safely, avoid smudges and scratches, and maintain anti-fog treatments.
Safe Removal
Removing the visor correctly is the first step. I always start by checking the helmet manual for specific instructions. Usually, the visor has release buttons or screws that need gentle pressure or a soft twist.
I avoid forcing the visor out to prevent cracks or breaks. Holding the helmet steady in one hand while carefully lifting the visor with the other helps. Once off, I place it on a clean, soft surface to avoid scratches.
Taking the visor off properly also makes cleaning easier, allowing me to reach every edge without bending or twisting the shield.
Smudge and Scratch Prevention
Visors have special coatings that protect against scratches and fog. I never use harsh chemicals or paper towels. Instead, I choose mild soap with water or a cleaner made for visors.
Microfiber cloths are my go-to for wiping dirt or bugs off. They clean gently and reduce the chance of scraping the surface. I use soft, circular motions for cleaning and drying.
To prevent scratches, avoid rubbing dried dirt or grit. If bugs are stuck on, soaking with warm water softens them first. This method keeps the visor clear and maintains its coatings.
Anti-Fog Treatments
Many visors have an anti-fog layer inside, but extra protection helps in cold or humid conditions. I apply anti-fog sprays or wipes designed for motorcycle helmets.
Before applying, I clean the inside surface thoroughly with baby shampoo or a similar gentle cleaner. After drying, I use a small amount of treatment spread evenly.
I avoid touching the shield after this to keep it effective. These treatments improve visibility during rain or heavy breathing inside the helmet. Some helmets also allow for pinlock inserts, which create a fog-free layer.
Caring for Vents, Chin Straps, and Accessories
Taking care of these parts keeps your helmet safe and comfortable. Vents need regular cleaning to avoid dirt buildup. The chin strap must stay clean and intact to hold the helmet properly. Accessories require careful maintenance to work correctly over time.
Cleaning Ventilation Areas
I always start by removing the vents carefully. Most helmets have vents that detach easily; look at the user manual for specific steps. Dirt, bugs, and small stones can clog these areas, which affects airflow and comfort.
I clean the vents using a soft brush or a gentle stream of water. Avoid harsh cleaners that can damage plastic components. After cleaning, I let the vents dry completely before putting them back on. This keeps the air flowing smoothly and prevents bad smells. For detailed vent care tips, you can visit Helmet Safety Institute.
Sanitizing Chin Straps
The chin strap keeps the helmet secure during a ride, so it must be clean and strong. I wipe it down regularly with mild soap and warm water. Using a soft cloth or sponge helps remove sweat and dirt without weakening the fabric.
If the chin strap comes with pads or covers, I take those off and wash them separately. Avoid soaking the entire strap as this can weaken the stitching or buckles. After washing, I air dry the strap completely to prevent moisture buildup that could cause odors or damage.
Maintenance Of Accessories
Accessories like liners, removable pads, and visors also need care. I remove liners and pads and hand wash them with mild detergent. This keeps the inside of the helmet fresh and hygienic.
For visors, I avoid wiping them when dry since this can create scratches. Instead, I use warm water and a soft cloth to clean them gently. If your helmet has special coatings, check manufacturer recommendations to avoid voiding any warranties. Keeping accessories clean extends the life of your helmet and improves your riding experience. Learn more on RevZilla’s helmet care guide.
Reassembling and Storing Your Helmet
After cleaning, it’s important to put your helmet back together carefully and store it properly. This helps keep its shape, protects the materials, and ensures it is ready for your next ride.
Proper Reassembly
I always make sure every part is completely dry before starting to reassemble. Moisture left inside can cause mold or weaken the materials over time. I begin by putting the interior liners and padding back in their exact spots, following any markings or shapes to ensure a snug fit.
For helmets with removable visors, I carefully click or screw it back on, making sure it moves smoothly without forcing it. Any vents or small parts should be securely replaced to keep the helmet’s function intact. I double-check all fastenings and attachments to avoid loose pieces.
Best Storage Practices
I store my helmet in a cool, dry place that is away from direct sunlight. Heat and UV rays can break down the helmet materials and fade colors. To prevent dust and scratches, I use a soft helmet bag or cover, especially when not riding for several days.
Avoid placing the helmet on hard or uneven surfaces that might cause dents or warping. Keeping it off floors or rough spots helps maintain the helmet’s shape and safety features. I also avoid hanging my helmet by the straps, as it can stretch or damage them.
Common Mistakes To Avoid
When cleaning my helmet, I have learned some mistakes can cause damage or reduce its lifespan. One big error is using harsh chemicals or household cleaners. These can break down the materials and weaken the helmet’s protection. I always choose mild soap and water instead.
Another mistake is washing the helmet too often or too roughly. Over-cleaning can wear out the interior padding and affect comfort. I clean the inside only when it feels dirty or smells bad.
Some riders dry their helmets in direct sunlight or near heaters. I avoid this because heat can warp the helmet shell or damage the lining. Air drying in a shaded, well-ventilated place is the safest method.
Many people forget to remove or gently clean the visor separately. Scrubbing the visor with rough cloths can scratch the surface, making it hard to see clearly. I use a soft microfiber cloth and mild soap for the visor.
Lastly, some try to soak the entire helmet in water. I never do this because it can ruin the padding and internal parts that are not meant to get wet. Spot cleaning inside with a damp cloth works much better.
Here’s a quick list of common mistakes I avoid:
- Using strong or abrasive cleaners
- Over-washing the helmet interior
- Drying in direct sunlight or heat
- Scratching the visor with rough cloths
- Soaking the whole helmet in water
Avoiding these keeps my helmet safe and comfortable for many rides.
Recommended Cleaning Frequency And Maintenance Schedule
I clean my motorcycle helmet regularly to keep it safe and comfortable. After every ride, I wipe the visor with a soft microfiber cloth to remove dust and bugs. This quick step helps maintain clear visibility.
For a deeper clean, I wash the interior padding about once a month. Sweat and dirt build up inside, so removing and gently hand-washing the liners with mild soap keeps things fresh. I always check my helmet’s manual first to avoid damaging the materials.
The helmet shell and exterior get a full cleaning every two to three months. I use a soft cloth and a gentle cleaning solution to remove grime and bugs without harming the finish. This also helps me spot any cracks or damage early.
I perform a thorough inspection every few months. This includes checking the straps, buckles, and padding for wear. Keeping these parts in good condition is important for safety.
Here is a simple maintenance schedule I follow:
| Task | Frequency |
|---|---|
| Wipe visor | After every ride |
| Wash interior liners | Monthly |
| Clean helmet shell | Every 2-3 months |
| Inspect helmet and straps | Every 3 months |
Following this schedule helps me make sure my helmet works well and lasts longer. Proper care is key to staying safe on the road.
FAQs
How often should I clean my motorcycle helmet?
I recommend cleaning your helmet regularly, especially after long rides or when it gets visibly dirty. Sweat, bugs, and dust build up inside and out. Keeping it clean helps maintain comfort and safety.
Can I use regular soap or household cleaners on my helmet?
No. I avoid harsh chemicals and strong soaps as they can damage the helmet’s materials. I use mild soap or special helmet-cleaning products. Always check your helmet’s manual for the best advice.
Is it safe to soak or wash the helmet in water?
I never soak the helmet fully. Water can damage the inner padding and liners. Instead, I gently clean the outside shell and use a damp cloth for the interior. Removable liners can be hand-washed based on the manufacturer’s instructions.
How do I clean the visor without scratching it?
I clean the visor carefully with a soft, microfiber cloth and warm water. I avoid paper towels or abrasive materials. Some helmets also have anti-fog coatings, so I avoid strong chemicals that could harm the visor’s surface.
Can cleaning improve my helmet’s safety?
Yes, in a way. Dirt and debris can reduce visibility by clouding your visor. Sweat and buildup inside may affect comfort and fit. Keeping your helmet clean ensures it works as designed without distractions or discomfort.
What should I avoid when cleaning my helmet?
I stay away from solvents, bleach, and strong sprays. Also, I avoid high heat like hair dryers or direct sun drying since these can warp or weaken the materials. Patience and gentle care are key.
Conclusion
Keeping my motorcycle helmet clean is a simple but important task. It protects me by keeping the helmet clear and comfortable, and it helps the gear last longer.
I always use gentle soap, warm water, and soft cloths to clean the outside and the visor. For the inside, I remove the padding when I can and wash it carefully with mild detergent. Letting everything dry away from direct sunlight prevents damage.
Regular cleaning stops dirt, sweat, and bugs from building up. This keeps the helmet fresh and safe. I also pay close attention to the visor because a clear view is key for safety.
By following these steps, I know my helmet stays in good shape, ready for every ride. Taking care of it is part of riding smart and protecting myself on the road.