
You want the bike to turn over and go, not sit silent. I’ll show you a clear, step-by-step way to find the likely cause, from quick checks you can do in minutes to the deeper tests that save time and money. Start with simple checks — battery, kill switch, neutral, fuel, and fuses — and you’ll fix most starting problems yourself.
If the quick checks don’t work, I’ll walk you through how to test the battery and charging system, inspect the starter and solenoid, verify fuel delivery and spark, and spot common safety-switch or sensor issues. You’ll learn which signs mean a simple fix and which mean you should call a mechanic.
Key Takeaways
- Do quick safety and basic checks first to rule out easy fixes.
- Test battery, starter, fuel, and ignition in a logical order.
- Know when signs point to a professional repair.
Initial Checks Before Troubleshooting
I focus on the simplest, most common reasons a bike won’t start: fuel, kill switch, and ignition. I check these first because they take little time and often fix the problem.
Verify Fuel Level and Type
I look at the fuel gauge and visually inspect the tank if possible. Low fuel or empty tanks are an easy miss. If the bike has a reserve petcock, I switch to reserve and try starting.
I confirm the fuel is the correct type for the engine. Using the wrong octane or mixing in diesel by accident can stop the engine from firing. If the bike sat for a long time, I smell the fuel for stale or varnished fuel and drain and replace it if it smells sour.
I also check fuel cut-off valves, fuel pump fuses, and connections at the fuel pump. On carbureted bikes, I verify the petcock setting (ON/RES/PRI). For EFI bikes, I listen for the fuel pump prime buzz when I turn the key on.
Inspect Engine Kill Switch
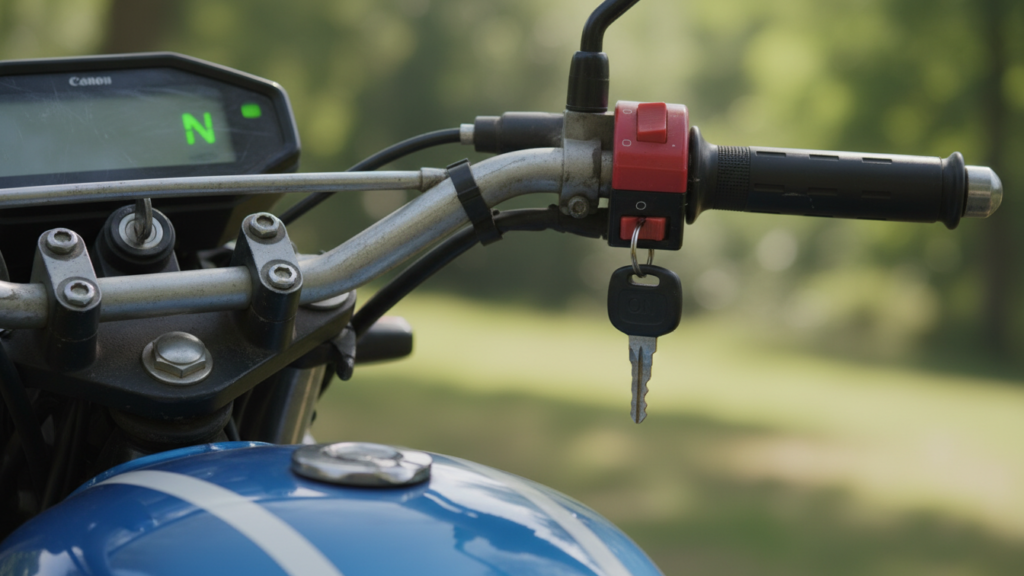
I find the kill switch on the right handlebar and verify its position. A bumped or worn kill switch can cut ignition power and prevent starting. I flip it a few times to feel for a positive click.
I check the wiring quickly for broken connectors or exposed wires near the switch. A multimeter helps me confirm continuity when I pull the switch housing apart. If continuity fails with the switch in the “run” position, I replace or bypass the switch to test.
I keep in mind some bikes have multiple cutoffs (stand, clutch, neutral). I make sure those systems are also in their correct state before moving on.
Ensure Ignition Is On
I make sure the key is fully turned to the ON position and not in ACC or LOCK. Some bikes require the key turned and a short press of a starter button; I follow the exact sequence for my model.
I check the instrument cluster and indicator lights. No lights or dim lights point to a weak or dead battery, a blown main fuse, or a bad ignition switch. I inspect the battery terminals for corrosion and tightness, and I test battery voltage with a meter—12.4V or higher is healthy for starting.
If the ignition switch shows power but the starter won’t engage, I verify starter relay connections and main fuses next.
Battery and Electrical System Inspection
I focus on the battery, terminals, and main fuses first because they cause most no-start cases. A quick meter check, a visual terminal inspection, and a fuse check will often point to the problem.
Test Battery Charge and Voltage
I start by measuring voltage with a digital multimeter across the battery terminals. With the bike off, a healthy 12V lead-acid battery reads about 12.6–12.8 volts. Anything below 12.4V suggests a partial charge; below 12.0V is a weak battery that may not crank the starter.
Next, I check voltage while cranking. If the voltage drops below about 10V during a start attempt, the battery can’t deliver enough current and likely needs charging or replacement. I also perform a charging-system test: with the engine running at 3,000 rpm, voltage should rise to roughly 13.5–14.8V. If it stays low or spikes too high, the stator or regulator/rectifier may be failing. For detailed procedures on charging tests and acceptable ranges, I reference reputable repair guides like those at Suzuki or Honda service manuals and general diagnostics pages such as Motorcycle Cruiser or a manufacturer’s service resource.
Examine Battery Connections
I clean and tighten all battery terminals and cable ends next. Corrosion, loose nuts, or frayed cables cause high resistance and voltage drop. I remove the terminals, inspect the posts and clamps, and use a wire brush and baking soda solution if I see acid corrosion. After cleaning, I apply a thin film of dielectric grease to slow future corrosion.
I also follow the negative cable to the frame and engine ground point. A loose or corroded ground can mimic a dead battery. I tighten ground bolts to manufacturer torque specs and check for broken wires or crushed insulation. If I see pitting or heavy corrosion on terminals, I replace the battery clamps or cables rather than rely on a temporary fix.
Check Main Fuses
I locate the main fuse box—usually under the seat or side panel—and inspect the large main fuse and smaller ignition fuses. I look for blown fuses (melted element or dark discoloration). I don’t replace a blown fuse repeatedly without diagnosing the short circuit that caused it.
I use the multimeter’s continuity mode to test fuses in place. If a fuse checks fine but a circuit is dead, I trace power from the battery positive through the fuse to the component. For wiring diagrams and fuse locations specific to my bike, I consult the factory service manual or reputable resources like Haynes or the manufacturer’s online manuals.
Starter Motor and Solenoid Issues
I focus on whether the starter motor cranks the engine, what noises it makes, and whether the solenoid sends power when you press the starter. I look for weak cranking, clicking, or no sound, and test wiring, battery voltage, and the solenoid coil.
Assess Starter Motor Operation
I check battery voltage at the battery and at the starter while someone turns the key. A healthy battery reads about 12.6 V at rest and should stay above ~11 V during cranking. If voltage falls much lower, the starter may not get enough current.
I inspect battery cable ends and starter terminals for corrosion or loose connections. I tighten clamps and clean terminals with a wire brush. Then I try a direct bench or jump test: apply 12 V briefly to the starter motor main terminal (with spark plug removed or engine in neutral). If the motor spins strongly, the starter is likely OK.
If the motor turns slowly, hums, or draws excessive current, the starter armature, brushes, or bearings may be failing. I consider replacing or having the starter rebuilt.
Listen for Clicking or Silence
I note the sound when I press the starter button: a single click, rapid clicking, or complete silence each mean different things. A single click often points to a bad solenoid or weak battery. Rapid clicking usually means low battery voltage or poor connections. Silence can indicate a blown fuse, a bad starter button, an open safety switch (neutral/clutch), or a failed starter motor.
I perform simple checks: verify fuses and safety-switch positions, wiggle wiring while someone tries to start, and watch voltage at the starter during the attempt. If voltage stays high but I hear no click, the solenoid coil or starter might be dead. If voltage drops and clicking happens, I address battery or cable issues first.
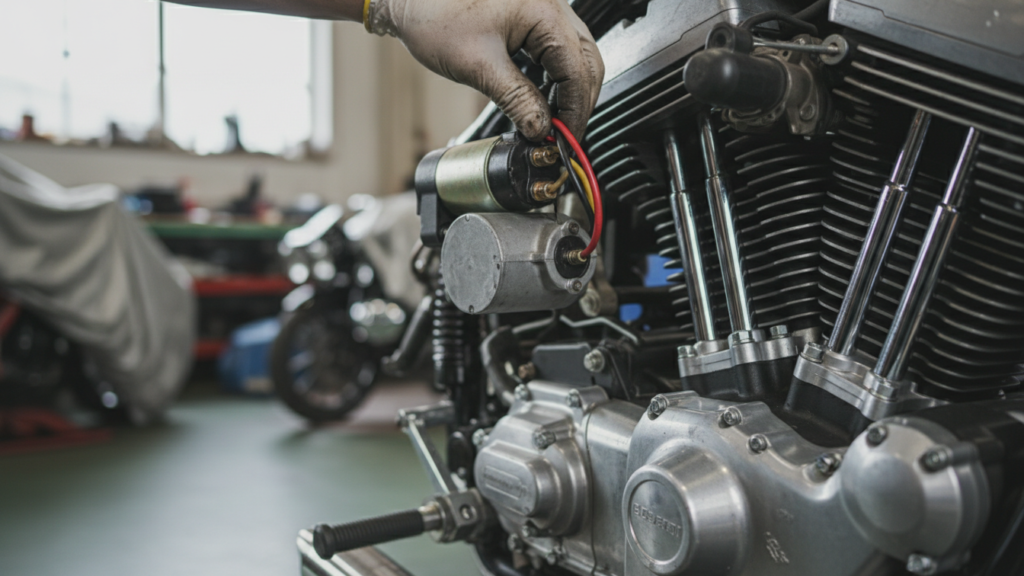
Check Solenoid Function
I test the solenoid coil by measuring resistance between its control terminal and ground; consult the service manual for the expected ohms. I also apply 12 V directly to the solenoid control terminal while grounding the body to see if it clicks and engages. A good solenoid will click distinctly and close the high-current circuit.
I inspect the solenoid contacts for pitting or burning if the starter spins slowly or intermittently. Clean light pitting with fine sandpaper; replace the solenoid if contacts are welded or severely eroded. If the solenoid sticks closed (starter runs after engine starts), I immediately cut power to avoid flywheel damage and tow the bike.
Fuel System Troubleshooting
I focus on fuel flow, pressure, and delivery parts when a bike cranks but won’t fire. Fixing or replacing small parts like hoses, filters, pumps, jets, or injectors usually gets the engine running again.
Inspect Fuel Lines and Filter
I start with a visual check of the fuel lines for cracks, soft spots, kinks, or loose clamps. Old rubber hoses often swell or split; pinch the line and look for fuel seepage or a distinct fuel smell. Replace any hose that looks aged or feels spongy.
Next, I remove and inspect the fuel filter or in-line strainer. A clogged filter cuts flow and causes hard starting or stalling. If the filter is dirty or looks dark, I replace it. For a quick test, I briefly disconnect the outlet line and crack the petcock or turn on the fuel pump to see if fuel flows freely — do this safely and catch fuel in a container.
I also check hose routing and clamps for proper seating and no rubbing against hot or moving parts. After replacing components, I prime the system and watch for leaks before trying to start the bike.
Test Fuel Pump Function
If the bike has an electric fuel pump, I listen for the pump’s whine when I turn the key on. No sound can mean a blown fuse, bad relay, or a failed pump. I test for power at the pump with a multimeter or test light while cycling the ignition to find where voltage is lost.
For mechanical pumps, I inspect the pump diaphragm and feed lines for vacuum leaks or damaged fittings. I measure fuel pressure against the factory spec using a fuel pressure gauge at the fuel rail or test port. Low pressure points to a weak pump, clogged filter, or restricted return line.
When I suspect the pump, I temporarily supply fuel from a clean container to the carburetor or injector rail to see if the bike starts. If it runs with external fuel, the pump or filter is the likely culprit. Always follow safety steps: work in a ventilated area and avoid sparks.
Check Carburetor or Fuel Injectors
For carbureted bikes, I drain the bowls and inspect jet passages, pilot jets, floats, and needle valves. Ethanol fuel can leave varnish that clogs tiny passages. I clean parts with carb cleaner and compressed air, then adjust float height per the manual to ensure correct fuel level.
For fuel-injected bikes, I check injector electrical connectors and resistance with a multimeter. I use a fuel injector cleaner or a dedicated injector cleaning kit to remove deposits if spray patterns look uneven. Listening to each injector with a mechanic’s stethoscope helps identify a dead or sticking unit.
In both systems, I confirm proper air-fuel mixture by checking spark plugs for color, noting black (rich) or white (lean) signs. After cleaning or replacing components, I retest starting and idle, and make small tuning adjustments if needed.
Ignition System Diagnostics
I focus on the parts that create the spark and deliver it to the cylinder. I check the plug condition, measure coil performance, and confirm a strong spark under load.
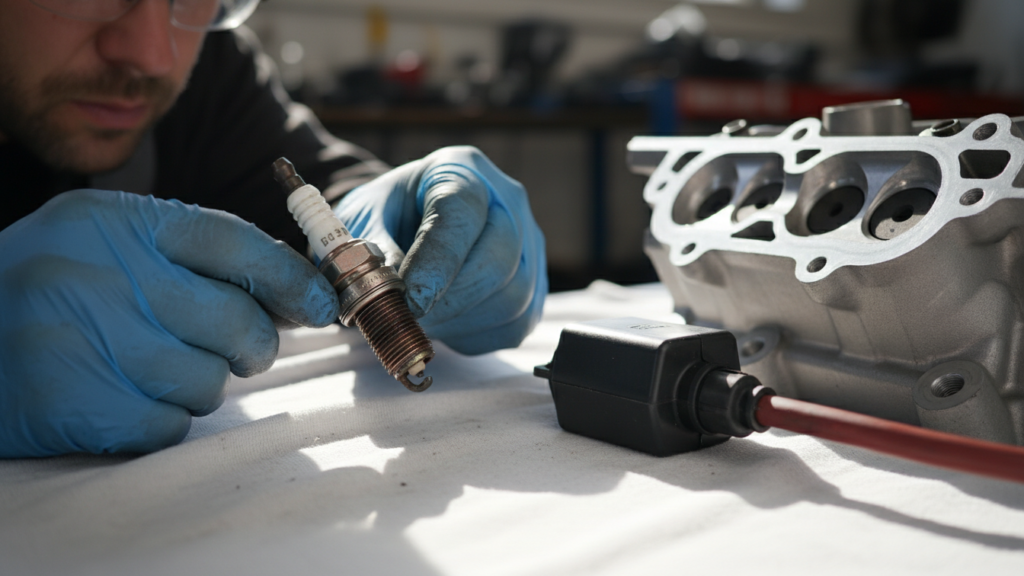
Evaluate Spark Plug Condition
I remove the spark plug with a proper socket and inspect it closely. Look for dry, light tan deposits for normal wear; black, sooty deposits mean a rich mixture or weak ignition; white or blistered porcelain means overheating. Check the electrode gap with a feeler gauge and compare it to the spec in your service manual. A gap too wide or too narrow can cause hard starting and misfires.
I also check the plug for oil fouling, which suggests worn piston rings or valve guides. Replace plugs that show heavy deposits, cracked porcelain, or worn electrodes. Use the correct heat range and torque to avoid damage.
Test Ignition Coil
I test the coil primary and secondary resistance with a multimeter. First, disconnect the coil and set the meter to the ohms range. Measure primary resistance across the low-voltage terminals and compare to the spec. Then measure secondary resistance between the secondary terminal and ground. Values outside spec suggest a failing coil.
I also perform a bench spark test if possible. Connect the coil to a known-good battery and a spark tester, then crank the starter briefly. Weak or inconsistent spark under these conditions points to a weak coil or poor connections. Inspect coil wiring and ground points for corrosion, looseness, or heat damage. Replace the coil if electrical values or bench tests fail.
Check for Spark
I use a spark tester or a spare plug plugged into the plug cap to check for a visible, strong blue spark while cranking the engine. Secure the tester to a grounded metal part and crank the engine for a few seconds. A bright blue spark that’s steady indicates a healthy ignition circuit.
If the spark is weak, intermittent, or absent, I trace wiring from the ignition switch, kill switch, and any safety cutoffs (neutral switch, clutch switch, side stand switch). I test the kill switch continuity and ensure the ignition switch supplies power. For electronic ignition systems, I scan for fault codes if an OBD-style system exists. Replace faulty wiring or switches before changing major ignition components.
Air Intake and Filter Examination
I focus first on the air path and filter because they control the oxygen your engine needs. A clogged filter or a loose intake seal often causes hard starting, poor idle, and low power.
Inspect Air Filter
I remove the airbox cover and pull out the filter to check for dirt, oil, or tears. If the element is dark, caked with dust, or damaged, I replace it. Foam filters need light oiling after cleaning; paper filters must be replaced rather than washed.
I also look for signs of insects, leaves, or rodent nesting that can block flow. Small debris near the carburetor or throttle body intake can cut airflow enough to stop ignition. If the bike has pod filters, I ensure the foam or cotton is intact and secured to the intake.
Checklist:
- Visual condition: replace if clogged or torn.
- Fitment: sits flush with the airbox seal.
- Type-specific care: clean and re-oil foam; replace paper.
Check Intake Connections
I trace the intake boots from the airbox to the carburetor or throttle bodies. I check clamps, rubber boots, and vacuum lines for cracks, splits, or loose clamps that let unmetered air enter the engine.
I perform a simple test by spraying a small amount of starter fluid or carb cleaner around the boot seals while the engine cranks. A change in RPM means a leak is present. Tighten or replace failing clamps and swap brittle boots for new ones to restore a proper air/fuel ratio.
Key checks:
- Clamps tight and not corroded.
- Boots pliable, not cracked.
- Vacuum lines secure and correctly routed.
Engine Mechanical Problems
I focus on the engine parts that stop it from making power: compression and valve timing/clearance. Fixing these keeps the engine turning and firing properly.
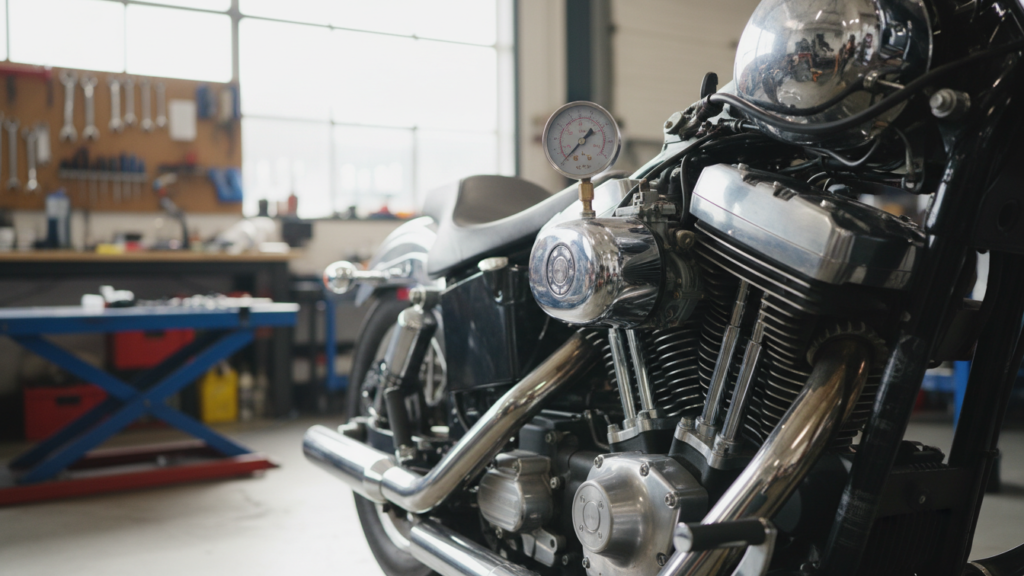
Assess Compression
I start by checking compression with a gauge on each cylinder. Warm the engine, remove spark plugs, screw in the gauge, and crank the starter for five seconds while holding the throttle wide open. Note peak PSI for each cylinder.
Compare readings to the service manual. Values within 10-15% across cylinders are usually fine. Low or uneven compression points to worn rings, a leaking head gasket, or burned valves. A wet compression test helps locate the cause: add a teaspoon of oil to the cylinder and retest. If compression rises significantly, rings or cylinder walls are likely worn. If it stays low, suspect valves or a head gasket.
Record your numbers and take photos. If readings are low and you lack tools or skills for a teardown, plan for professional inspection.
Check Valve Clearance
I check valve clearances because tight or loose valves affect starting and running. With the engine cold, remove the valve cover and rotate the engine to the specified TDC or cam position in the manual. Use feeler gauges to measure the gap between the cam (or rocker) and valve stem.
Compare measurements to the spec in the service manual. Adjust shims or rocker arm screws as required. Tight valves can prevent the intake valve from closing fully, reducing compression. Loose valves can cause noisy operation and poor timing. Recheck after adjustments and torque covers to spec.
Keep a log of clearances and dates. If valves are consistently out of spec, consider valve guide wear or camshaft issues and get a mechanic to inspect further.
Sensor and Safety Switch Checks
I focus on the switches that stop the starter from turning—clutch, kickstand, and neutral sensors—because they commonly block starting even when the battery and spark are fine. I explain how to test each switch and what readings or actions show a fault.
Test Clutch and Kickstand Switches
I start by locating the clutch lever switch and the kickstand (side-stand) switch near the pivot points. With the key on and kill switch set to run, I use a multimeter set to continuity or ohms. Pull the clutch lever and expect continuity (near 0 Ω) when pulled; release and expect open circuit. For the kickstand, fold it up and expect continuity; down should be open. If readings don’t match, try cleaning connectors and spraying contact cleaner on the switch. Bent actuators or misaligned mounts can prevent proper contact, so check mechanical alignment too.
If the multimeter isn’t available, I carefully bridge the switch connector with a jumper to check starter engagement—only as a brief diagnostic and never while the bike is in gear. For model-specific guidance, I consult the service manual or wiring diagram from the manufacturer’s site or a trusted resource like Haynes or the factory manual online.
Inspect Neutral Safety Switch
I check the neutral safety switch to confirm it tells the ECU the gearbox is in neutral. With the bike on a level surface and the transmission in neutral, I use the multimeter on the switch connector and expect continuity. If the bike reads neutral but the switch shows open, the switch may be worn or the wiring damaged. Trace wires visually for nicks, corrosion, or loose connectors at the gearbox area.
If the neutral lamp on the dash doesn’t match the switch reading, I verify the bulb and wiring into the relay. Replacing a faulty neutral switch is usually straightforward, but some bikes require partial fairing removal. For detailed steps and specs, I reference the factory service manual or a reliable tech article like those on Motorcycle Consumer News.
Environmental and Weather-Related Factors
Cold, wet, or high-altitude conditions change how a motorcycle starts. I focus on battery health, fuel-air mix, and moisture entry because those cause most weather-related failures.
Evaluate Cold Weather Starting
Cold reduces battery cranking power and thickens engine oil, so I check the battery first. I use a multimeter: under 12.4 V at rest means the battery is weak. I also test under load or try a jump start to confirm cranking strength.
Fuel and vaporizing matter. I use a richer choke setting or a slightly higher idle when the engine is cold. For fuel-injected bikes, I watch for long cranks; a warm-up cycle or a battery warmer helps. I keep the bike on a trickle charger in storage and use fresh fuel with a stabilizer to avoid gumming.
Moisture can foul spark plugs and carburetors. I dry or replace damp plugs, and I check intake boots and airboxes for water. I store the bike under cover and consider dielectric grease on electrical connectors to keep moisture out.
Consider Altitude Effects
Higher altitude means less oxygen, so a lean air-fuel mix can make starting hard. I watch symptoms like backfiring, slow throttle response, or hard starting above 3,000–5,000 feet. If I ride often at high elevation, I rejet carburetors or have the fuel map adjusted on fuel-injected models.
I check the air filter and intake for restrictions; a clogged filter worsens altitude issues. For EFI bikes, I monitor fuel trims and use a tuner or dealer reflash when necessary. Small adjustments—richer pilot jets or a remapped ECU—usually restore steady starting and idle.
When to Seek Professional Help
I try simple checks first, but I call a mechanic when problems go beyond basic troubleshooting. If the bike still won’t start after checking battery, fuses, fuel, and kill switch, I get a professional opinion.
I contact a pro if I hear grinding, clunking, or other unusual noises when trying to start. These sounds can mean starter, gearbox, or severe internal engine issues that need tools and experience.
I also seek help when electrical faults are intermittent or complex. Faulty stators, charging problems, or wiring faults can be hard to trace without diagnostic gear.
If I smell fuel or smoke, or see oil leaking onto hot parts, I stop and get professional service right away. That can be a fire risk and needs immediate attention.
I hire a mechanic for repairs that require engine disassembly, valve work, or carburetor synchronization on modern fuel systems. These jobs need precision and special tools.
I choose professional help when I lack time, skill, or confidence. A certified technician saves time and prevents costly mistakes.
Quick checklist I use before calling a mechanic:
- Tried basic checks (battery, fuel, fuses, neutral, kill switch)
- Noted strange noises or smells
- Confirmed intermittent or complex electrical faults
- Decided the repair needs special tools or engine work
FAQs
What do I check first when my motorcycle won’t start?
I check the basics: fuel level, kill switch, choke, and neutral gear. These simple items cause many no-starts and take seconds to confirm.
How do I know if the battery is the issue?
I look for weak or no clicking when I press the starter. A voltmeter reading below 12.4 V points to a low battery. Corroded terminals or loose cables are also common culprits.
What if the engine cranks but doesn’t fire?
I confirm spark, fuel, and air. I check spark plugs for fouling, listen for the fuel pump, and ensure the air filter isn’t clogged. Missing one of these means the engine won’t ignite.
Can a starter motor fail without warning?
Yes. I watch for grinding, whirring, or a single click noise. Those sounds often mean the starter or starter relay needs inspection or replacement.
When should I call a mechanic?
I call a mechanic if electrical tests fail, I find internal engine damage, or I lack the tools. I also get professional help for complex fuel-injection and ignition system repairs.
Quick checklist I use:
- Battery voltage and terminals
- Kill switch and neutral
- Fuel level and pump
- Spark plug condition
- Starter motor sounds
I keep this list handy for fast troubleshooting and to decide when I can fix it myself or need help.
Conclusion
I focused on the most common causes first so you can find the likely problem fast. Start with the battery, fuel, and kill/neutral switches. Those cover most no-start cases.
If simple checks don’t fix it, I recommend a step-by-step approach: verify power, check fuel flow, confirm spark, and inspect the starter circuit. Small tests often point to the faulty system without guessing.
I urge you to keep basic tools and a multimeter handy. They save time and money when you troubleshoot on the road or at home.
When a problem looks complex — like internal engine damage, major electrical faults, or timing issues — I suggest professional help. A trained mechanic can prevent costly mistakes.
Use a checklist for future trips. Regular battery care, fuel quality, and wire checks reduce surprises. A short routine prevents many common starting problems.