
You know how a small problem can stop a great ride. Pack a compact toolkit, tire repair gear, a basic first aid kit, and a reliable light so you can fix common issues and stay safe until help arrives. Carry a multitool, socket set or adjustable wrench, tire plug kit or CO2 inflator, first aid supplies, and a flashlight or headlamp to handle most roadside emergencies.
I’ll show you which items earn space in your bag, why each one matters, and how to organize them so you can act fast without guessing. You’ll learn simple fixes and smart gear choices that keep you moving and calm when things go wrong.
Key Takeaways
- Carry versatile hand tools and tire repair gear for common mechanical problems.
- Pack basic medical supplies and reliable lighting for safety and visibility.
- Add simple navigation, weather, and spare-part items to stay self-sufficient on long rides.
Core Emergency Tools Every Rider Should Carry
I focus on gear that fixes common roadside problems fast: tools for bolts, a tyre repair option, and levers to change or patch a tube. Each item must be compact, reliable, and easy for me to use under stress.
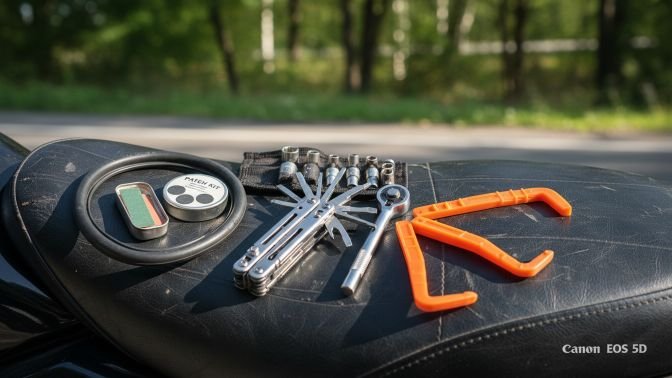
Multi-Tool Kit
I carry a compact multi-tool that combines screwdrivers, pliers, hex keys, and a knife. Look for one with a 10–12 mm socket or an adapter for common motorcycle fasteners, plus a Phillips and flat driver. Metal construction with locking tools is safer and lasts longer.
I keep the kit in a waterproof pouch where I can reach it quickly. A small ratchet or folding wrench set can replace bulkier pieces when I need more torque. Check fasteners for tightness after any repair and carry spare bits if your tool uses removable heads.
Spare Inner Tube or Patch Kit
For tubed tires I carry a correctly sized spare inner tube and a small pump or CO2 cartridge. I mark the tube size and valve type so I don’t grab the wrong one in a hurry. Spare tubes let me get rolling again without guessing at a puncture’s severity.
If I ride tubeless or want less bulk, I pack a patch kit with sandpaper, vulcanizing cement, and patches. Practice patching once at home so you can do it quickly. Replace seals and adhesives when they age or the kit looks used.
Tire Levers
I use two sturdy plastic or metal tire levers to pry the bead off the rim without damaging the rim or tube. Metal levers are stronger but can scratch rims; plastic levers are gentler and usually enough for most motorcycle tires. Choose levers long enough to give leverage but short enough to fit my kit.
I slide one lever under the bead, lock it to the spoke if possible, then work the second lever around the rim to free the tire. Carrying a spare set matters—one can break under pressure, and having backups speeds the job.
Tire and Inflation Solutions
I focus on tools that get you rolling fast: reliable pumps, quick CO2 options, and a small valve core tool to fix leaks or swap cores when needed. Each item saves time and keeps you safer on remote rides.
Portable Air Pump
I carry a compact hand pump that fits my frame bag. Choose a pump rated for your tire type: high-volume pumps for mountain tires and high-pressure pumps for road tires. Look for a pump with a firm hose or a reversible head that fits both Presta and Schrader valves to avoid cross-threading.
A good pump should have a stable base, a pressure gauge, and a threaded hose or secure head so you can pump without breaking the valve stem. I prefer metal construction for durability and a capacity of at least 60 psi for most bikes, or 100+ psi if I ride narrow road tires. A pump adds seconds to a repair but removes the need to rely on canisters.
More on proper tire pressures and guidelines is available from the Bicycle Tire Manufacturers Association and cycling guides at REI.
CO2 Inflator
I use a CO2 inflator for fast roadside inflation when speed matters. CO2 cartridges deliver rapid pressure and are great after a tube swap or patch. Carry several cartridges sized for your tire volume: 16 g works for many road tubes; 25–38 g is better for larger or fat tires.
Pick an inflator with a bleed valve so you can fine-tune pressure and avoid overinflation. Keep cartridges in a protective case to prevent punctures and store them away from heat. Remember CO2 can cool quickly and may affect the tube adhesion of some patches; let the cartridge warm to room temperature before use for best results. For safety tips and cartridge handling, check guidance from major cartridge makers and bike shops.
Valve Core Tool
I never leave home without a small valve core tool. It removes and tightens valve cores on Presta and Schrader valves, which solves slow leaks and allows you to inject sealant or use a threaded valve adapter. A multi-tool with a built-in valve core end or a tiny wrench-style tool works well.
To use it, depress the valve briefly, unscrew the core, and either replace it or add sealant. Tighten the core finger-tight plus a small turn—don’t overtighten, or you risk stripping the threads. Valve cores are cheap to carry as spares and save long walks home when a core has backed out or become clogged.
Essential Safety and First Aid Items
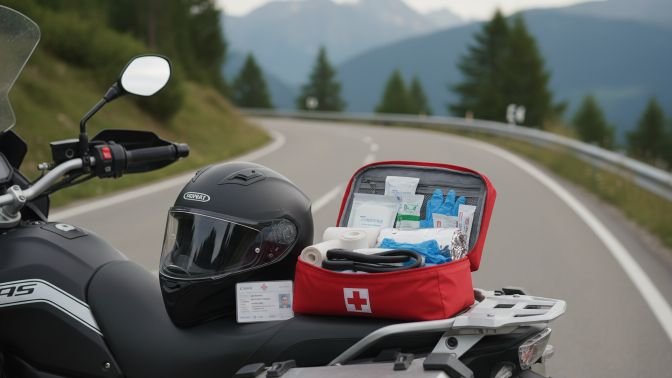
I carry a compact set of items that treat wounds, show my medical needs, and make it easy to call for help. Each item fits on my bike or in my pack so I can reach it fast.
Basic First Aid Kit
I keep a small, organized kit that treats cuts, scrapes, and common riding injuries. It includes sterile gauze pads (2–4 sizes), adhesive bandages (assorted), non‑stick dressings, and adhesive tape. I add antiseptic wipes, a small tube of antibiotic ointment, and single‑use gloves to reduce infection risk.
For bleeding control I carry a compact tourniquet and an Israeli-style pressure dressing. Pain relief and allergy meds I use are acetaminophen, ibuprofen, and an antihistamine in blister packs. I pack a Mylar blanket and a CPR face shield for shock and breathing help.
I store items in a water-resistant pouch with a clear checklist inside. Replace used or expired items after every ride. For kit ideas and checklists I reference the American Red Cross first aid guidance .
Identification and Medical Information
I wear or carry clear ID that lists my name, emergency contact, blood type (if known), and major allergies. I put this on a laminated card, the back of my phone case, or a medical ID bracelet. That way responders can see critical facts at a glance.
I also keep a printed, folded medical info sheet in my kit with current medications, chronic conditions, and my primary doctor’s phone number. A digital copy on my phone under “Medical ID” helps when paper gets wet. For chronic conditions I follow guidance from professional health sites like the NHS.
Whistle
I carry a loud, weather‑proof whistle that makes 100+ dB sound and fits on my vest or keyring. It requires less energy than yelling and can be heard further in wind or traffic. I use three short blasts as a universal distress signal.
I practice using the whistle so I don’t fumble in stress. I keep a spare in my kit in case one gets lost or damaged. A whistle is lightweight, cheap, and often the fastest way to attract nearby help.
Lighting and Visibility Gear
I carry specific lights and reflective items that help others see me and help me see the road. Bright, reliable lights and high-visibility clothing are the two most important pieces I pack for any ride.
Front and Rear Lights
I use a bright LED headlight and a separate rear light with steady and flashing modes. For the front, I prefer a 1000-lumen helmet or handlebar-mounted LED for night rides and a lower setting for urban areas to avoid blinding others. For the rear, I choose a red LED that runs at least 20–40 lumens with a visible flash mode for daytime.
I always bring spare batteries or a small USB power bank. Rechargeable lights with a USB port cut down on battery waste and let me top up power from my phone charger.
I also carry a small penlight and a compact red flasher clip. The penlight helps with roadside repairs and signal tasks. The red flasher can attach to a backpack or seat and increases visibility when stopped on the shoulder.
Reflective Gear
I wear a reflective vest over my jacket whenever visibility is poor or I ride at dusk. I look for vests with wide reflective panels rather than small strips because they catch headlights from farther away.
I add reflective tape to the sides of my helmet, luggage, and fork legs. I use high-contrast yellow or lime tape for daytime visibility and silver reflective tape for night. The tape is low-cost and lasts through rain and vibration.
For extra safety, I carry reflective ankle bands. They are lightweight and move with my legs, which draws drivers’ eyes to my motion. These are especially useful in city traffic and when riding in mixed light conditions.
Communication and Navigation Devices
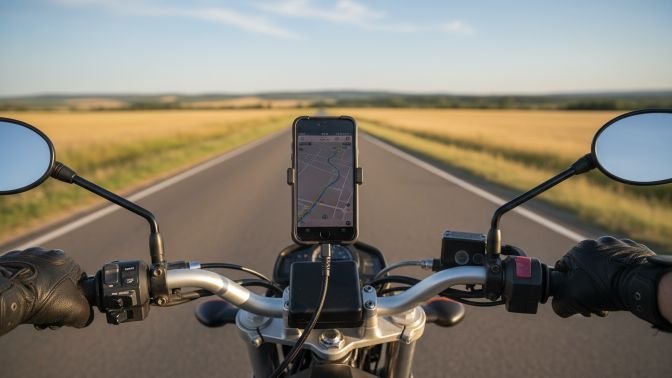
I carry reliable tools that let me call for help, find my way, and keep working when power is low. I focus on devices that fit my bike, resist weather, and are simple to use under stress.
Mobile Phone
I use a rugged smartphone or one in a waterproof case with a strong signal plan. I keep offline maps for my main routes and the areas I ride through so I can navigate without cell service. I install a dedicated riding app that shows turn-by-turn navigation and can share my live location with a contact.
For emergencies, I set up speed-dial and message templates for quick calls or texts. I enable location sharing and medical ID on the lock screen. I also protect the phone in a tank bag mount that keeps the screen visible and use vibration or loud audio alerts for directions.
Portable Power Bank
I carry a high-capacity power bank (minimum 10,000 mAh) that supports at least one USB-A and one USB-C output. This gives me multiple charges for my phone and power for small USB devices like heated gloves or a GPS unit. I choose a power bank with fast-charge capability and a built-in battery-level indicator.
I store the power bank inside a padded compartment to protect it from bumps and weather. I keep a short, durable charging cable and a USB-to-phone adapter ready. I recharge the power bank after every long ride so it’s full when I need it.
Weather and Survival Essentials
I focus on compact, proven items that keep me dry and warm fast. Each tool should stow easily on the bike and work without extra gear.
Emergency Rain Poncho
I carry a lightweight, waterproof poncho sized to cover me and my luggage. I choose one with taped seams and a hood that cinches tight to stop wind-driven rain. Look for a poncho made of at least 2.5 mil TPU or coated nylon for durability without heavy weight.
I prefer a poncho with snaps or side buttons so I can wear it while seated on the bike and still reach controls. A bright color or reflective trim improves visibility in low light. Pack it in a small stuff sack and clip it to the bike for quick access.
Maintenance is simple: rinse mud off, let it dry inside out, then store in the sack. Replace if the coating flakes or if seams leak.
Thermal Blanket
I keep a compact mylar thermal blanket and a thicker emergency bivvy for cold-weather rides. The mylar blanket reflects body heat and fits in a pocket, making it ideal for short stops after a breakdown. The emergency bivvy gives more insulation and blocks wind when I need longer shelter.
I use the mylar for immediate heat retention and the bivvy when temperatures are near freezing. Both fold small; I stash them in a tank bag or tail pack. When using them, I layer clothing inside and protect the ground with a clear plastic sheet to reduce heat loss through conduction.
Inspect these items before long trips. Tears or crinkles can reduce effectiveness, so replace any damaged piece.
Spare Parts and Repair Aids
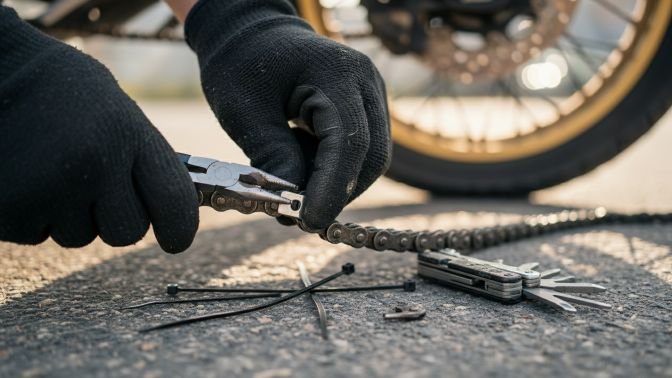
I focus on small, high-impact items that get you rolling again: parts that directly fix common failures and quick aids that hold repairs until you reach a shop.
Chain Link or Quick Link
I carry a spare chain link (quick link) sized to my chain’s pitch and width. For most motorcycles that means a 520, 525, or 530 quick link. I store it in a small plastic tube with a drop of light oil to prevent rust and a tiny pair of pliers in my tool roll to open and close it.
When a link breaks, a quick link lets me rejoin the chain without a full toolset. If your chain master link is clip style, bring the clip type. For rivet-style chains I pack a spare rivet and a compact chain tool, but be aware that a pressed rivet repair is often temporary. For guidance on sizing and correct install, I refer to manufacturer specs or a reliable source like Motorcycle Consumer News.
Cable Ties
I always carry a packet of nylon cable ties in mixed lengths (4″, 8″, 11″). They secure loose fairings, hold wiring, or fasten a leaking coolant hose temporarily. I keep a metal-backed pair: standard ties for quick holds and a few stainless steel ties for higher-heat areas.
Cable ties are versatile: use multiple small ties to distribute load, or loop a large tie as a temporary strap. I also pack a small cutter or multitool to trim ties cleanly. For durability tips and heat ratings, I check supplier specs at sites like McMaster-Carr when choosing ties for motorcycle use.
Practical Extras for Extended Rides
I pack a few non-tool items that solve real problems on long rides: a small amount of cash and a couple of cards, plus quick, compact calories that digest fast. These items sit where I can reach them without stopping for long.
Cash and Cards
I carry a small wallet with $20 in cash and one credit/debit card. Cash helps when a rural shop or café won’t take cards, or a vending machine needs coins. I keep the wallet in a zippered pocket or saddle bag so it stays dry and safe.
I also bring an emergency contact card with a phone number and any medical needs written plainly. If my phone dies, first responders can still access the info. I check card expiration dates before long trips and stash a photocopy of my card details at home, not with me.
Energy Snacks
I bring 3–4 energy gels or bars and a couple of pieces of easy fruit like a banana or an apple. Gels work well when I need a fast sugar hit; bars give longer fuel and a little chewing break. I pick high-carb, low-fiber options to avoid stomach upset.
I pack snacks in a small, resealable bag so they stay clean and dry. I eat a small portion every 45–60 minutes on long rides to keep my energy steady instead of waiting until I feel drained.
FAQs
What basic tools do I always carry?
I carry a compact multi-tool, tire repair kit (plugger and small compressor or CO2), a set of screwdrivers, and adjustable wrenches. These cover most common roadside fixes without taking much space.
Do I need a full socket set?
I keep a small, lightweight socket set for essential fasteners only. A full, heavy set is useful at home but not for most quick roadside repairs.
What first aid items should be in my kit?
I include adhesive bandages, antiseptic wipes, sterile gauze, and a CPR mask. A compact first aid kit plus personal meds is usually enough for immediate care.
How do I carry these tools?
I use a tank bag or tail bag with compartments, and a small tool roll for the wrenches and sockets. Keeping items organized speeds up repairs and keeps the bike balanced.
How often should I check my kit?
I inspect tools and consumables before long trips and at least once per season. Replace used items and test inflators and batteries regularly.
Can I learn to use these tools easily?
Yes. I practice basic tasks like changing a tire, tightening bolts, and using a puncture repair kit at home. Short practice sessions build skill and confidence quickly.
Conclusion
I focus on practical, compact gear that solves the problems I’m most likely to meet on the road. A small toolkit, tire repair items, basic first aid, and weather protection let me fix common issues or stay safe while I wait for help.
I check and pack these items before every ride. Regularly inspecting tools and replacing used or expired supplies keeps the kit ready and reliable.
I balance weight and usefulness. I carry multi-use tools and light, foldable items so my bike stays manageable and I still have what I need.
I train myself on basic repairs and first aid. Skills make the gear more effective and cut the time I might spend stranded.
I recommend a simple checklist I follow:
- Multi-tool, tire plug kit, compact pump
- Small socket set or wrench, screwdrivers
- First-aid supplies, antiseptic wipes, emergency blanket
- Flashlight, phone charger/power bank, reflective vest
I update my kit based on trip length, weather, and route. That keeps the load light but the preparedness strong.