
A motorcycle pre-ride safety inspection is a quick check you do before riding to make sure your bike is safe and ready for the road. It involves examining key parts like tires, brakes, lights, fluids, and controls to prevent accidents and mechanical problems. This simple step helps avoid costly breakdowns and keeps you safer while riding.
Doing a pre-ride inspection is a smart habit for every rider, whether you ride daily or just on weekends. By spending a few minutes on this routine, I can spot small issues before they turn into big problems. It also gives me confidence that my motorcycle will perform well and respond properly when I hit the road.
Taking time to inspect my bike is part of being a responsible rider. Knowing exactly what to look for and how to check it saves me time, money, and frustration later. It’s a small effort that can make a big difference every time I ride.
Key Takeaways
- Checking critical motorcycle parts before riding reduces risks.
- A quick inspection prevents breakdowns and costly repairs.
- Routine checks improve overall safety and riding confidence.
Understanding the Motorcycle Pre-Ride Safety Inspection
A motorcycle pre-ride safety inspection is a quick check I perform every time before riding. It helps me make sure my bike is safe and ready to go. This includes looking at important parts like tires, brakes, fluids, and controls. Doing this regularly keeps me safer and helps avoid breakdowns or accidents.
Definition and Purpose
The pre-ride safety inspection means checking my motorcycle before I start a ride. I look at several key areas like tire pressure, brake function, fluid levels, and lights. I also test the throttle and clutch to make sure they work smoothly. The purpose is to find problems early before they cause breakdowns or accidents.
This inspection doesn’t take long but makes a big difference. It ensures the bike is in good working order and ready for the road. I also confirm I have enough fuel and that the chain is properly lubed and adjusted. Doing this helps me stay safe and confident when I ride.
Benefits of Regular Inspections
Performing these checks regularly helps me prevent mechanical failures while riding. It also reduces the chances of accidents caused by faulty brakes, tires, or controls. I save money in the long run by catching small issues before they become costly repairs.
Feeling confident about my bike’s condition lets me focus more on the ride. I also avoid unexpected stops or delays from breakdowns. Plus, getting into a routine of inspecting the bike sharpens my awareness of how it performs.
Legal and Safety Implications
Some places require riders to keep their motorcycles in safe condition by law. A pre-ride check can help me meet those legal safety standards. If I ride with broken lights or bad brakes, I risk getting fined or worse.
Safety-wise, riding with a faulty bike endangers not just me but everyone else on the road. Regular inspections help me minimize this risk by making sure critical components like brakes and lights work well. It also ensures emergency gear like the horn is ready if I need it.
| Key Points | Details |
|---|---|
| Legal Requirements | Many states require safe equipment and lights |
| Safety | Prevents accidents and protects other drivers |
| Inspection Helps Compliance | Keeps the motorcycle road-legal and secure |
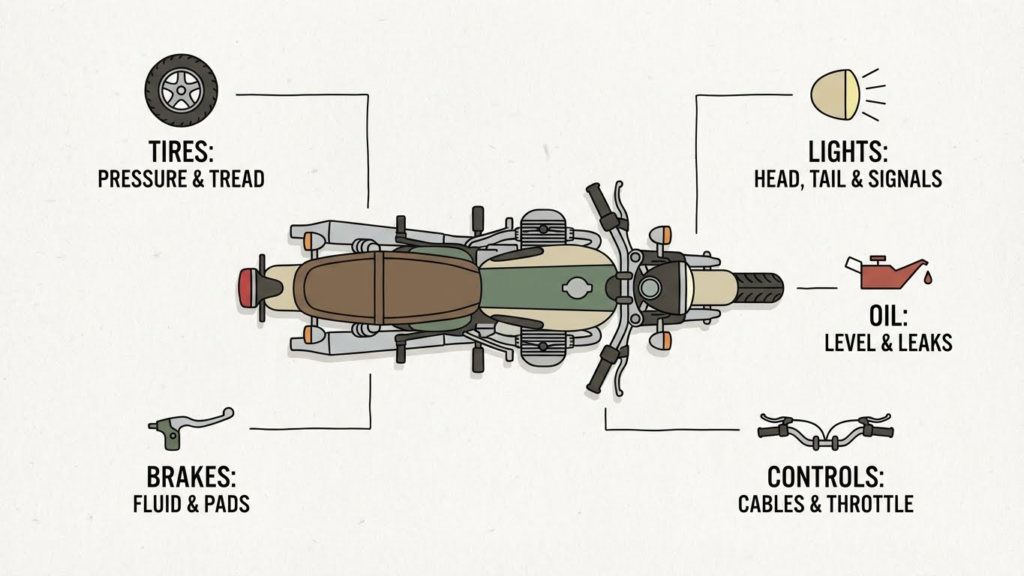
Key Components to Inspect
Before every ride, I carefully check several parts of my motorcycle that affect safety and performance. These include the tires, brakes, lights and electrical system, and controls and cables. Paying close attention to these areas helps me avoid accidents and mechanical problems on the road.
Tires and Wheels
I start by inspecting the tires for proper inflation and visible damage. The right tire pressure improves handling and fuel efficiency, so I use a pressure gauge to measure it against the manufacturer’s recommended level. I also look for cracks, cuts, or uneven wear on the tread.
Next, I check the wheels for any bends, cracks, or missing spokes if applicable. Damaged rims can cause instability while riding. Finally, I make sure the tires have enough tread depth to grip the road well, especially in wet conditions. Proper tire maintenance is critical for safety and can prevent blowouts or loss of control. More details on safe tire care can be found at the U.S. Consumer Product Safety Commission.
Brakes
The brakes need a thorough check every time before I ride. First, I test the brake levers and pedals to make sure they respond smoothly without feeling spongy or too stiff. Then, I inspect the brake pads for wear. Worn-out pads reduce stopping power and can damage the rotors.
I also check brake fluid levels in the reservoirs. Low fluid or dirty fluid signals the need for a refill or bleed to remove air bubbles. Finally, I listen for any unusual noises when squeezing the brakes during a short test ride. Proper brake function is essential to avoid accidents and stop quickly in emergencies.
Lights and Electrical System
Ensuring all lights and the electrical system work correctly is key before riding at night or in traffic. I test the headlights, brake lights, turn signals, and hazard lights to confirm each bulb works and flashes properly. Faulty lights reduce visibility and can increase risk on the road.
I also check the horn since it is a vital alert tool. Examining the battery terminals for corrosion and ensuring a full charge helps avoid sudden electrical failures. A properly working electrical system supports safety and avoids problems like getting stranded. More information on motorcycle lighting standards is available at the National Highway Traffic Safety Administration.
Controls and Cables
Controls and cables impact how well I can maneuver the motorcycle. I check the throttle for smooth operation and return to idle quickly when released. The clutch lever should have proper free play with no stiffness, allowing me to shift gears without strain.
I also inspect all cables for fraying, kinks, or rust, which can cause sudden control failures. Lubricating cables prevents wear and keeps controls responsive. Lastly, I verify the handlebars turn freely and the switches for lights and signals function without sticking. Well-maintained controls increase riding confidence and reduce fatigue.
Step-By-Step Pre-Ride Inspection Process
I make sure my motorcycle is safe by following a clear and organized routine. This includes getting ready with the right mindset and tools, doing a careful check of key parts, and writing down or fixing any problems I find. Each step helps me avoid breakdowns or accidents.
Preparing for Inspection
Before I start, I park my motorcycle on a flat, stable surface and turn off the engine. I wear gloves if needed and have all my tools handy, like a pressure gauge and flashlight. This setup helps me focus and stop me from missing important checks.
I also review the owner’s manual sometimes. It reminds me of specific parts to check based on my bike’s model. Lastly, I make sure I’m not rushed or stressed. Taking my time means I’m more likely to spot risks early.
Systematic Walkaround Checks
I follow a set order during my inspection to cover everything. First, I check the tires. I look for cracks, punctures, and make sure they have enough tread. I use a pressure gauge to confirm the air pressure matches the recommended level.
Next, I test the brakes by squeezing the front and rear brake levers. They should feel firm, not spongy or loose. Then, I check all lights—headlights, brake lights, turn signals—and make sure they work.
I also inspect the chain or belt for tightness and lubrication. The fluid levels matter too; I check oil, brake fluid, and coolant. Finally, I test the throttle responsiveness and make sure mirrors and controls feel secure.
Documenting and Addressing Issues
If I find any issues, I write them down clearly. This helps me keep track and plan repairs. For minor problems like low tire pressure or loose bolts, I fix them immediately.
More serious issues, like worn brake pads or leaking fluids, I note for professional repair. I avoid riding until those problems are fully solved. Keeping a simple checklist on my phone or notebook helps me stay organized each time I inspect my bike.
Common Issues Detected During Pre-Ride Inspections
When I perform a pre-ride inspection, I focus on specific problems that could stop the motorcycle or cause danger. These issues often involve the tires, brakes, and the hardware holding the bike together.
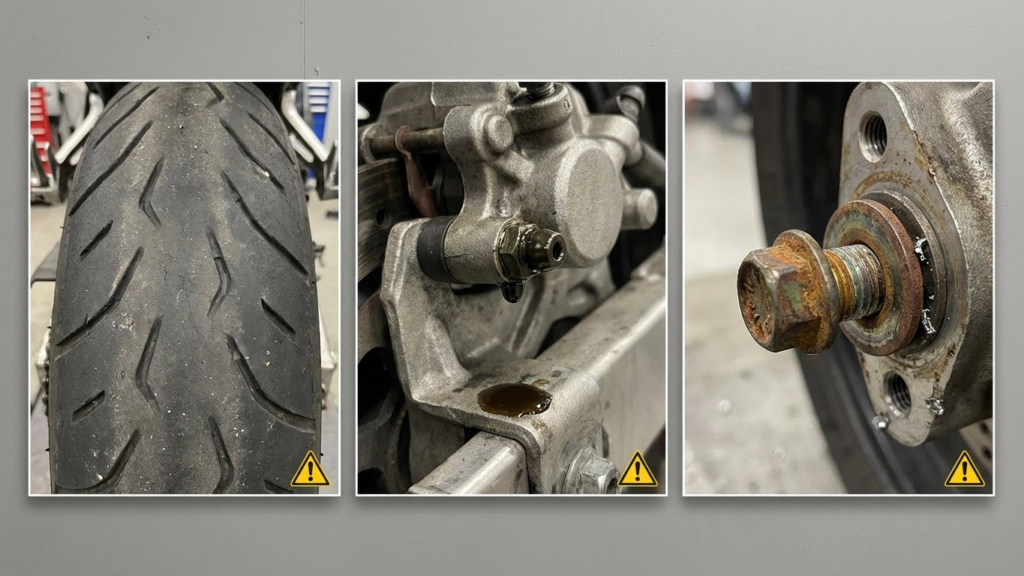
Worn or Underinflated Tires
Tires are one of the most important parts to check. I look for worn tread because it reduces grip, especially on wet roads. If the tread is shallow or uneven, it’s time to replace the tires.
I also check tire pressure with a gauge before riding. Underinflated tires can cause poor handling and increase the risk of a blowout. Overinflated tires may reduce traction and cause a harsh ride.
Other problems like cracks, bulges, or embedded objects in the tire sidewalls can lead to sudden failure. I make sure there aren’t any visible damages or signs of dry rot. Proper tires help keep me safe and in control.
Brake Fluid Leaks
Brakes must work perfectly every time. One issue I often find is brake fluid leaks around the master cylinder or brake lines. Leaks lower brake fluid levels, which affects braking power and can cause brake failure.
I check the fluid level in the brake reservoir and look for wet spots or stains near the calipers and hoses. If I see leaks, I avoid riding until the problem is fixed.
Additionally, I inspect the brake fluid color. Dark or dirty fluid means it’s time for a change to keep the system working right. Keeping brakes leak-free ensures I can stop quickly and safely.
Loose Bolts or Fasteners
Loose bolts on a motorcycle may sound minor, but they can cause big problems. I check critical bolts on the frame, engine mounts, and suspension to make sure everything is tight.
If bolts or nuts are loose, parts might shift or come off while riding. I also check smaller fasteners on the handlebars and bodywork. These can vibrate loose over time.
Using a proper tool, I tighten anything loose to the correct torque. This prevents mechanical failures and keeps the bike steady. Loose hardware is a risk I don’t ignore during inspections.
Tools and Supplies Needed
To perform a thorough pre-ride safety inspection, I rely on a few essential tools and supplies. These help me check key items like tires, brakes, and fluids quickly and accurately. Having the right gear makes the process safer and more efficient.
Basic Inspection Tools
I keep a tire pressure gauge with me at all times. Checking tire pressure before each ride is critical to avoid accidents caused by underinflated or overinflated tires. A flashlight is also handy to inspect hard-to-see parts, such as underneath the bike or inside the headlight housing.
A small set of wrenches and screwdrivers helps me tighten loose bolts or adjust controls like the clutch or throttle. I also use a clean rag to wipe off oil or dirt from sensitive parts. My toolkit usually fits into a compact pouch for easy transport.
For detailed guidance on tire care and other tools, I recommend visiting the Motorcycle Safety Foundation. They offer easy-to-understand tips and equipment suggestions.
Recommended Maintenance Items
In addition to basic tools, I always check engine oil, brake fluid, and chain lubricant before heading out. These fluids affect how well the bike performs and how safely it stops. I carry a small bottle of chain lube and a spray nozzle for quick application right before the ride.
Brake fluid levels need checking with a clear view of the reservoir, so I use a clean cloth to wipe the reservoir before inspection. Engine oil can be checked with a dipstick or sight glass, depending on the bike model.
I also make sure to have a replacement bulb or two and spare fuses for lights. This way, if something fails on the road, I can quickly fix it without needing to stop for long. Keeping these supplies organized saves time and stress, especially on longer rides.
For more detailed info on fluids and maintenance supplies, the AMA Motorcycle Guide is a useful resource.
Rider Responsibilities and Best Practices
Knowing exactly what to check on both the motorcycle and myself before I ride helps keep everything safe and smooth. It means building habits and staying up-to-date with the latest safety information. These two steps are key to reducing risks and handling my bike with confidence.
Establishing a Routine
I make it a habit to perform a full pre-ride inspection before every ride. This means I check tires for pressure and condition, brakes for function and fluid levels, and lights and horn to ensure they work properly. I also feel the throttle and clutch for smooth response, and check for any loose parts or leaks.
Doing these steps in the same order every time helps me catch problems early and makes the process quick and reliable. I use a mental or written checklist to avoid missing anything important. This routine keeps my bike ready and reduces surprises on the road.
Staying Informed on Safety Standards
Motorcycle safety rules and best practices change as technology and laws evolve. I read updates from trusted sources like safety organizations and manufacturers regularly. This helps me learn about new gear, safety courses, or bike features that can make riding safer.
I also follow local laws about helmets, lighting, and other gear. Knowing these helps me avoid fines and keep my ride legal and protected. Staying informed means I can adjust my checks and habits as needed to stay safe and confident out there.
Consequences of Skipping the Pre-Ride Safety Inspection
When I skip the pre-ride safety inspection, I increase the chances of something going wrong on the road. Even small problems, like low tire pressure or a faulty brake, can lead to dangerous situations.
Mechanical failures are a common result. For example, if my chain is too loose or not lubricated, it might snap while I’m riding. This can cause me to lose control or even crash.
Missing problems with lights or the horn makes me less visible and less able to warn others. This raises the risk of accidents, especially at night or in bad weather.
Here are some main risks I face if I skip the inspection:
- Brake failure or reduced stopping power
- Flat tire or blowout
- Engine problems due to low fluids
- Unresponsive throttle or controls
- Chain or belt issues
The simple checks in the inspection help catch these issues early. I know that ignoring them is not worth the risk to my safety and my bike’s condition.
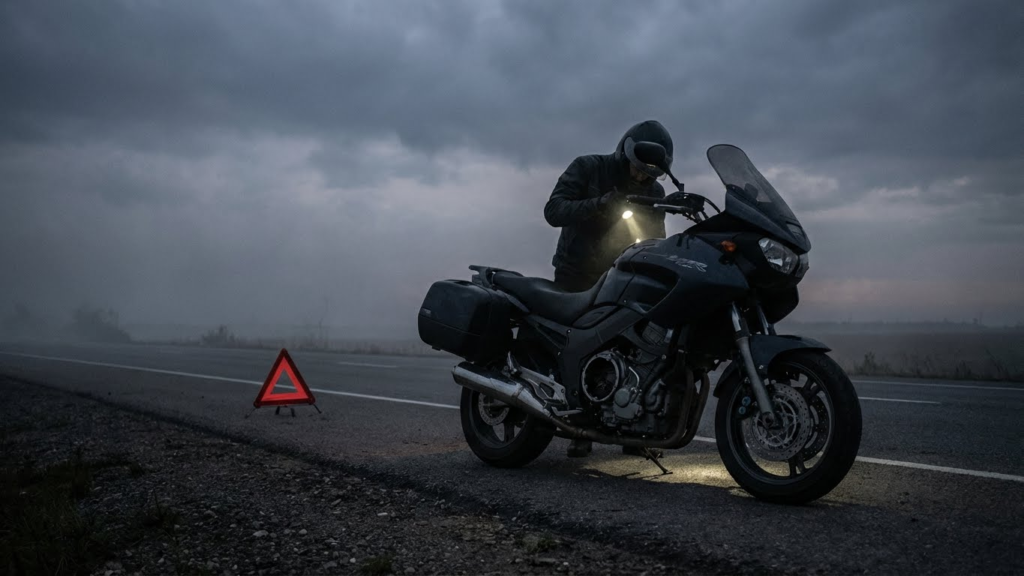
Skipping the checks also increases the chance of breaking down. That can leave me stranded on the road, which is inconvenient and unsafe. Taking just a few minutes to inspect the bike helps me avoid both crashes and breakdowns.
Enhancing Motorcycle Longevity Through Inspections
I believe regular pre-ride inspections play a key role in making my motorcycle last longer. By checking important parts before every ride, I can catch small problems early. This prevents bigger and more expensive damage later.
Some critical areas I always inspect include tires, brakes, fluids, and electrical systems. For example, worn tires or low brake fluid can wear down parts faster. Spotting these issues helps me fix them before they hurt other components.
I also find that keeping my motorcycle well-maintained improves its performance. When mechanical parts work smoothly, there is less stress on the engine and frame. This careful attention extends the time I can safely use my bike.
To keep track, I use a simple checklist each time I inspect my motorcycle. This helps me stay consistent and not forget any steps. My list includes:
- Tire pressure and condition
- Brake function and fluid level
- Lights and signals
- Oil and coolant levels
- Chain or belt condition
These regular checks create a habit that supports both safety and longevity. Over time, I see fewer breakdowns and less need for major repairs. That saves me money and keeps my motorcycle ready to ride.
FAQs
What is a motorcycle pre-ride safety inspection?
It’s a quick check I do before riding to make sure my bike is safe and ready. I look at tires, brakes, lights, fluids, and controls. This helps prevent breakdowns and accidents.
How long does the inspection usually take?
Typically, it takes about 5 to 10 minutes. Spending a little time here can save me trouble on the road.
Which parts should I always check?
I always check these key items:
- Tire pressure and condition
- Brake function and fluid levels
- Lights (headlights, brake lights, and indicators)
- Oil and other fluids
- Throttle and clutch responsiveness
Can I skip the inspection on short rides?
No, I don’t skip it. Even short trips can be risky if the bike has issues. Doing the inspection every time builds good habits.
Do I need tools for the inspection?
Basic tools aren’t usually needed. Pressure gauges and a flashlight can help but I mostly use my hands and eyes.
What if I find a problem?
If I spot something wrong, like low brake fluid or a flat tire, I fix it before riding. If it’s a big issue, I get a mechanic to check it.
This small routine makes a big difference in staying safe on every ride.
Conclusion
I always make a pre-ride safety inspection a part of my routine before riding. It helps me catch any possible problems early. This simple habit reduces the chances of accidents and bike breakdowns.
The key parts I focus on include tires, brakes, lights, fluids, and controls. Checking these can save time and money on repairs later. I also find it gives me peace of mind.
For longer trips, I sometimes get a professional to inspect my bike. But even for short rides, a quick check can make a big difference. I believe every rider should take these few minutes seriously.
In the end, this safety check isn’t just about the bike—it’s about protecting myself. The time spent upfront is worth it compared to dealing with avoidable risks on the road.