
Starting motorcycle maintenance can feel overwhelming, but focusing on a few key tasks will keep your bike safe and reliable. The most important maintenance beginners should learn first is how to regularly check tires, oil, brakes, and the chain. These parts affect your bike’s safety and performance the most, so keeping them in good shape is critical.
Knowing how to inspect and adjust these areas helps you avoid breakdowns and costly repairs. Simple routines like checking tire pressure, oil levels, brake function, and chain tension can make a big difference in how your bike runs and responds on the road.
Learning these basics builds a strong foundation for more advanced care later. Taking the time to understand your motorcycle’s core needs helps you enjoy riding with confidence and control.
Key Takeways
- Regular safety checks on key parts keep your bike reliable.
- Basic engine and drive system care prevent major problems.
- Simple routines improve riding safety and performance.
Essential Safety Checks
Keeping your motorcycle safe to ride starts with checking a few critical parts before every trip. I focus on the tires, brakes, and lights since these affect how well the bike handles, stops, and stays visible. Making these checks part of my routine helps me avoid surprises and keeps me confident on the road.
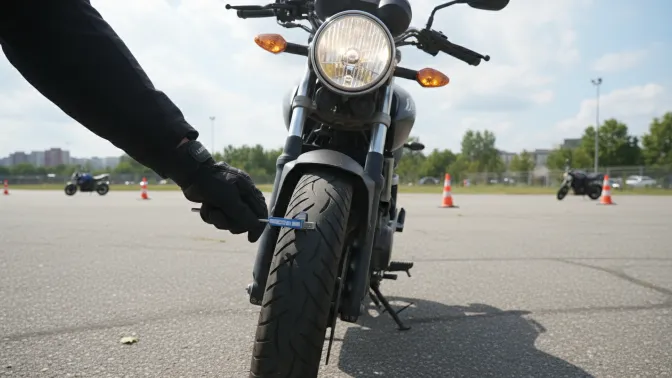
Tire Inspection and Pressure
I begin with the tires because they are the only contact points between me and the road. I look for cracks, cuts, or objects stuck in the tread. If the tread is worn down close to the wear indicators, it’s time to replace the tire.
Next, I check tire pressure with a gauge. Proper pressure is important for good handling and fuel efficiency. The recommended tire pressure is usually printed on a sticker on the bike or inside the manual. I always check pressure when the tires are cold, because heat can make the pressure seem higher than it really is. Keeping tires at the right pressure helps prevent flats and makes the ride smoother.
Brake Function Test
Checking brakes means ensuring both the front and rear brakes respond well. I start by squeezing the brake levers to feel if they are firm, not spongy. A soft lever might mean air in the brake lines or low brake fluid, which I need to fix right away.
I also test the brakes while rolling slowly. Both brakes should stop the bike smoothly without pulling to one side or making strange noises. If the brakes feel weak, it could indicate worn pads or disks that need replacement. Good brakes give me peace of mind that I can stop quickly when it counts.
Lights and Signals Review
Before I ride, I check all lights and signals so other drivers can see me clearly. This includes the headlight, tail light, brake light, and turn signals. I turn each on to confirm they work and are bright enough.
I also make sure the lenses are clean and free from cracks because dirt or damage can reduce visibility. Proper lighting lets me communicate my actions on the road and stay visible in low light or bad weather. Fixing any burned-out bulbs before I leave saves me trouble and increases safety.
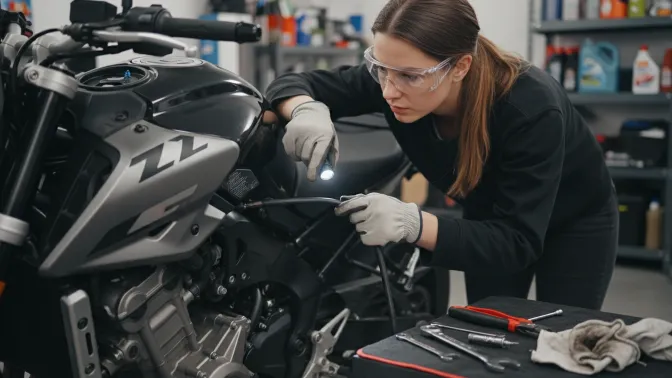
Basic Engine Maintenance
Keeping the engine in good shape is key to avoiding breakdowns and extending your motorcycle’s life. I focus on checking oil and coolant levels regularly and inspecting the air filter to ensure the engine runs smoothly and doesn’t overheat.
Oil Level Check and Replacement
Oil lubricates the engine’s moving parts and helps prevent wear and overheating. I make it a habit to check the oil level weekly using the dipstick or sight glass, depending on the bike model. The engine should be cool and on level ground to get an accurate reading.
Changing the oil is just as important as checking it. I follow my motorcycle manual for the right oil type and replacement schedule, usually every 3,000 to 5,000 miles. Old, dirty oil can cause engine damage. Don’t forget to replace the oil filter at the same time to keep the oil clean. For more details on oil types and schedules, you can visit This is Motorcycling.
Coolant Level Monitoring
Coolant keeps the engine from overheating, especially during hot weather or long rides. I check the coolant level every two weeks by looking at the reservoir while the engine is cold. The level should be between the “min” and “max” marks.
Top up the coolant with the right mixture of water and antifreeze recommended in your owner’s manual. Never open the radiator cap while the engine is hot, as this can cause serious burns. Keeping the coolant clean and at the right level prevents engine overheating and costly repairs.
Air Filter Inspection
The air filter stops dirt and debris from entering the engine, which can cause poor performance or damage. I inspect the air filter every few weeks, especially if I ride in dusty or dirty conditions.
Cleaning or replacing the air filter depends on its type. Foam filters can be washed and oiled, while paper filters usually need replacement once clogged. A clean air filter improves fuel efficiency and engine power. If you want step-by-step help, check out this guide on Basic Motorcycle Maintenance.
Drive System Care
Taking care of the drive system is key to keeping your motorcycle running smoothly. It involves regular cleaning, lubrication, and inspection. These steps prevent wear and help you avoid costly repairs later.
Chain Cleaning and Lubrication
The chain is the main part that transfers power from the engine to the wheel. I check my chain every week or after riding in the rain. Dirt and grime build up quickly and can cause the chain to wear out faster.
I clean the chain using a mild chain cleaner and a brush. It’s important to remove all dirt before applying lubricant. After cleaning, I use a specific motorcycle chain lubricant on the inside of the chain while slowly turning the wheel. This ensures each link gets coated evenly.
Lubricating the chain reduces friction and protects against rust. I avoid using WD-40 or other household oils since they can damage the chain. Keeping the chain clean and lubricated improves performance and extends its life.
Drive Belt Inspection
If my motorcycle has a drive belt instead of a chain, I inspect it differently. I look closely for cracks, fraying, or missing teeth on the belt. These signs mean the belt needs replacing soon.
I check the tension by pressing on the belt—too loose or too tight can cause problems. The owner’s manual usually shows the right tension measurement. If I find damage or incorrect tension, I get it fixed before riding more.
Belts don’t need lubrication like chains, but they do need regular inspection. A worn or damaged belt can break and leave me stranded. Staying on top of belt care keeps my ride safe and reliable.
Fuel System Awareness
Knowing how your fuel system works and staying on top of its condition is key to keeping your motorcycle running smoothly. I focus on two main areas: making sure the fuel quality and level are right, and checking the fuel lines for damage or leaks. Both help avoid performance problems and keep the engine healthy.
Fuel Level and Quality
I always check my fuel level before rides to avoid running out unexpectedly. Keeping the tank at least a quarter full helps prevent the fuel pump from overheating and sucking up dirt from the bottom.
Good fuel quality is just as important. I use fresh fuel and avoid old gas that can cause clogging or engine trouble. Adding a fuel stabilizer if the bike sits for a long time also protects the system from damage.
Regularly draining old fuel and refilling with clean gas keeps my engine performance steady. A bad smell or dark color in the tank is a sign that the fuel needs changing.
Fuel Line Inspection
I inspect the fuel lines for cracks, leaks, or swelling before every ride. Damaged fuel lines can cause leaks, poor engine response, or even fires.
I run my fingers along the fuel hoses and look closely where the lines connect to the tank and engine. Any brittleness or stickiness means it’s time to replace them.
Replacing fuel lines at the first sign of wear is a small job that prevents bigger problems. I recommend using quality rubber or braided lines made for motorcycles. This ensures safety and consistent fuel flow.
Battery Maintenance
Keeping your motorcycle battery in good shape is key to starting your bike and avoiding breakdowns. I focus on two main things: watching the battery charge and keeping the terminals clean. These simple habits help your battery last longer and work better.
Battery Charge Monitoring
I always check my battery’s charge regularly to avoid surprises. A battery that’s too low won’t start the bike, especially in cold weather. To test the charge, I use a multimeter and look for a voltage between 12.4 and 12.7 volts when the engine is off.
If the voltage is below 12.4 volts, I recharge the battery with a proper charger. Avoid jump-starting too often because it can damage the battery. Keeping the battery charged also means removing it during long storage periods and using a trickle charger to keep it healthy.
Learn how to monitor your battery charge properly at Battery University.
Terminal Cleaning
Dirty or corroded terminals cause poor connection and can stop your bike from starting. I check my battery terminals often for any white or green powdery build-up. When I see corrosion, I clean terminals carefully using a mix of baking soda and water.
First, I remove the battery cables and apply the baking soda paste with a toothbrush. After scrubbing, I rinse with water and dry the terminals. Applying a thin layer of dielectric grease afterward helps prevent future corrosion.
A clean connection means better power flow and fewer starting problems. Check this simple guide on how to clean battery terminals for step-by-step instructions.
Control and Cable Checks
I pay close attention to how my controls and cables feel and respond every time I ride. Making sure the clutch, throttle, brake lever, and pedal all work smoothly can prevent bigger problems and keep me safe on the road. These parts need regular inspection and adjustment.
Clutch and Throttle Adjustment
For the clutch, I check that there’s the right amount of free play—usually about 10-20 mm at the lever. Too tight and the clutch might not fully engage, causing slipping. Too loose and it might drag, making gear changes rough.
I also look for smooth cable movement, making sure it’s neither frayed nor rusted. Lubricating the cable can help it slide freely. The throttle should snap back quickly when I let go. If it doesn’t, I find and clean any dirt or debris around the throttle tube.
Adjusting these cables usually means turning adjusters near the levers until the right tension feels correct. Keeping these controls smooth is key for good bike handling and rider comfort.
Brake Lever and Pedal Operation
I inspect the brake lever on the right handlebar and the rear brake pedal near my right foot. Both should move easily without sticking. I check for adequate lever free play, usually around 10-15 mm. Too little free play can cause the brakes to drag, while too much reduces braking power.
It’s important to keep lever and pedal pivots clean and lubricated to avoid stiffness. I also look for any damage or loose bolts that could affect operation. If the brake feels soft or spongy, it could signal air in the brake lines, which means I should bleed the brakes or have a mechanic do it.
Regular checks here help me trust my brakes and maintain control during sudden stops.
Final Preparations Before Riding
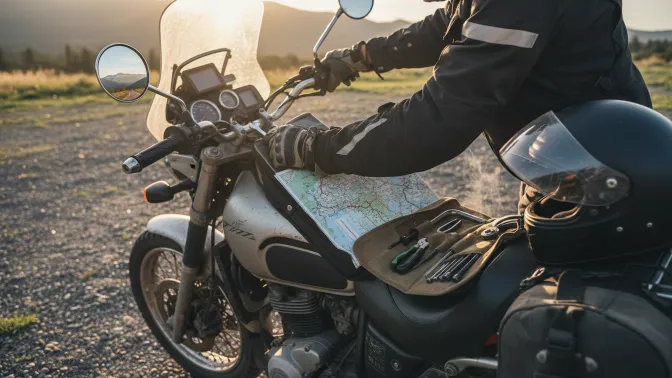
Before I hit the road, I make sure a few key things are set to keep me safe and ready. Adjusting mirrors and controls to fit my body helps me stay comfortable and aware while riding. I also double-check my toolkit so I’m prepared for minor fixes if something goes wrong.
Mirror and Control Positioning
I start by adjusting my mirrors so I have a clear view behind me without moving my head too much. The left and right mirrors should show the edges of my arms or the motorcycle’s sides to avoid blind spots. This lets me see cars or obstacles approaching from behind.
Next, I set up the handlebars, brake, and clutch levers to fit my hand size and riding style. The levers need enough free play for smooth operation but without being too loose. I also check the throttle response— it should snap back quickly when I release it to avoid unexpected acceleration.
Proper mirror and control positioning reduces strain and improves reaction time, which makes riding safer and more enjoyable.
Toolkit Familiarity
I keep a small, basic toolkit with me every time I ride. It usually includes screwdrivers, pliers, an adjustable wrench, tire pressure gauge, and a patch kit. Knowing where each tool is helps me respond quickly if I need to tighten bolts, fix a flat, or adjust the chain.
I recommend practicing simple repairs in a safe place before venturing out. Changing a tire or adjusting the chain on the side of the road can be stressful if you aren’t familiar with the tools. Having this knowledge saves time and frustration.
The key is to carry only what’s necessary but enough to handle common issues without overloading the bike. This balance keeps me prepared without adding extra weight.
FAQs
What are the first motorcycle maintenance tasks I should learn?
I recommend starting with checking tire pressure, oil levels, and the chain. These are simple but very important for safety and bike performance. Learning to inspect brakes and lights early is also helpful.
How often should I do basic maintenance checks?
I suggest doing quick checks before every ride, like tires, brakes, and lights. A more thorough check, including oil and chain care, can be done weekly or after every few hundred miles.
Do I need special tools for maintenance?
You don’t need many tools at first. Basic tools like a tire pressure gauge, oil funnel, chain cleaner, and a wrench set cover most tasks beginners face. As you gain experience, you can expand your tool kit.
Can I maintain my motorcycle without professional help?
Yes, you can handle basic maintenance on your own. However, some tasks like valve adjustments or major repairs are best left to professionals until you get more experience.
Is it necessary to follow a maintenance schedule?
Absolutely. A simple schedule helps me keep track of what needs attention and when. Most bikes have recommended intervals in their manuals, and sticking to these keeps the bike reliable.
| Task | Frequency | Why It Matters |
|---|---|---|
| Tire Pressure | Before every ride | Safety and handling |
| Oil Check | Weekly or 500 miles | Engine health |
| Chain Cleaning | Weekly or after rain | Smooth ride, longer chain life |
| Brake Check | Before every ride | Stopping power and safety |
Conclusion
Learning the basics of motorcycle maintenance is an important step for every new rider. I found that starting with simple tasks like checking tire pressure, oil levels, and brake function gives me confidence and helps keep my bike safe.
Routine upkeep prevents bigger problems later. For example, adjusting the chain tension and lubricating cables regularly can extend my bike’s life and improve performance. These small actions also save money by avoiding costly repairs.
To stay organized, I use a simple checklist:
| Task | Frequency |
|---|---|
| Check tire pressure | Weekly |
| Inspect brakes | Weekly |
| Change oil | Every 3,000 miles |
| Adjust chain | Every 500 miles |
| Lubricate cables | Monthly |
Taking responsibility for my motorcycle’s care makes me a safer and more confident rider. It’s not just about following rules—it’s about understanding how my bike works and being prepared on the road. Starting with these basic skills builds a strong foundation for more advanced maintenance as I gain experience.