
You know riding a bike feels freeing, but it also puts you at risk every time you hit the road. Wear a DOT- or ECE-certified full-face helmet, a sturdy armored jacket, abrasion-resistant pants, gloves, and proper riding boots to cut your chance of serious injury. Those core pieces protect your head, skin, joints, and feet so you can ride with more control and confidence.
I’ll show why each item matters and how to pick gear that fits your style and budget. Expect clear, practical tips on helmets, impact protection, visibility, and small accessories that make a big safety difference.
Key Takeaways
- Choose certified helmets and well-fitted protective clothing to reduce injury risk.
- Prioritize abrasion protection, impact armor, and secure footwear for full-body defense.
- Add visibility and smart accessories to increase safety in traffic and low light.
Essential Helmet Safety Standards
I focus on helmets that meet certified impact, retention, and field-of-view tests. I look for clear labels, fit guidance, and features that match the kind of riding I do.
Full-Face Helmets
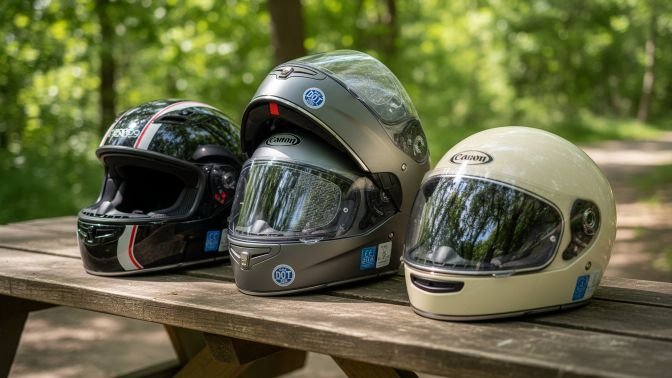
I choose full-face helmets for maximum coverage. They protect the skull, jaw, and face with a single shell and a fixed chin bar. A proper full-face helmet will meet DOT (FMVSS 218), ECE 22.06, or SNELL M2020 standards, which test impact absorption, shell penetration, strap strength, and visor clarity.
Fit matters more than style. The shell should sit snug without pressure points and the cheek pads should hold the head firmly. I check for a secure retention system (double D-ring or equivalent) and a visor that resists fogging and scratches.
Ventilation and weight affect wear time and fatigue. Look for multiple vents you can open and close, a replaceable liner, and certification stickers inside the helmet. These details keep the helmet safe and comfortable on long rides.
Modular Helmets
I use modular helmets when I need the protection of a full-face with the convenience of an open face. The front flips up on a hinge so I can talk, eat, or get fresh air without removing the helmet. Choose models that lock solidly when closed and that pass the same impact tests as full-face helmets.
Inspect the hinge and locking mechanism for play and corrosion. A weak lock can open on impact, reducing protection. Confirm the helmet retains a continuous shell profile when closed, and that the chin bar snaps firmly into place.
Weight is often higher than a comparable full-face helmet. Make sure the extra mass does not cause neck strain. Look for modular helmets with clear certification labels and user-replaceable parts.
Half and Open-Face Helmets
I pick half or open-face helmets for low-speed, urban, or cruiser riding where visibility and comfort matter. These helmets protect the top and sides of the head but leave the face exposed, so they offer less crash protection than full-face or modular types.
Verify certifications—DOT and ECE still apply to many quality half helmets. Check shell material, secure strap hardware, and EPS liner thickness. A proper fit and strap retention remain essential even without a chin bar.
I add eye protection (goggles or a shield) because face exposure increases the risk of debris and wind injury. Consider a model with a short peak to block sun and debris, and prioritize helmets with good internal padding and replaceable liners.
Protective Jackets for Impact and Abrasion
I focus on jackets that stop road rash and absorb crash energy. The right jacket balances tough outer fabric, certified armor, and weather control so you stay safe and comfortable.
Material Types: Leather vs. Textile
I choose materials based on the type of riding and expected speeds. Full-grain leather gives excellent abrasion resistance and slides predictably in a crash. It is heavy and warms up fast, so I reserve leather for sport or track use and cold-weather rides.
Modern textile jackets use Cordura, Kevlar, or high-denier polyester blends that resist abrasion while weighing less than leather. Many textile shells include reinforced panels in high-wear areas like shoulders and elbows. Textile also accepts waterproof liners and removable thermal layers, which I find useful for commuting or long-distance touring.
Check MotoCAP ratings or the Motorcycle Safety Foundation for fabric performance data to compare abrasion tests and real-world protection.
Body Armor and Padding
I always look for CE-rated armor at shoulders, elbows, and spine. CE Level 2 armor absorbs more force than Level 1 and is worth the small extra cost for higher-speed crashes. Removable armor helps with washing, but fixed pockets that keep armor aligned during a ride are better.
Chest protectors and back protectors add significant impact protection. A back protector that conforms to your spine and stays in place during motion reduces compression risk. Make sure armor sits in the riding position; sit on the bike when trying jackets so shoulder and spine pads line up with your body.
Trusted standards and testing labs such as the European CE scheme give measurable ratings you can rely on.
Ventilation and Weather Features
I consider ventilation essential for comfort and retention of concentration on hot rides. Look for large intake vents on the chest and shoulders, plus exhaust vents on the back. Mesh liners or full-mesh panels let air pass while keeping abrasion resistance in key areas.
For wet or cold conditions, choose jackets with removable waterproof liners and a separate thermal layer. Sealed zippers and cuff adjustments keep water out. A good collar and adjustable waist reduce flapping and heat loss at highway speeds.
For more on multi-season designs, see advice from the Motorcycle Safety Foundation and gear reviews on reputable sites to match ventilation and weather features to your riding climate.
Motorcycle Riding Pants and Leg Protection
I recommend choosing pants that block abrasion, absorb impact, and fit well so they stay in place during a slide. Look for tested materials, reinforced seams, and room for armor at the knees and hips.
Reinforced Motorcycle Jeans
I wear reinforced motorcycle jeans when I want a casual look with real protection. Good riding jeans use heavy denim (12–14 oz) plus a strong abrasion layer such as Kevlar or Dyneema stitched into the seat, knees, and inner thighs. Check that the reinforcement covers high-wear zones and that seams are triple-stitched or bar-tacked; this prevents the fabric from splitting on impact.
Fit matters: jeans should be snug enough to keep armor over the knee but not so tight they restrict movement. Many brands include removable CE-rated knee protectors and pockets for hip pads. For more on standards and testing, see information from the Motorcycle Safety Foundation and CE armor guidelines at the European Commission’s site.
Leather or Textile Riding Pants
I choose leather for high abrasion resistance and textile for weather versatility. Full-grain leather offers the best slide protection; look for 1.0–1.2 mm thickness and reinforced panels at the hips and seat. Textile pants use Cordura, ballistic nylon, or similar fabrics with waterproof liners and ventilation zippers for touring or commuting.
Both types should include CE-rated armor pockets and strong closures at the waist and cuffs. Inspect zippers, Velcro, and fastening tabs—broken hardware negates protection. For buying advice and comparison tests, reputable sources like consumer safety groups and manufacturer tech pages help evaluate real-world performance.
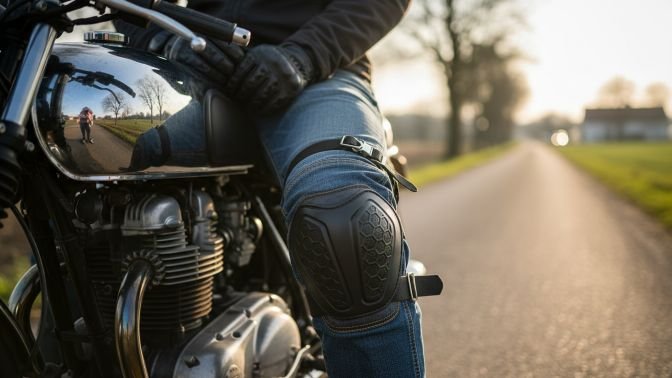
Knee and Hip Protectors
I never ride without CE-rated knee and hip protectors. Effective protectors combine hard outer shells with energy-absorbing foam or viscoelastic material behind them. Look for EN 1621-1 or EN 1621-2 ratings; level 1 is basic, level 2 absorbs more energy and is preferable for higher risk riding.
Ensure protectors sit over the joint when you are in riding position. Removable armor is handy for washing pants, but fixed armor typically stays in place better during a slide. If your pants lack hip pockets, buy thin external protectors or use a dedicated hip belt insert to add certified coverage.
Gloves for Hand and Wrist Protection
I recommend gloves that protect knuckles, palms, and the wrist joint while letting you keep good feel of the controls. Choose gloves with clear impact protection and weather features that match your riding style and climate.
Impact-Resistant Construction
I look for gloves with hard knuckle protectors made from carbon fiber, TPU, or reinforced plastic. These materials spread and absorb impact energy, lowering the chance of knuckle fractures in a crash. Palm sliders of leather or replaceable TPU help reduce abrasion when hands slide on pavement.
Reinforced stitching and double-layered leather over high-wear zones add durability. A good wrist strap and cuff design keep the glove from pulling off during a fall, and built-in wrist protectors or external splints help limit hyperextension. Fit matters: a snug glove keeps armor aligned with your bones so protection sits where it should.
Weatherproofing and Comfort
I choose insulation and membranes based on typical ride temperatures. Gore-Tex or similar waterproof-breathable liners work well for wet rides without making hands sweat excessively. For cold weather, layered insulation or removable liners let me adjust warmth without losing protection.
Ventilation panels, perforated leather, or mesh zones are essential for hot weather to prevent sweaty hands and loss of grip. Soft leather or synthetics on the fingertips preserve throttle and brake feel. Lastly, secure closures at the cuff seal out wind and keep armor in place, which both improves comfort and safety.
Footwear: Boots Designed for Riders
I value boots that protect my feet and give me control on the bike. The right pair should cover the ankle, resist abrasion, and keep my foot planted on pegs and pavement.
Ankle and Shin Protection
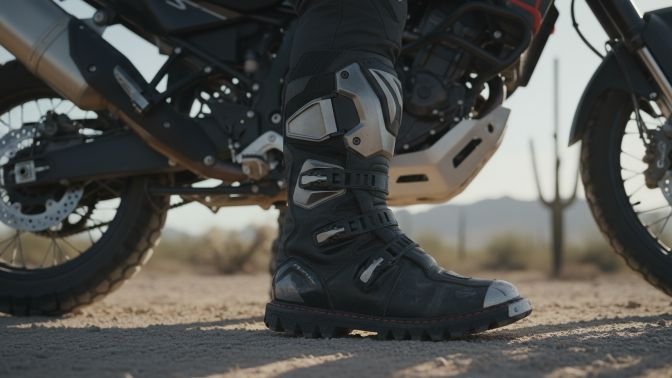
I choose boots that cover the ankle and extend to the lower shin for real impact protection. Look for reinforced ankle cups, hard plastic or TPU shin plates, and internal ankle supports that limit sideways movement in a crash.
Many riding boots use layered materials—full-grain leather over molded protectors—to resist abrasion at speed. Check for CE certification or similar safety ratings; those indicate tested impact and abrasion performance. Also verify closure systems: a mix of strong zippers, buckles, and Velcro keeps protectors aligned and prevents boots from coming off in an accident.
Fit matters. A snug heel hold reduces twisting, while enough toe room prevents discomfort on long rides. If I plan off-road riding, I pick taller, stiffer boots. For commuting, I favor mid-height boots with reinforced ankles and flexible shin panels.
Non-Slip Soles
I pick soles that balance grip on footpegs with traction on wet pavement. Look for rubber compounds labeled oil- and slip-resistant with deep, multi-directional tread patterns.
Stiffer soles help when shifting and protect feet from peg pressure. But too rigid makes walking awkward. I prefer soles with a semi-rigid midsole and a rubber outer that offers flex for walking and a firm platform for riding.
Check for heat resistance near the exhaust and reinforced toe boxes for gear changes. Many boots include replaceable sole units or stitched construction for longer life. Test the sole by standing on metal pegs and wet surfaces where possible before buying.
Eye and Face Protection Options
I recommend choosing protection that keeps your vision clear and your face safe from debris, wind, and sun. Fit, material strength, and anti-fog or UV features matter most.
Visors and Face Shields
I prefer full-face helmets with integrated visors because they protect the whole face and reduce wind noise. Choose a visor made of shatterproof polycarbonate with at least basic UV protection. Look for an anti-fog coating or a pinlock insert to prevent fogging in cool or humid conditions.
Fit and locking mechanism are important. The visor should seal around the helmet rim to keep out dust and insects. Quick-release systems let me swap visors fast for different light conditions. Tints and photochromic lenses help with glare, but I carry a clear spare for night riding.
Maintenance is simple but vital. I clean visors with a mild soap and a soft cloth to avoid scratches. Replace a scratched or cracked visor immediately—damage can scatter light and reduce visibility.
Motorcycle Goggles
I use goggles when my helmet lacks a full shield or when riding vintage and off-road bikes. Goggles must fit snugly against the face and seal at the nose and cheeks to block wind and small debris. Foam padding and adjustable straps keep them comfortable and stable at highway speeds.
Lens material should be shatterproof and offer UV protection. Anti-fog coatings or double-pane lenses help when I sweat or ride in cold weather. If I wear prescription glasses, I choose goggles that fit over them (OTG) or that accept prescription inserts.
Look for goggles with good ventilation and durable frames. Replace foam padding when it compresses, and swap lenses to match light conditions. Proper fit and clear optics make goggles practical and safe for many riders.
High-Visibility and Reflective Gear
I prioritize gear that makes me easier to see in traffic and low light. Bright colors and reflective material work together: fluorescent for daytime contrast, and reflective strips for night and poor light.
Reflective Vests and Strips
I wear a reflective vest over my jacket when visibility is low or traffic is heavy. A vest with 360° silver retroreflective tape is best because headlights return light from all angles. Look for vests that meet ANSI/ISEA 107 or similar standards so the reflective material and placement are proven.
I also add reflective strips to hard parts: helmet edges, panniers, and the back of my boots. Peel-and-stick or sew-on strips let me place reflectivity where it matters most. For technical details about retroreflective performance, I check resources like NHTSA guidance on conspicuity.
A good reflective setup should not flap or peel off at highway speeds. Secure attachment and regular cleaning keep reflectivity effective. I inspect the strips monthly and replace faded material immediately.
Fluorescent Colors for Daytime Riding
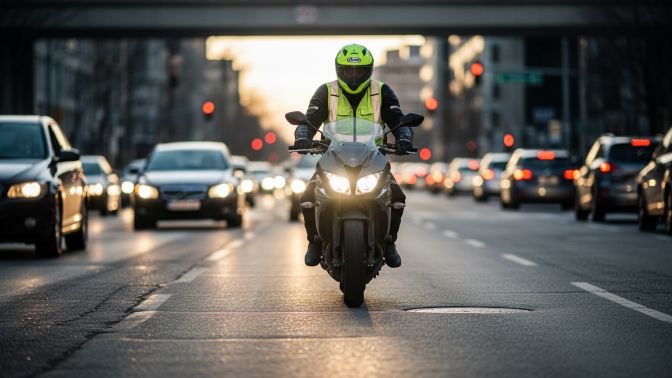
I choose fluorescent jackets and helmets in yellow, orange, or green for daylight visibility. These colors stand out against common backgrounds like asphalt, trees, and buildings because they reflect more visible light and remain noticeable at typical rider distances.
Fluorescent panels on shoulders, chest, and back help drivers spot me from farther away. I prefer contrast zones—bright colors combined with darker fabric—so detail and my body position remain clear to other road users.
For buying guidance, I compare products that cite EN 17092 or similar protective standards and have high-visibility color options. I avoid relying solely on color; combining fluorescent gear with reflective strips gives the best all-day and all-weather visibility.
Specialized Safety Accessories
I focus on gear that adds protection beyond a helmet, jacket, gloves, boots, and pants. These items reduce injury risk to the torso, ears, and skin layers while keeping you comfortable on long rides.
Riding Airbag Vests
I recommend airbag vests for riders who want extra chest and spine protection without a bulky jacket. They inflate on crash sensors or tether pulls and absorb impact forces to lower the chance of rib, sternum, and spinal injuries.
Choose a vest that fits snugly over your jacket and matches your riding style. Look for CE-certified protection, reliable trigger systems (mechanical or electronic), and easy replacement of canisters or cartridges after deployment. Battery life and app connectivity matter for electronic units; check how many deployments a battery supports and how the unit alerts you to faults.
Maintain your vest by inspecting seams, electronics, and cartridges regularly. Replace a vest after any deployment, even if no visible damage exists. I advise testing fit with your usual riding layers so the vest sits correctly over armor and won’t shift in a crash.
Hearing Protection
I use earplugs or electronic ear muffs to protect hearing and reduce fatigue from wind and engine noise. Prolonged exposure to 85 dB or more can cause hearing loss, and most open-face or full-face riding at speed easily exceeds that.
Foam earplugs are cheap and effective for basic protection. For clearer communication and situational awareness, choose filtered earplugs or active noise-cancelling devices that cut harmful frequencies while allowing speech and sirens through. If you use intercoms, pick plugs that work with your system and don’t muffle voice too much.
Clean and replace earplugs regularly. Keep spare pairs in your kit. I check insertion depth and seal every ride because a poor fit cuts protection dramatically and can let in damaging noise.
Base Layers for Additional Safety
I put on technical base layers to manage moisture, temperature, and added abrasion resistance where needed. Modern base layers use synthetic or natural fibers that wick sweat, dry fast, and reduce chill when wet or windy.
For added safety, pick base layers with built-in cut-resistant fibers (like Dyneema) for high-risk riding. These thin panels can reduce road-rash severity under outer gear without bulk. Make sure layers don’t bunch under armor; they should be smooth to keep armor in the right place.
Wash base layers per manufacturer instructions to maintain fiber performance. Rotate a couple of sets so you always have a dry, intact layer ready for long tours or hot, sweaty days.
FAQs
How often should you replace gear?
I suggest replacing helmets every 5 years or after any crash. Jackets, gloves, and boots should be replaced when stitching, armor, or material show damage.
Do you need full gear for short rides?
Yes. Even low-speed falls can cause serious road rash or broken bones. I wear at least helmet, gloves, jacket, pants, and boots on every ride.
What about high-visibility gear?
I recommend bright colors and reflective strips. They don’t prevent crashes but help other drivers spot you sooner.
Can I ride without armor?
I advise against it. Armor protects shoulders, elbows, knees, and back from impact. Removable armor lets you wash layers without losing protection.
Quick checklist I use before every ride:
Helmet (certified)
Protective jacket and pants with armor
Gloves and over-ankle boots
High-visibility or reflective elements
If you want gear choices for your riding style, I can suggest options that fit your budget and local weather.
Conclusion
I recommend wearing a full set of protective gear every time I ride. A good helmet, jacket, gloves, pants, and boots work together to lower injury risk and keep me comfortable.
I choose gear that fits well and meets safety standards. Proper fit keeps armor in place and makes riding easier, so I swap items that feel loose or restrictive.
I replace helmets after five years or after any crash. I also check textiles and armor regularly and replace them when they show heavy wear or damage.
I favor high-visibility colors or reflective strips for night and poor-light riding. Small visibility changes help other road users see me sooner and react more safely.
I balance protection, comfort, and weather needs when picking gear. For example, ventilated jackets for summer and layered, waterproof gear for cold or wet rides.
I keep one simple checklist in my phone:
- Helmet (certified, good fit)
- Jacket and pants (abrasion-resistant, with armor)
- Gloves (full-fingered, protective)
- Boots (ankle support, non-slip)
- High-visibility items or reflectors
Wearing the right gear is a decision I control every ride. It reduces harm and makes me a more confident, prepared rider.