
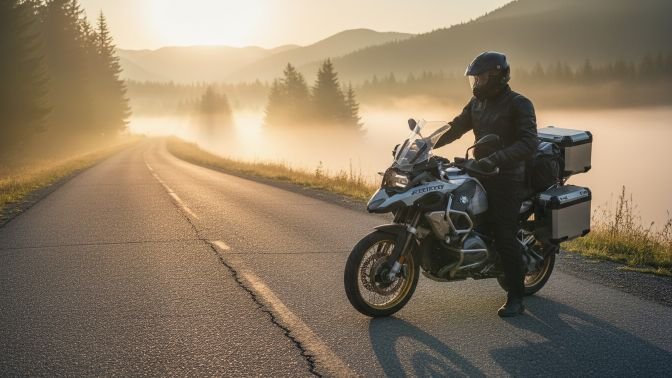
You’re about to ride a long way, and a few smart safety checks will keep you on the road and out of trouble. Do a full bike inspection, wear solid protective gear, plan your route and weather stops, and tell someone your plan—these steps cut risk and keep you riding longer.
Start with a thorough bike check, reliable gear, and a clear plan so you can ride safely and confidently on long trips.
Trust your body and your bike: rest well, hydrate, pack sensibly, and carry the right documents and emergency tools before you go.
Key Takeaways
- Inspect the bike, gear up, and confirm your route before departure.
- Prepare your body and pack to reduce fatigue and handle issues.
- Share your plan and carry essential documents and tools.
Pre-Ride Motorcycle Inspection
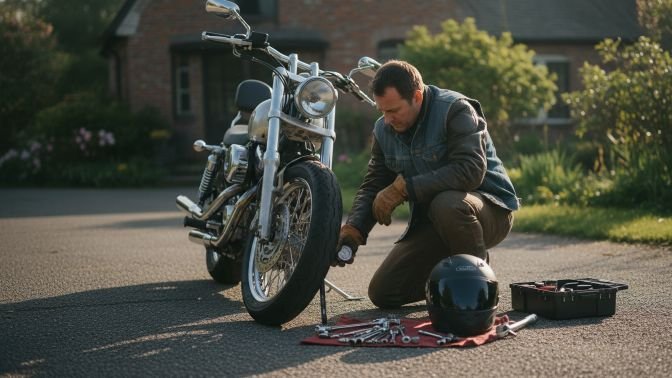
I check a few key systems every time before a long trip: tires, brakes and controls, lights and signals, plus fluid levels. I spend extra time on anything that looks or feels off so I don’t face a failure on the road.
Check Tire Pressure and Tread
I measure tire pressure with a reliable gauge when the tires are cold. I set pressure to the motorcycle manufacturer’s recommendation found in the owner’s manual or on the swingarm/inside fairing. I check both front and rear and adjust for passenger or luggage weight if needed.
I inspect tread depth and look for cuts, bulges, or embedded objects. I can often tell a tire is dying by uneven wear or a flat spot. If tread depth is near the legal limit or the rubber feels hard and cracked, I replace the tire before a long trip.
I also spin the wheel and watch for wobble or hops. Any vibration or wobble can mean wheel imbalance, bent rim, or failing bearing. I tighten the axle and check wheel bearings if I detect play.
Test Brakes and Controls
I squeeze the front brake lever and push the rear brake pedal to confirm firm pressure and proper travel. Spongy feel or long travel signals air in the lines or worn pads. I inspect pads through the caliper for even wear and minimum thickness.
I pull the clutch lever and shift through gears while the bike is on the stand. Smooth clutch engagement and crisp shifting mean the cable or hydraulic system is healthy. I check throttle response—twist should snap back smoothly without sticking.
I look at brake fluid reservoirs for level and color. Dark or low fluid suggests service is due. I also test the parking brake or stand switch (if present) to ensure it doesn’t block starting or movement while riding.
Inspect Lights and Signals
I turn on the ignition and test all lights: low beam, high beam, tail, brake, and turn signals. I walk around the bike to confirm bulbs light evenly and lenses are clean. I check the brake light both with the brake lever and pedal pressed.
I verify turn signals cancel correctly and flash at a steady rate. Fast flashing can mean a burned-out bulb. I replace any blown bulbs and keep a small spare kit of fuses and bulbs in my luggage.
I clean lenses and remove condensation that can hide cracks. I also check the horn and auxiliary lights for mounting security so nothing vibrates loose on a long ride.
Review Fluid Levels
I check engine oil level on the dipstick or sight glass with the bike on level ground. I top to the recommended mark using the correct oil weight from my owner’s manual. I note oil color and smell—metallic or milky oil needs immediate service.
I inspect coolant level in the reservoir, especially on liquid-cooled bikes. I top to the marked level with the proper coolant mix only when the engine is cool. I check brake and clutch hydraulic fluid reservoirs and top with the correct DOT fluid if low.
I check the final drive: chain bikes get a chain slack measurement, lubrication, and tension adjustment; shaft or belt drives need visual inspection and proper fluid or tension. I refill windshield washer fluid and secure all caps and reservoirs before I head out.
Personal Safety Gear Preparation
I focus on the gear I wear and carry so I stay protected and comfortable for long hours on the road. Good choices for helmet, clothing, and eye/ear protection cut injury risk and reduce fatigue.
Select the Right Helmet
I choose a helmet that meets DOT, ECE, or Snell standards and fits snugly without pressure points. Try helmets on with the pads in place; a proper fit sits low on the forehead and does not move when I shake my head. Full-face helmets give the best protection and wind control for long trips, while modular helmets add convenience for stops.
Check the helmet’s age and replace it after any crash or after 5–7 years of use, depending on manufacturer guidance. I inspect the shell, straps, and visor for cracks, worn padding, or damaged fasteners. I prefer helmets with good ventilation and an anti-fog treated visor, and I carry a spare clear visor for night or low-light riding.
Wear Protective Clothing
I wear a motorcycle jacket and pants with CE-rated armor at shoulders, elbows, hips, and knees. Textile gear with waterproof liners and ventilation works well for mixed weather. Leather offers abrasion resistance, but modern textile suits often give better weather flexibility.
Layering matters: I add a moisture-wicking base layer and use thermal or cooling liners as needed. Gloves must fit well and cover the wrist—I pick gloves with knuckle protection and reinforced palms. Boots should be above the ankle, oil-resistant, and have good toe and heel protection. Reflective panels or a high-visibility vest improve my visibility to other drivers.
Use Eye and Ear Protection
I protect my eyes with a clear or tinted visor that resists fog and scratches, or with shatterproof goggles if my helmet lacks a visor. Proper eye protection prevents debris and insects from causing injury and reduces the need to squint, which lowers fatigue. I keep replacement tear-offs or an anti-fog insert on hand for wet conditions.
I use earplugs rated to reduce wind noise to a safe level without blocking important traffic sounds. Long-term exposure to wind noise can cause hearing loss and rider fatigue. For full-face helmets, low-profile foam earplugs work well; for open-face setups, custom-molded plugs give more comfort on multi-day trips.
External links:
- For helmet standards and fit tips, I refer to the National Highway Traffic Safety Administration (NHTSA)
- For hearing protection guidance, I check resources from the Centers for Disease Control and Prevention (CDC)
Route and Weather Planning
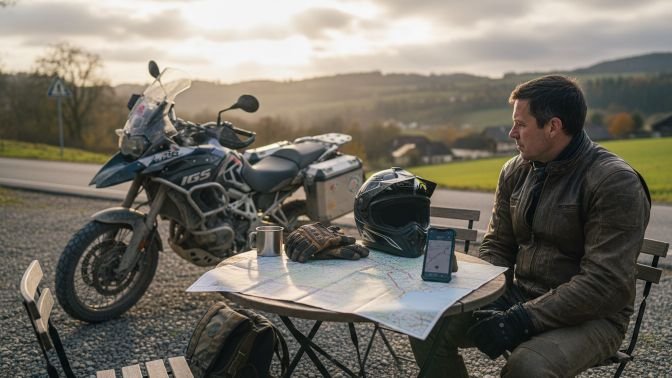
I plan the route, watch forecasts, and mark fuel and rest stops so I can ride safely and avoid surprises. I check distance, road types, and likely weather to set realistic daily goals.
Map Out the Route
I start with a detailed route on a mapping app and print a backup paper map. I note mileage for each day and estimate riding time using conservative speeds plus 20–30% for breaks and delays.
I choose roads by surface and traffic: state highways and well-maintained rural roads over gravel or remote dirt whenever possible. I mark alternate roads in case of closures and save GPS waypoints for tricky turns or junctions.
I load the route into my phone and into a dedicated GPS device, then test that both follow the same path. I share my daily route and expected arrival times with a trusted contact and update them if plans change.
Research Weather Conditions
I check forecasts for each segment of the route at least three days out and again the night before departure. I look at hourly forecasts for temperature, wind speed and direction, precipitation chance, and severe-weather alerts.
I pay special attention to mountain passes and coastal stretches where weather can change fast. If forecasts show sustained heavy rain, high winds, or freezing temperatures, I consider delaying or rerouting.
I pack clothing layers and waterproof gear based on expected conditions and include a warm layer for nights. I set weather alerts on my phone for the regions I’ll pass through so I get updates while riding.
Identify Fuel and Rest Stops
I list gas stations every 80–120 miles and mark low-fuel areas where stations are sparse. I identify at least one backup station for each planned refuel and note station hours in rural areas.
I plan stops every 90–120 minutes for hydration, stretching, and quick bike checks. I choose rest stops with safe parking, lighting, and nearby food or shelter options.
I also note motorcycle-friendly lodging or campgrounds for overnight stays and verify booking options along the route. I save contact numbers and addresses in both my phone and on paper in case electronics fail.
Physical and Mental Readiness
I make sure my body and mind are ready before a long ride. I focus on sleep, fluids and food, and checking any health issues that could affect my ability to ride safely.
Ensure Adequate Rest
I target at least 7–9 hours of sleep the night before a long ride. If I will be riding multiple days, I plan sleep blocks so I don’t ride while drowsy.
Short naps (20–45 minutes) work well if I need a quick refresh during a long day. I set an alarm and use a cool, dark room to get quality rest.
I avoid alcohol and heavy sedatives for 24 hours before riding. I also stop caffeine a few hours before planned sleep so I can fall asleep on schedule.
Before I leave, I check my alertness with a simple test: can I keep my eyes open and react quickly in a calm setting? If not, I delay the ride.
Maintain Hydration and Nutrition
I drink water steadily before and during the ride. My goal is about 500–750 ml (16–25 oz) in the two hours before departure, and then 200–300 ml (7–10 oz) every 30–45 minutes while stopped.
On hot days I add electrolyte mixes to avoid sodium loss and cramps.
I eat a balanced meal 1.5–2 hours before the ride: lean protein, whole grains, and a small amount of healthy fat. I pack easy-to-eat snacks like nuts, energy bars, and fruit to keep blood sugar steady.
I avoid heavy, greasy foods that make me sluggish. If I start to feel lightheaded, I stop immediately, eat a quick carb, and rest until I feel stable.
Assess Personal Health
I review my medical checklist before any long trip. This includes current medications, known allergies, and any recent illnesses or injuries.
I carry necessary prescriptions and a written list of dosages. I also bring a basic first-aid kit tailored to my needs.
If I have chronic conditions (diabetes, heart issues, asthma), I check with my doctor about the ride plan and take extra precautions.
I monitor signs that could force me to stop: unusual chest pain, severe shortness of breath, fainting, or persistent dizziness. If I notice any of those, I seek medical help immediately.
Packing and Load Distribution
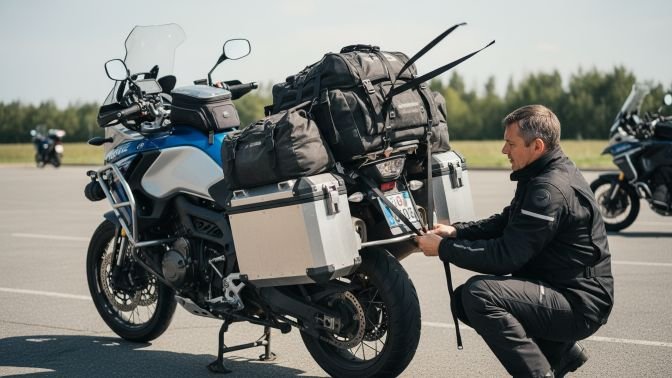
I pack to keep the bike stable, carry essential emergency gear, and plan for unexpected problems. I focus on weight placement, secure fastening, and items that let me fix common issues or get help quickly.
Balance and Secure Luggage
I place the heaviest items low and as close to the bike’s center as possible. That usually means tank bags for items I need often, a low tail bag for clothing, and soft saddlebags for lighter gear. I keep total rear load within the bike’s recommended rear weight limit to avoid lifting the front wheel or making steering heavy.
I use compression straps and luggage racks to stop shifting. I saddle-tie with multiple tie-down points and check knots after 10 miles. I also shim and pad hard edges so bags don’t rub paint or wiring.
Before long rides, I do a short test loop with the full load. I note handling, braking distances, and lean feel, then rebalance if the bike pulls or feels unstable.
Carry Emergency Supplies
I carry a compact first-aid kit, tire repair kit, and a small multi-tool kit that fits in a tank bag. The tire kit includes plugs, a mini compressor or CO2 cartridges, and a pressure gauge. I pack spare fuses, a couple of basic hand tools, and zip ties for temporary fixes.
I include a charged power bank, a USB charging cable for my phone, and a small flashlight or headlamp. I keep copies of registration, insurance, and emergency contact info in a waterproof pouch. I add water and high-energy snacks for short delays.
I rotate supplies after each multi-day ride to replace used items and expired meds. I also learn how to use each tool before I leave.
Prepare for Unexpected Situations
I plan routes with fuel stops and note repair shops along the way. I download offline maps and save a handful of local emergency numbers where cell coverage may fail. I tell a trusted contact my route and check-in schedule.
I carry lightweight rain gear and a thermal layer in an accessible bag. For cold or wet weather, I add chemical hand warmers and quick-dry inner layers. I practice roadside tire plugging and simple wiring repairs at home so I can act confidently if something breaks.
I keep a small roll of duct tape and a tow strap for serious breakdowns. For long remote stretches, I consider an emergency locator beacon or a satellite messenger and test it before departure.
Pre-Trip Communication and Documentation
I make sure key people know my route, carry the right papers, and have quick access to emergency contacts. These steps cut response time if something goes wrong and keep me legal and organized on the road.
Share Travel Itinerary
I give a detailed itinerary to at least two trusted contacts: start/end dates, daily stop towns, planned fuel or rest stops, and the exact highways I’ll use. I include estimated times of arrival and alternates for bad weather or detours.
I send this in writing — email or a shared cloud doc — and text a condensed version the morning I leave. If I change plans, I update the same contacts immediately.
I also use location-sharing tools like my phone’s Find My or Google Maps location sharing for real-time tracking during long legs. For multi-day rides, I schedule daily check-ins at set times so someone knows I’m safe even if my phone battery dies.
Carry Identification and Insurance
I carry a government-issued photo ID, my motorcycle license endorsement, and a physical and digital copy of my insurance card. I store scanned copies in my phone and in an encrypted cloud folder so I can access them if the originals are lost.
I verify my insurance policy covers out-of-state travel and emergency towing before I leave. If I ride across borders, I check visa, passport, and local insurance requirements well ahead of time.
I keep vehicle registration in the bike’s storage compartment and a small waterproof folder with emergency cash and a list of medical allergies. A laminated card with my blood type and any critical medical info sits in my wallet where responders can find it fast.
Check Emergency Contacts
I create a prioritized list of emergency contacts: primary contact, backup contact, and my motorcycle club or riding partner. I include names, relationship, phone numbers, email, and the best times to reach each person.
I add these contacts to my phone under clear labels like “ICE — Sarah (sister)” and save a printed copy in my luggage. Local emergency numbers (like 911 in the U.S.) and the number for roadside assistance go at the top of the list.
I also register my trip with services such as a roadside assistance provider and, when applicable, my embassy or consulate. For high-risk routes, I share my itinerary with local authorities or park services when required; that gives responders a point of contact and improves search efficiency.
External resources: check the Department of Transportation or AAA for travel and roadside assistance guidance, and use official consulate pages for international entry and emergency rules.
Final Safety Reminders Before Departure
I check my travel documents and ID one last time. I keep photocopies or photos of them on my phone and in my carry bag.
I confirm the bus company, route number, and departure time. I arrive early so I avoid rushing and can ask staff any last-minute questions.
I pack a small safety kit: water, a basic first-aid item, flashlight, charger, and any medicine I need. I store valuables in a secure, reachable place.
I review emergency procedures and note the nearest exits on the bus. I make a mental plan for how to help myself or others if needed.
I share my trip details with a trusted contact and set check-in times. I give them the bus company name, route, and expected arrival time.
I follow simple personal-safety habits: stay aware of my surroundings, keep bags zipped, and avoid showing large amounts of cash. I trust my instincts and move away from situations that feel unsafe.
I verify the vehicle looks well-maintained and that seat belts (if provided) work. If something seems wrong, I tell the driver or staff before we leave.
I set my phone to full charge and enable location sharing if possible. That keeps me connected and helps others find me if needed.
FAQs
What gear should I bring?
I pack a DOT helmet, armored jacket, gloves, and sturdy boots. I carry rain gear, a basic tool kit, tire repair supplies, and a compact first-aid kit.
How do I plan rest and fuel stops?
I map fuel stations and rest breaks for every 100–150 miles or every 2 hours. I factor in traffic, weather, and daylight to avoid fatigue.
How should I handle weather changes?
I monitor forecasts before and during the trip. I slow down in rain, increase following distance, and use extra layers for cold.
What about documents and emergency info?
I carry my license, registration, insurance, and emergency contacts. I also leave a route plan with someone I trust.
How much training do I need?
I recommend practice rides with full luggage and varied roads. If possible, take an advanced riding course to improve handling and braking under load.
What if the bike breaks down?
I try basic fixes first—fix a flat, top off fluids, or tighten a loose part. For major issues, I call roadside assistance or arrange towing.
Can I ride alone?
Yes, but I tell someone my route and check in regularly. Riding with a partner is safer and easier for sharing tasks and emergencies.
Conclusion
I checked my bike or vehicle, packed the right gear, and planned a sensible route before I left. Those steps cut risks and make riding more comfortable.
I rest and hydrate well, and I set realistic daily distances. This helps me stay alert and react to traffic or weather without panic.
I carry basic tools, a first-aid kit, and emergency contacts. Having those items keeps small problems from turning into big ones.
I choose protective clothing and a quality helmet every ride. Proper gear lowers injury risk and helps me ride longer with less fatigue.
I review weather forecasts and road conditions, and I change plans if needed. Flexibility keeps me safe when things do not go as expected.
I practice simple maintenance checks I can do roadside. Knowing how to fix flats, check brakes, and tighten bolts saves time and worry.
I share my itinerary with someone I trust and check in during multi-day trips. That gives me a safety net if I need help.
I use a short checklist before each departure to confirm the essentials. That small habit makes long-distance trips safer and more predictable.