
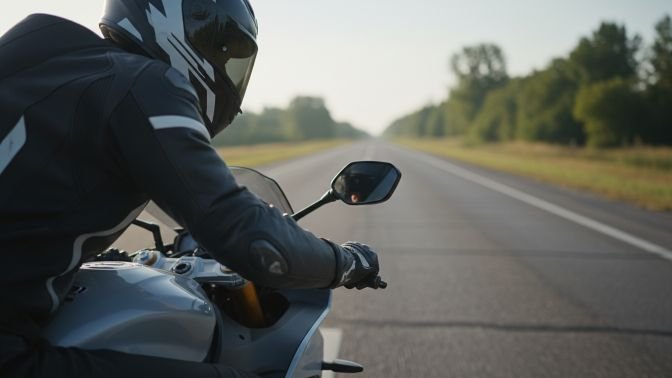
You might face a tire burst without warning, and how you react in the next few seconds matters more than you think. Stay calm, keep a firm grip on the bars, ease off the throttle, and steer steadily to a safe spot away from traffic. If a tire bursts, control your bike with smooth inputs, slow gradually, and get out of traffic as soon as it is safe.
Once you stop, check tire and wheel damage before deciding to ride on or call for help. I will walk you through clear, simple actions for control, safe exiting, basic damage checks, and quick repair or replacement options so you can handle this without panicking.
Key Takeaways
- Keep calm, hold the bars firmly, and slow in a straight line.
- Move out of traffic and stop in a safe spot before checking the tire.
- Inspect damage and choose repair or roadside help based on safety.
Immediate Actions to Take After a Tire Burst
I focus on staying calm, keeping the bike steady, slowing in a controlled way, and getting safely off the road. These steps reduce the chance of a crash and help me protect myself and the bike.
Maintain Control of the Bike
When the tire bursts, I grip the handlebars firmly with both hands and keep my arms slightly bent to absorb jolts. I look where I want to go, not at the obstacle or the wheel, and steer smoothly in that direction. I avoid large steering inputs; small, steady corrections keep the bike tracking straight.
I shift my weight slightly back to lighten the front if the rear blew, or forward if the front blew, depending on which tire failed. I keep feet on the pegs and avoid grabbing brakes or clutch suddenly. Smooth inputs let the bike settle and prevent a low-side or high-side crash.
Avoid Sudden Braking
I never grab a single brake lever hard after a burst. Sudden braking can lock a wheel and dump the bike or cause a violent skid. If I must slow quickly, I apply both front and rear brakes progressively, with more rear if the front tire burst and vice versa.
If ABS is available, I use steady pressure and let the system modulate for me. On non-ABS bikes, I squeeze brakes gently in short, controlled bursts. My goal is to reduce speed without unsettling the chassis.
Reduce Speed Safely
I let the bike slow naturally by lifting off the throttle first. Coasting reduces speed without abrupt weight shifts. If traffic allows, I downshift one gear at a time to use engine braking while keeping control.
I scan for a safe place to stop—shoulder, wide breakdown lane, or a low-traffic side road. I avoid stopping on curves, soft shoulders, or steep slopes. I maintain balance by keeping the bike upright and feet ready to stabilize at low speed.
Signal and Move Off the Road
Once speed is under control, I signal and check mirrors and blind spots. I use my indicator or hand signal to show intention, then move steadily to the shoulder or a flat area off the lane. I watch surface conditions—the shoulder could be gravel, potholes, or soft dirt.
I park clear of traffic flow, turn on hazard lights if the bike has them, and secure the stand carefully. I dismount on the side away from traffic and put on high-visibility gear if I have it. Then I assess damage and call for help or change the tire if I can do so safely.
Positioning and Balance Techniques
I focus on steady posture, a firm grip, and moving my weight away from the damaged tire to keep control and buy time to slow safely.
Stay Upright and Centered
I keep my body aligned with the bike’s centerline. This means sitting tall, eyes forward, and feet steady on the pegs. A centered position helps the suspension and frame do their job and minimizes sudden shifts that could make the bike wobble.
If the tire bursts, I avoid leaning or twisting my torso. Small, smooth inputs to throttle and brakes matter more than big moves. I use my core to absorb movement, not my arms, which keeps steering inputs calm.
For low-speed failures, I prepare to put a foot down while keeping hips centered. For higher speeds, I stay seated and let the bike settle before easing off controls. The Motorcycle Safety Foundation has useful guidance on posture and control that I consult when practicing these skills.
Grip the Handlebars Firmly
I hold the bars with a firm but relaxed grip—tight enough to control steering but not so tight my forearms lock up. Locking my arms makes the bike react to every bump, increasing the chance of overcorrection.
When a blowout occurs, I avoid jerking the bars. Instead, I keep a steady hand and make small corrections. I let the handlebars move slightly to follow the bike’s natural path rather than fighting it. This reduces the risk of a tank-slapper or an unintended swerve.
I also check my thumbs and wrist position during practice so I can maintain control under stress. The Virginia Tech Transportation Institute and other rider-safety resources explain how proper hand position improves control during emergencies.
Shift Weight Away from the Affected Tire
I move my body weight away from the side with the failed tire. If the rear tire blows, I sit slightly forward and lower my center of gravity. This lightens the rear load and helps the bike track straighter.
If the front tire fails, I shift my weight rearward and keep the bike as upright as possible. I avoid abrupt upper-body moves that shift the handlebars. Small, deliberate shifts of hip and shoulder position change weight balance without upsetting steering.
When shifting weight, I use the balls of my feet and knees to steady myself. I avoid standing or hopping unless I must stop immediately, because standing raises my center of gravity and can worsen instability.
Exiting Traffic and Stopping Safely

I will slow, look, and pick a clear place to stop that keeps me out of traffic and away from hazards. I act calmly and use signals so other drivers know my plan.
Scan for a Safe Spot
I quickly check my mirrors and glance over my shoulder to see traffic behind and beside me. I look for a wide shoulder, a parking lane, a paved turnout, or a driveway at least one vehicle length away from moving lanes.
I avoid soft gravel, steep slopes, and lanes with heavy debris or standing water. If the shoulder is narrow, I scan for the nearest safe exit and note the speed of approaching vehicles before I steer there.
If traffic is heavy and no shoulder exists, I aim for a right-turn lane, emergency lane, or an area where traffic can pass safely without squeezing by.
Use Turn Signals or Hand Gestures
I signal early and clearly to warn following drivers of my intent to leave the lane. I use my electric turn signal if it works; if not, I hold my hand out and point toward the direction I plan to go.
I keep the signal on until I have entered the safe spot and reduced speed. If I must wave a driver back or stop traffic in an emergency, I use firm, visible arm motions and make eye contact when possible.
I avoid sudden moves that confuse others. My signaling gives drivers time to slow and create space for me to steer off the road.
Bring the Bike to a Controlled Stop
I hold the handlebars firmly and keep the bike upright while easing off the throttle. I use both brakes together, giving more steady pressure to the rear if the rear tire failed, or more careful modulation to the front if the front tire lost pressure.
I slow gradually to avoid locking a wheel. As speed drops, I shift my weight rearward for a front-tire issue or stay balanced over the bike for a rear-tire issue.
I select first gear before coming to a stop so I can move quickly if needed. Once stopped, I put the bike on the sidestand when safe and check tires and surroundings before leaving the roadway.
Assessing Damage After Stopping
I stop in a safe spot, turn off the engine, and put on a high-visibility vest if I have one. I check the scene for traffic and hazards before I move closer to the bike.
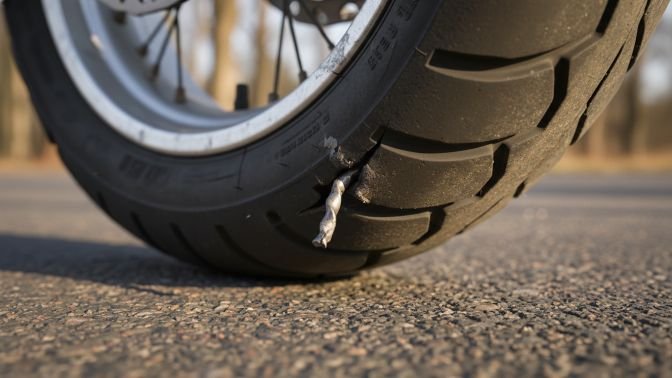
Inspect the Tire and Rim
I first look at the tire to find the cause: a puncture, a large tear, or a shredded sidewall. I run my eyes and fingertips around the tread and sidewall (only when the tire is cool) to find embedded nails, glass, or pieces of rubber. If the tread is mostly intact and there’s a small puncture in the center, a plug or patch might work temporarily.
Next I check the rim for bends, cracks, or sharp edges where the tire sits. A bent rim can leak air fast or cut a new tire. I also spin the wheel by hand to see if it wobbles; lateral or vertical runout means the rim or hub may be damaged. If the bead is torn or the rim is badly bent, I won’t attempt a roadside repair.
Check for Additional Damage
I inspect nearby components that the burst could have hit. I look at the brake rotor, caliper, chain/sprocket, swingarm, and any plastic fairings for gouges, bends, or fluid leaks. A wheel that hit the frame or caliper can lock up later and create a crash risk.
I also check for oil or coolant leaks under the bike and examine fork seals and shock housings. Any fluid leak or structural damage means I won’t ride the bike. I photograph the damage with my phone for repair estimates or insurance.
Determine Roadside Repair Feasibility
I consider tools, spare parts, and skill before deciding to fix the tire roadside. If I have a can of tire sealant and the puncture is small and on the tread, I may use it to reach a shop. If I have a spare tube and know how to change it, I check the rim and valve type first.
If the rim is bent, the sidewall is shredded, or other parts are damaged, I call for a tow. I weigh distance to the nearest repair shop, weather, traffic, and my ability to safely complete the fix. If I’m unsure, I prioritize getting the bike off the road and calling professional help.
Repair and Replacement Options
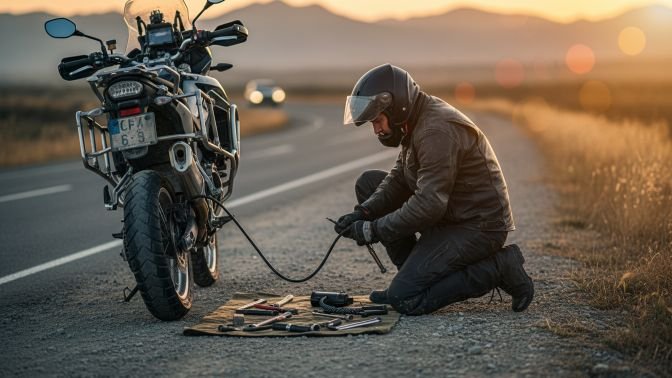
I list practical ways to get back on the road after a tire burst. I focus on tools you can carry, steps to fit a spare, and when to call a pro.
Using Emergency Tire Repair Kits
I carry a compact kit for small punctures or slow leaks. Most kits include a sealant bottle and an inflator or a plug kit with tools and rubber plugs. If the damage is a small puncture in the tread, I remove debris, insert the plug per kit instructions, trim the excess, then inflate to the correct PSI.
I avoid using sealant or plugs for sidewall cuts or large gashes. Those repairs are temporary at best. After a kit repair, I ride slowly to the nearest tire shop and replace the tire as soon as possible.
Key items to pack:
- Sealant and inflator or plug tool
- Tire pressure gauge
- Gloves and a small flashlight
Installing a Spare Tire
I check my bike’s manual to know if a spare is usable for my model. Motorcycles rarely carry full-size spares, but some riders carry a spare inner tube or a lightweight donut wheel for short distances.
To install a spare tube, I secure the bike on a center stand or paddock stand. I deflate and remove the wheel, take off the tire bead, replace the tube, seat the bead, and inflate to the specified pressure. I test stability by rolling the bike slowly before riding.
If I’m not confident dismounting the wheel, I wait for help. Proper tools make the job faster:
- Wrenches and axle tools
- Tire levers
- Pump or CO2 cartridge
Seeking Professional Assistance
I call a roadside service when damage is severe or unsafe to ride on. Explain the tire burst, your location, and whether the wheel or fork might be bent. A pro can tow the bike or replace the tire on-site with correct tools and torque settings.
At a shop, technicians inspect rim damage, check wheel alignment, and fit the correct tire size and rating. I bring my bike’s specs and note any recent handling issues. Professional replacement ensures the tire is balanced and inflated to the right PSI for safe riding.
Preventive Measures to Reduce Tire Burst Risks
I focus on checks you can do now: inspect tires for cuts or bulges, keep pressure within the vehicle or tire maker’s PSI, and replace tires that show wear or damage. These actions cut the chance of a sudden burst and make rides safer.
Regular Tire Inspections
I visually check every tire before long rides and at least once a week for daily use. I look for cuts, hidden nails, sidewall bulges, cracks, and uneven wear patterns. Any bulge or deep cut means the tire must be taken out of service immediately.
I run my hand across the tread to feel embedded objects and press the sidewall to sense soft spots. I also inspect the rim area for sharp edges, corrosion, or bead seating problems that can weaken the tire. If I find anything suspicious, I have the tire examined by a pro.
Maintaining Proper Tire Pressure
I follow the vehicle or tire maker’s recommended PSI, not the maximum printed on the tire wall. I check pressure with a reliable gauge when the tires are cold—before driving or after sitting for a few hours.
I adjust pressure for heavy loads or long highway trips according to the manufacturer’s load and speed recommendations. I lower pressure slightly on very hot days to allow for air expansion. I recheck pressure weekly and after any impact like hitting a pothole.
Replacing Worn or Damaged Tires
I replace tires when tread depth drops below the safe limit or when I see sidewall damage. For most bikes and cars, tread under 1/16 inch (1.6 mm) or visible cord means replacement now.
I also replace tires older than the maker’s recommended service life, even with decent tread, because rubber weakens with age. After any repair, I make sure a qualified technician confirms the tire is safe to use. If not, I fit a new tire before riding again.
Understanding Common Causes of Tire Bursts
I’ll explain the main reasons tires fail so you can spot risks and reduce the chance of a sudden burst. Focus on pressure, damage from objects, and the tire’s age or manufacturing faults.
Overinflation and Underinflation
Too much or too little air makes tires work poorly. Overinflation raises the internal pressure, which reduces the tire’s contact patch and makes the tread stiffer. That increases the risk of hitting a pothole or debris causing a blowout. Underinflation heats the tire as it flexes more, which weakens the sidewalls and can cause a sudden loss of pressure at speed.
I check tire pressure with a gauge before every ride and adjust to the manufacturer’s PSI on the sidewall or in the owner’s manual. Don’t rely on “squeeze” or visual checks. Temperature changes affect pressure, so re-check when the bike or car has been parked for several hours.
For guidance on correct pressure and inflation tools, see the U.S. Department of Transportation’s tire safety page and your vehicle maker’s recommendations.
Punctures and Foreign Objects
Sharp objects—nails, glass, metal shards—can pierce a tire and start a slow leak or an immediate burst. Hitting a curb, pothole, or road debris at speed can cut the tread or sidewall. Sidewall damage is especially dangerous because repairs are often unsafe there.
I inspect tires for embedded objects and run fingers carefully along the tread (while parked). If I find a nail, I mark the spot and get a professional repair or replacement rather than using a temporary plug on a high-speed tire. Ride routes with lots of construction or trash raise exposure to puncture risks; avoid them when possible.
Roadside assistance and tire repair shops can assess whether a puncture is repairable. The Tire Industry Association has useful repair standards and safety info.
Aging or Defective Tires
Rubber degrades over time. Even if tread looks okay, UV light, heat cycles, and ozone break down compounds in the tire. Cracks, bulges, or a brittle feel signal age-related failure. Manufacturers also sometimes issue recalls for defects that can cause delamination or sudden bursts.
I check the DOT code on the sidewall for the manufacture week and year. Tires older than six years should be inspected by a pro, and many experts recommend replacement at 6–10 years regardless of tread. If you notice uneven wear, repeated flats, or visible cords, replace the tire immediately.
For recall and defect info, search the National Highway Traffic Safety Administration (NHTSA) database using your tire’s DOT number.
Additional Safety Tips for Riders
I check my gear before every ride. A quick helmet, gloves, and jacket check can cut injury risk and help me stay calm if something goes wrong.
I keep my tires properly inflated and inspect them for cuts or bulges. Good tire care lowers the chance of a burst and gives me more time to react if a problem starts.
I ride at a speed that matches the road and my skill. Slower speeds give me more control during emergencies and reduce stopping distance.
I practice emergency braking and low-speed control in a safe place. Rehearsing these skills builds muscle memory so I act quickly without panicking.
If a tire bursts, I stay relaxed and steer straight until speed drops. I then look for a safe spot to pull over and stop.
I carry basic tools and a phone. A compact tire repair kit, pump, and my phone let me handle minor repairs or call for help.
I tell a friend or family member my route when I ride alone. Someone knowing where I am makes it easier to get help if an incident happens.
I avoid sudden inputs—no harsh braking or sharp turns—after a tire issue. Smooth, calm control keeps the bike stable while I find a safe place to stop.
Bold reminders:
- Check tires weekly
- Ride within your limits
- Practice emergency skills
FAQs
What should I do first if a tire bursts while riding?
I keep a firm grip on the handlebars and avoid sudden steering moves.
I gently ease off the throttle and let the bike slow down; I use the rear brake lightly if needed.
Can I brake hard or grab the clutch?
I do not slam the brakes. Hard braking can make the bike unstable. I pull the clutch only if I need to reduce engine power quickly.
Which way will the bike pull?
The bike usually pulls toward the side of the blown tire. I counter-steer gently to stay balanced and aim for a controlled slowdown.
Where should I stop after a blowout?
I look for a safe spot off the road, away from traffic and on solid ground. I turn on hazard lights if I can and signal other road users.
Should I try to ride to a service shop?
I avoid riding far on a flat or damaged tire. If the bike is unstable, I stop and call for help. If distance is short and the bike handles well, I ride slowly to the nearest repair shop.
What about checking the tire later?
I inspect the tire, rim, and brake components before riding again. I also check tire pressure, and I replace a blown tire rather than patch it for long-term use.
Conclusion
I stayed calm and slowed the bike as soon as I felt the tire fail. I avoided hard braking and sharp steering because those actions can cause a crash.
I steered to a safe spot off the road and kept the bike stable until it stopped. I checked myself for injuries and then inspected the tire to judge the damage.
I carry basic tools and a repair kit on rides so I can handle minor punctures or at least get to a repair shop. If the damage is severe or I feel unsafe, I call for help or roadside assistance.
I practice tire checks before each ride and keep proper tire pressure to reduce the chance of a blowout. Regular inspections and timely replacements give me the best control over risks.
Key steps I follow:
- Stay calm and reduce speed gradually.
- Avoid sudden inputs to brakes or steering.
- Move to safety and assess the situation.
- Repair if minor, or get professional help if needed.
I focus on prevention and preparedness. Doing so keeps me safer and makes it more likely I’ll ride home without trouble.