

Riding a motorcycle is an exciting experience, but it comes with important responsibilities. Before I hit the road, I always check several key parts of my bike to make sure everything works properly. The most important checks are looking at tires, brakes, lights, fluids, and controls to keep myself safe.
Making these checks quick and routine helps me avoid breakdowns and accidents. I also double-check my safety gear and make sure I’m mentally ready to ride. This simple pre-ride routine saves me trouble on the road and gives me confidence every time I start my engine.
Taking a few minutes to inspect the bike and prepare myself makes a big difference. Knowing the bike is in good shape helps me focus more on my ride and less on what could go wrong.
Key Takeways
- Always inspect essential parts to ensure the bike is safe to ride.
- Prepare yourself mentally and gear up properly before every ride.
- Regular checks help prevent mechanical issues and increase safety.
Pre-Ride Motorcycle Condition
Before I start riding, I make sure my motorcycle is in good working order. I pay close attention to the parts that affect control and safety, focusing on the tires, brakes, fluids, and the drive system. These checks help me avoid problems while on the road.
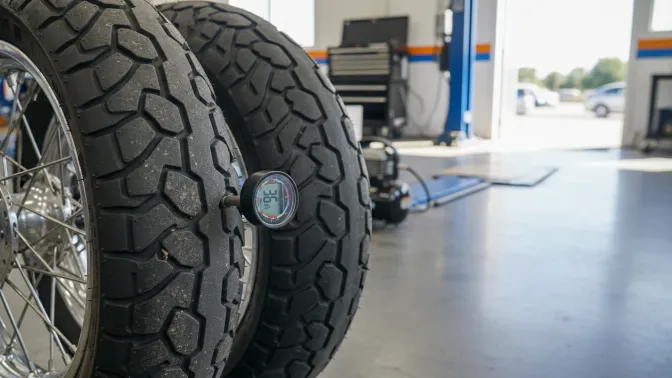
Tire Pressure and Tread
I always check the tire pressure first because incorrect pressure can cause poor handling or tire damage. I use a pressure gauge to measure the air pressure when the tires are cold. Then, I compare it to the manufacturer’s recommended levels listed in the manual or on the bike frame.
Next, I inspect the tread to ensure it is deep enough for traction. I look for any signs of wear, cuts, or cracks. Tread must be even across the tire surface without bulges or embedded objects. If the tires show damage or worn tread, I know it’s time to replace them before riding.
Brake Functionality
To test my brakes, I first check the brake fluid level in both the front and rear reservoirs. Fluid should be at or above the minimum mark and clear, not dark or dirty.
Then, I press the brake levers and pedals to make sure they respond smoothly without feeling too soft or too hard. I listen for any unusual noises while applying the brakes. If the brakes grab suddenly or don’t stop the bike well, I avoid riding until the system is fixed. The brakes must work reliably to keep me safe.
Fluid Levels
I check the key fluids to ensure the engine runs smoothly. This includes engine oil, coolant, brake fluid, and sometimes transmission oil. For engine oil, I use the dipstick or sight glass to confirm the level is within the recommended range.
Coolant should be checked when the bike is cool, ensuring the tank is full. Brake fluid levels are checked as part of the brake test. If any fluid is low, I top it up with the correct type specified in the manual. Low fluid can lead to engine overheating or brake failure, so this step is critical.
Chain and Drive System
If my bike has a chain drive, I check its slack by pressing down on the chain at the midpoint between the sprockets. It should move only slightly, usually about 1 to 1.5 inches. Too tight or too loose can cause damage or unsafe riding.
I also inspect the chain for rust, dirt, or stiff links. Before every ride, I lubricate the chain lightly to keep it moving smoothly. The sprockets should be checked for worn or broken teeth. A well-maintained chain and drive system are key to power delivery and overall safety.
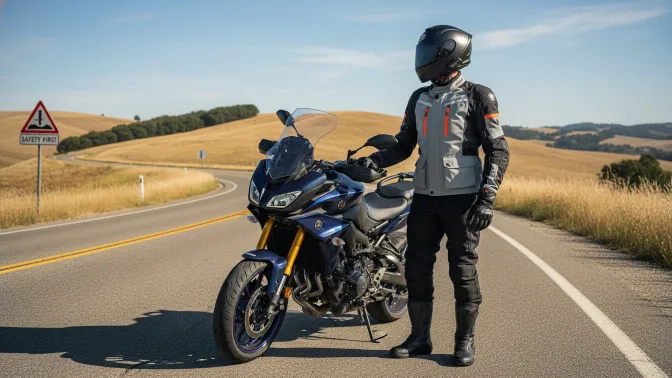
Safety Equipment Checklist
Before I start any ride, I make sure my safety gear is in top condition. This includes checking my helmet for damage, wearing proper protective clothing, and using sturdy gloves and boots. Each part protects me differently but is equally important.
Helmet Condition
I always begin with my helmet because it’s the most critical piece of safety gear. I check for cracks, dents, or any signs of damage on the shell. A small crack can weaken the helmet’s ability to protect my head in a crash. The interior padding must feel firm but comfortable, not worn out or loose.
The helmet’s strap should fasten securely and release easily. I never skip testing this before riding. Reflective stickers or bright colors also help increase visibility on the road. For safety standards, I look for certifications like DOT or ECE. Learn more about helmet safety at the National Highway Traffic Safety Administration.
Protective Clothing
I choose protective jackets and pants made from durable materials like leather or high-quality textile. These materials resist abrasion better than normal clothes. Many jackets have built-in armor at the elbows, shoulders, and back for added impact protection.
Besides material, I check for proper fit. Clothing that’s too tight restricts movement, while gear too loose might not stay in place during a fall. Ventilation and weather resistance are also important depending on the ride conditions. Reflective strips on jackets improve visibility, especially at night.
Gloves and Boots
My hands and feet need strong protection too. Gloves should fit snugly and cover the wrists fully. I look for reinforced knuckles and palms, and materials that resist tearing. Good gloves improve grip on the controls and protect against wind and debris.
Boots should cover above the ankle and have a stiff sole to protect my feet from bending in a crash. They also need strong fasteners like laces and straps to stay on securely. Slip-resistant soles help me keep my balance when stopping or starting. For more details on motorcycle gear, the Motorcycle Safety Foundation offers reliable advice.
Lighting and Signals
When I prepare to ride, I focus on making sure every light on my motorcycle works correctly. This helps me see the road and lets other drivers know what I plan to do. I test all lighting elements, checking brightness, function, and response.
Headlights and Taillights
I always start with the headlights and taillights because they are key to being seen, especially in low light or at night. I turn on the ignition and switch the high and low beams on. The beams must be bright and aimed correctly, never dim or flickering.
For taillights, I check that they are solid and bright. They show other drivers my location from behind. I also look over the lenses for cracks or dirt and clean or repair them if needed. Properly working headlights and taillights reduce the risk of accidents.
Turn Signals
Turn signals tell others where I’m going, so I make sure each one flashes clearly and at the right speed. I activate them one at a time while standing beside the bike. If a signal is slow, fast, or not flashing at all, I check the bulbs or wiring.
I also listen for the clicking sound the signals make, which helps me know they’re on even without looking. The lenses should be intact and clean. If the signals don’t work correctly, I fix them before riding. This avoids confusion on the road.
Brake Lights
Brake lights warn drivers behind me when I slow down or stop. I test both the front and rear brake levers separately to see if the brake light turns on each time. If it doesn’t light up, I check the brake light bulb or its connection.
I pay attention to the brightness, making sure the light is strong and visible. Dirty or cracked lenses can reduce how well the brake light shows, so I clean them regularly. Having reliable brake lights helps prevent rear-end collisions.
Controls and Levers
Before riding, I check all the controls and levers to make sure they work smoothly and respond quickly. I focus on how the throttle and clutch feel, the brake levers’ condition, and how well the mirrors are set. These parts help me stay in control and see what’s around me.
Throttle and Clutch Operation
I start with the throttle to make sure it moves freely and snaps back when I release it. A sticky throttle can be dangerous because it might keep the engine running when I want to slow down. I also check the clutch lever for smoothness. It should pull in easily and fully disengage the clutch. If the clutch feels tight or doesn’t release fully, I adjust or fix it before riding.
I look for any frayed cables or loose connections in the throttle and clutch systems. Smooth operation here means I can control my bike better, especially during starts, stops, and gear changes.
Brake Levers
I test both the front and rear brake levers to ensure they respond immediately when squeezed. The front brake lever should activate with a light pull, usually before it moves more than an inch. If the lever feels loose or spongy, it could mean low brake fluid or worn pads.
I also check for stiffness or unusual resistance in the levers. Any stiffness might signal a mechanical problem that needs fixing. Having responsive brakes is essential for stopping safely and avoiding accidents.
Mirrors Adjustment
Properly adjusted mirrors let me see the road behind without turning my head too far. I adjust the left and right mirrors so I can see the lanes beside me clearly. If the mirrors are loose or shift during the ride, I tighten them before I go.
I try to position each mirror to reduce blind spots as much as possible. Good mirror placement helps me monitor traffic, especially when changing lanes or stopping. I always re-check mirrors after mounting the bike because their angle can shift when I sit down.
On-Board Technology and Electronics
Before taking off, I always check the bike’s onboard systems to make sure everything is working properly. The dashboard gives me critical information, and I need to confirm the horn is loud and responsive. These checks help prevent problems while riding.
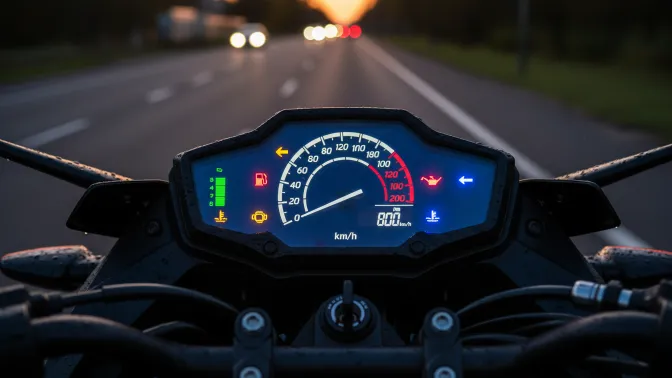
Dashboard Indicators
The dashboard shows important signs about the bike’s condition. I look for warning lights like the engine, oil, and ABS indicators. If any of these lights stay on, it means there could be something wrong.
Besides the warning lights, I check the fuel gauge and the speedometer to ensure they are working. On modern bikes, some dashboards also show tire pressure and battery status. These details help me stay safe and avoid breakdowns.
If your bike has an electronic display, test if the backlighting works well for night riding. A faulty dashboard can hide issues until it’s too late. You can find more details about dashboard warnings on sites like the Motorcycle Safety Foundation.
Horn Functionality
I never skip the horn test because it’s a key safety tool. The horn must sound loud enough to warn others clearly. I press the horn button firmly and listen for a strong, consistent tone.
If the horn sounds weak or not at all, I check the fuse and wiring for problems. Sometimes dirt or corrosion can block the connection. Fixing the horn right away is essential before going on the road.
A working horn is crucial for alerting drivers and pedestrians. Skipping this step could mean missing a chance to avoid danger. More tips on horn checks can be found at the American Motorcyclist Association.
Personal Rider Readiness
Before I ride, I make sure I’m physically and mentally ready. I also check that all my legal documents are current and easy to access. Being prepared is as important as checking the bike itself.
Physical and Mental State
I never get on a motorcycle unless I feel completely alert and focused. Riding takes quick reflexes and sharp attention, so if I’m tired, stressed, or distracted, I don’t ride. Even minor fatigue can slow my reaction time and increase risk.
I also check for any physical discomfort. If my body feels tight or sore, especially in my neck, shoulders, or back, it can affect control. Staying hydrated and eating well before riding helps maintain my energy.
If I’m sick or on medication that causes drowsiness or dizziness, I skip riding. Mental clear-headedness is key. I pause if I feel overly emotional or upset because those feelings can cloud judgment.
Riding Documentation
Before riding, I verify I have my motorcycle license with me and that it’s valid for the type of bike I’m operating. It’s essential to carry other important documents too, like registration and proof of insurance.
I keep these documents in a waterproof holder or inside a secure pocket. If stopped by law enforcement, quick access to these papers avoids delays.
I also check if any documents need renewal, such as insurance or registration, and handle that before heading out. Riding without proper documentation can result in fines or legal problems.
Having everything in order gives me peace of mind, so I can focus fully on the ride.
Environmental and Legal Considerations
Before I head out on my motorcycle, I check factors that affect both safety and compliance with laws. This includes what the weather looks like and how the road conditions could impact my ride. I also make sure I know and follow the local traffic rules to avoid trouble.
Weather and Road Conditions
I always check the weather before riding. Rain, ice, or strong winds can make riding dangerous. Wet roads lower traction, increasing the chance of slipping. Cold weather might cause ice patches that are hard to see.
Road surfaces matter too. I look out for gravel, potholes, or debris that could make handling tricky. Dry, clear roads are best, but if I must ride in poor conditions, I slow down and stay extra alert.
For safety, I wear gear suited for the weather, like waterproof clothing or layers for cold. I also plan alternate routes if roadwork or accidents affect the main path. Checking these factors helps me avoid risks that could cause crashes or delays.
Local Traffic Regulations
I make sure I follow all local laws before I ride. This starts with having the right license and insurance for my motorcycle. Many places require specific endorsements or training.
I keep updated on helmet laws, speed limits, and lane-splitting rules because they differ across regions. Some areas have strict noise or emission limits that I must respect.
Before every trip, I review rules about lights, signals, and safety gear requirements. Following these laws protects me from fines and makes my riding safer. If I’m unsure about any rule, I check official sources or talk to local authorities.
FAQs
What is the most important thing to check before riding?
I always start by checking my tires. Proper tire pressure and no visible damage are crucial for safe handling. Tires are the only contact between me and the road, so they must be in good shape.
How long should a pre-ride check take?
A good pre-ride check doesn’t need to take long. After a few rides, it takes me less than five minutes. The key is to be consistent, so it becomes a habit.
Do I need to check the fuel before every ride?
Yes, fuel is something I never skip. I look at the fuel gauge to make sure I have enough for the trip. Running out of gas on the road is dangerous and avoidable.
Should I inspect my brakes before riding?
I always test my brakes before hitting the road. I check for brake fluid and ensure the brake levers feel firm. Brakes are essential safety gear, so I never take them for granted.
Is it necessary to check lights and signals?
Definitely. I verify all lights and signals work properly. This includes headlights, brake lights, and turn signals. Proper lighting helps keep me visible to other drivers.
What about controls and fluids?
I quickly check handlebars, clutch, and throttle to ensure smooth operation. I also look at oil and coolant levels to avoid engine problems during my ride.
Conclusion
Before I ride, I always make sure to perform a quick but thorough check of my motorcycle. This habit helps me catch small issues before they turn into serious problems. It also makes me feel more confident and safe on the road.
My checklist includes tires, brakes, lights, fuel level, and controls. These parts affect how my bike handles and responds while riding. If any of these are not in good shape, I don’t ignore it. I either fix the issue or delay my ride until it’s safe to go.
Taking a few minutes to inspect the bike can prevent breakdowns and reduce the risk of accidents. It’s a simple step that builds good riding habits over time.
I find that having a written or mental list keeps me focused. It’s easy to rush out without checking, especially when I’m excited. But stopping to look over my bike gives me peace of mind. It assures me that I’m doing all I can to be safe and prepared.